View Your Android Device on Your PC using Droid@Screen
30 Jan 2014Android devices don’t have any native feature (currently) to mirror the display onto a PC. There are however a few alternative ways to accomplish this. In this post I’ll be giving a quick run down on how I got my Samsung Galaxy S2 to mirror it’s display onto my Windows laptop using Droid@Screen
Whilst it is entirely possible (and some might say preferable) to root your device and use an AirPlay receiver (such as Reflector) and a streaming app such as Shou or Mirror, it is not without risk. This post should help those who are unwilling* or unable to root a device to capture the output from the device. One limitation is however that the solution I’m about to describe is limited in that you do have to physically connect your device by USB cable to the computer.
* My situation was that this was not a device I own so I wasn’t about to start rooting it.
Pre-requisites
- PC (assumed to be running Windows and with Java installed; although this solution will work for other platforms with some slight (fairly obvious) amendments to the instructions).
- Android device.
- USB cable to connect the Android device to the PC.
Step 1 - Install Android Device Drivers
In order to communicate with your PC over USB, device drivers for your Android device must be installed. Please review the details set out by the manufacturer of your device.
In my particular case for the Samsung Galaxy S2 the drivers were bundled in with a piece of software called Kies. Fortunately Kies is free to download from the Samsung web site. There are two versions of Kies available. Please ensure you select the one appropriate for use with your device - Kies3 is for newer devices, the Samsung Galaxy S2 requires the older (just “Kies”) version of Kies.
Step 2 - Install the Android SDK
Next you need to download the Android Software Development Kit (SDK). Once downloaded, simply step through the installation process accepting the default options. Just make sure to take note of where you are installing it as you’ll need that information later on.
Once installed, navigate to the SDK in Windows Explorer (e.g. “C:\Program Files (x86)\Android\android-sdk”), find the “SDK Manager.exe” file and then run it.
when the SDK Manager application opens, select the Tools > Android SDK Platform-tools package and install it. This will create a new sub folder in the android-sdk folder called platform-tools. In this new sub folder you should be able to find an application file called “adb.exe” - the Android Debug Bridge.
Step 3 - Set Environment Variable
Create a new environment variable called ANDROID_HOME and set its value to the installation path of the Android SDK (see above).
Step 4 - Grab a copy of Droid@Screen
Droid@Screen is the final piece of software you need. You can download it for free from ribomation.com. It ‘s a Java application and so as such it doesn’t need to be installed. It is a single Java Archive file (.JAR) that you should be able to run (using Java) when you double click on it.
When you have downloaded the JAR file, put it anywhere you wish. Perhaps move it into the SDK installation directory … but remember if you upgrade the SDK at any point you may also have to download it again.
You can create a short cut to it (and place it in your start menu, on your desktop, etc.) just as with any other file. This will save you having to navigate to it each time you wish to use it. Just use the short cut (which you might want to name something memorable) instead.
ADB > ADB Executable Path from the menus. Next click on the ellipsis (…) and navigate to the ADB.EXE file (see end of step 2 for details). OK it and then click the Restart ADB button to pick up the setting. It should be picked up automatically when you run it again next time.
Whilst step 3 should have overcome the need to set the ADB path some Droid@Screen users have had issues when they don’t explicitly have one or other of the variable and path setting set … so currently the good practice is to explicitly set both and be doubly sure!
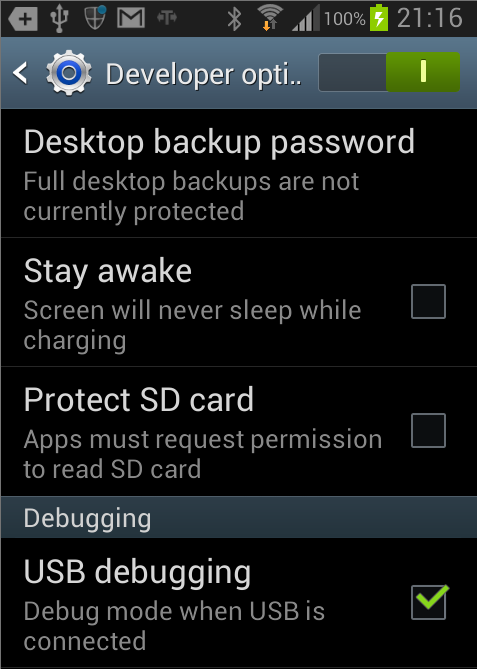
Step 5 - Enable
The exact menu options may vary a little by device and version of Android but the next step is to locate the Developer options on your Android device.
For the Samsung Galaxy S2 device I was using (running Android 4.1.2) I found the options by selecting System Settings > Developer Options and then setting the slider (at the top) on to enable them.
Next navigate down the developer options until you find the USB Debugging option. Enable this setting.
Step 6 - Plug it in
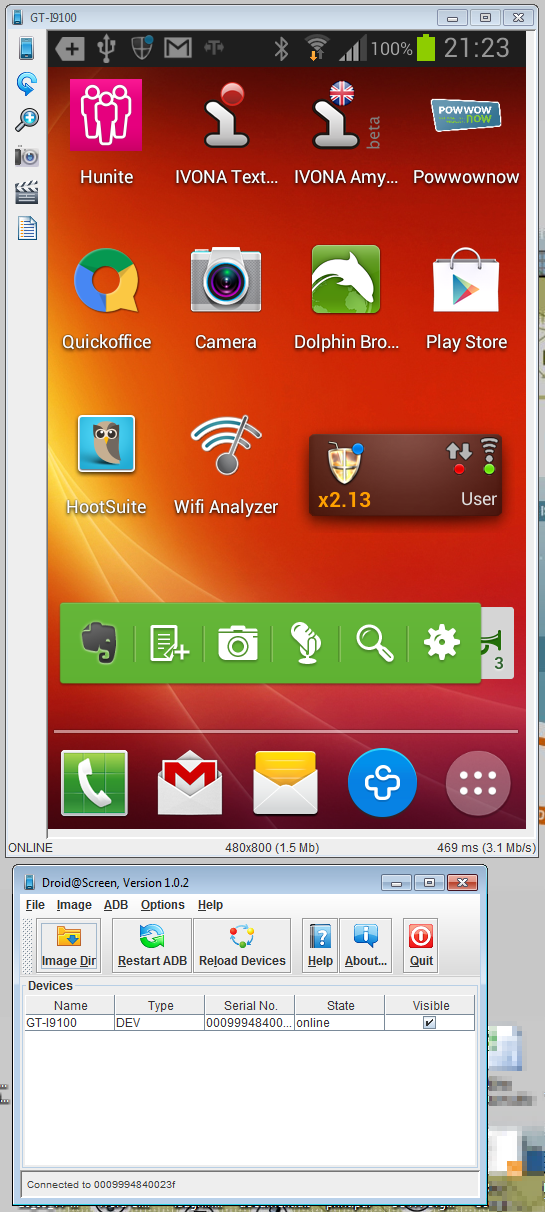
Connect your Android device using the USB cable. If Droid@Screen is running, then after a few moments it should automatically pop up a window displaying the device’s screen.
If this hasn’t worked for you … go back through the list and double check everything!
What did we just do?
We’ve now enabled the developer debugging feature on the Android device. This allows it to send a variety of information back and forth over USB. This can of course include information about what the screen is currently doing. On the PC side we installed the drivers that allow the Android device to be understood by the PC and the Android SDK which included the Android Debug Bridge (ADB). The ADB is the software that receives the debug information from the Android device. The Droid@Screen application uses the ADB (in the background) to poll the Android Device for screen information and renders it as fast as it can to the window on the PC.
I hope that all makes sense and you now have your device’s screen available on your desktop. This should make those screen captures and recordings a little bit easier.