Adding Multiple Sets of Looping Slides to PowerPoint
30 May 2014For some time now there have been techniques around for having a set of slides that loop at the start of your PowerPoint presentation. These generally involve hiding your main presentation slides, adding an invisible button to each of the visible slides (that allows you to jump to your first hidden slide), setting those slides to auto advance and then setting your presentation to loop continuously. But what if you want to add more loops and/or want to control everything from a presentation remote?
Last year I was working on a webinar where we wanted to have a couple of looped sets of slides and I needed an alternative - ideally one that didn’t involve having to break out and run a separate presentation. Fortunately it wasn’t too hard to come up with a solution.
The approach
Framing the problem in this way quickly lead me to wondering if there was a way to set up a parent-child relationship between slide decks. Could I link sets of slides together and run them as chained but separate slide shows. Whilst there’s nothing particularly obvious in the way you create PowerPoint slide decks that allows you to outline across multiple files there are two features that can in effect give you this functionality.
- Embedded objects.
- Animations for OLE objects.
The basic premise is that you can create a separate PowerPoint file for each of the looped presentations you wish to include. These are set-up to auto advance and loop. The presentations are then embedded onto separate slides in your main presentation where they are set to automatically play.
There are a few steps to setting up a presentation like this, so let me walk you through an example.
Setting up a looping child presentation
The first thing to do is to create your looping presentations. Once you have your slides created select the Transitions tab on the ribbon and look for the Advance Slide settings.
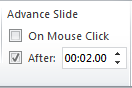
Set each slide to automatically advance after a specific period of time. If you want to set several slides, select them all in the slide sorter and then change the Advance Slide settings.
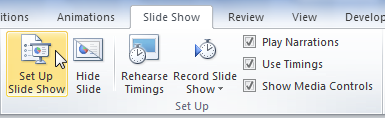
Next you will need to set-up the presentation to loop back around to the start when it gets to the last slide. To do this first select the SlideShow tab on the ribbon and then select Set Up Slide Show.
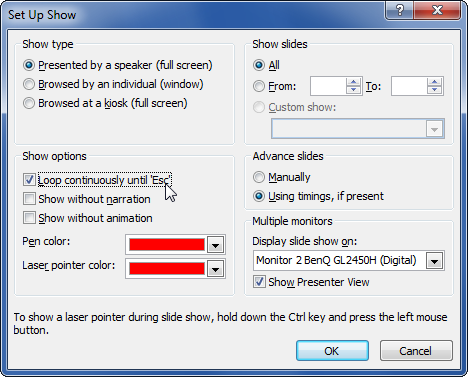
In the dialog window that appears set the option to “Loop continuously until ESC”.
Save the presentation and repeat for any other looping child presentations you wish to include in your main presentation.
Setting up the main presentation
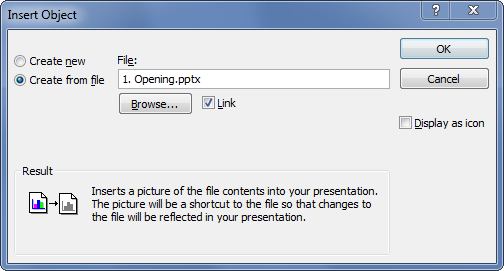
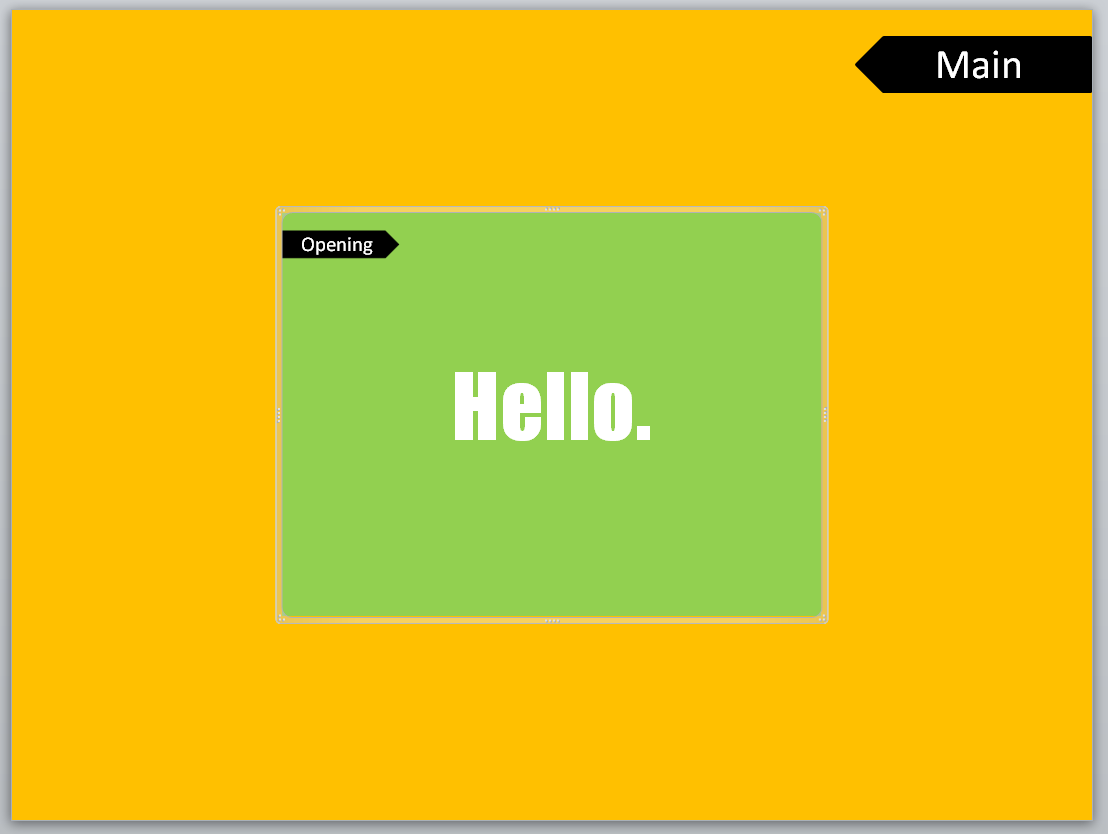
In your main presentation add in slides for each of the looping child presentations. Then select the first of these slides and from the Insert tab on the ribbon, select Object.

In the dialog box select the Create from file option and selector the child presentation file you want to include at this point in the presentation. If you tick the Link check box, any changes you make in your child presentation will be automatically incorporated into your main presentation. If you don’t, you will have to manually work through these steps and re-add the child presentation if you make a change to it. Do be warned however that when you link the file it will use the full file path. If you later move your files or share them with someone else, unless the file path matches precisely, the embedded file will not be found.
You should now have an object embedded in your slide. Whilst it will still work leaving the object sized as is, I find the transitions a bit smoother (but not perfectly so) if you resize the object to fill the slide.
With the object selected, select the Animation tab on the ribbon. Select the Animation Pane to open the list of animations if you have not already got it open, then select Add Animation.

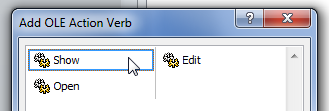
Towards the bottom of the list of available animations you should see one called OLE Action Verbs. This is what is going to allow us to run our embedded slide show.

When you select OLE Action Verbs it will open a window containing a few options of what we can do with our embedded presentation. Select the Show option.
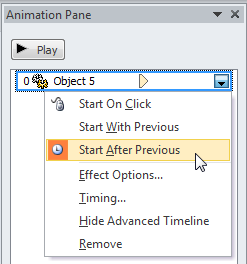
Now select the embedded presentation object in the animation pane (it’s probably the only entry in there). Set the animation to Start After Previous (or Start With … it doesn’t make any difference in my tests for this particular case). This will mean that once the main presentation slide is loaded up the embedded child presentation will automatically trigger and display.
Now select the Transitions tab on the ribbon and go to the Advance Slide options. Set the slide to immediately auto advance - i.e. 00:00:00. The showing of the embedded presentation triggers immediately, but this is actually the delay before moving to the next slide in the main presentation once we exit the child presentation. So we really do want it to be immediate.

Now repeat for each of the other embedded presentations and save your main presentation.
Running the presentation
When you run your presentation, you should find that each child presentation will automatically run (and loop) when you reach the slide on which it is embedded in your main presentation. To exit the child presentation, return to your main presentation and automatically advance to the main slide simply press ESC - just as you would to exit any PowerPoint presentation. One of the advantages this has over the clicking a hidden button is that if you have a presentation remote they typically have a show/end show button that will send the ESC command to your computer … meaning you can control the embedded presentations using your remote too.
With this solution I also like the fact that you don’t have to hide your main slides and you can use them in a more traditional way (e.g. old slide revisions, additional slides to have on hand if you get a particular question). It works well for me and I hope you find it useful too.
Conclusion
So that’s the principles of how it works and a step-by-step guide to setting it up.
To help you on your way I’ve created an example set of slide decks where there are three looping child presentations embedded (but not linked) in a main presentation deck.