The Badger 2040: Custom Badges
01 May 2022This is the third and final post in my introductory series for the Pimoroni Badger 2040. So far, I have talked a little about getting things set up so you can easily work with and find out about the Badger 2040, and about the physical additions I have made to turn my Badger 2040 into a functional eInk badge. In this post I am going to cover the programmable side of this eInk badge, and what (simple) revisions I have made in order to turn this into a badge suitable for my own purposes.
The Badge Script
As already noted in my first post in the series, the Badger 2040 comes with a variety of pre-installed scripts. One of these is a badge script that allows you to fill in some text attributes in a text file and assign an image to be displayed. Details about the script set up can be found in the Pimoroni GitHub repository.
![]()
The idea of putting my face on the badge is not one that I was particularly enamoured of. My face is typically only going to be a matter of inches away from where the badge is, and the resolution will be much worse … though that may be a good thing. Many of the reviews out on the Internet include a person’s face on the badge, but for something that isn’t a security badge, I am not sure it would be of any benefit, and this device is not secure so using it as a security or ID badge is not an option.
I think that placing a company logo in the portrait area might be a good option, but it relies on the logo being proportioned appropriately for a portrait display. As a result, even that is not always going to be a viable option. But realistically, the badge script is only supposed to be an example of what is possible, so there’s certainly no foul in it being available. On the contrary, it provides many useful insights for working with the Badger 2040.
As you may have guessed, I quickly concluded that the badge script was not going to be the solution for me. I wanted a more flexible layout and display option. I therefore decided to go the route of displaying pre-built images for my badges rather than dynamically generating the display as the badge script does. There is even a handy image script to facilitate this.
With the image approach I can tailor them in a design/graphics/image editing application, and use the standard images script to display the images. I created a custom 296px x 128px template in Affinity Designer to create my images, but you can use practically any application capable of creating an image file for those dimensions.
It also does not need to be complex, and I would argue is better if it is not. Here is an example of my most basic badge design for work based on my previous enamel printed badge that I had made up for my just prior to the pandemic.

Customising the Launch Options
When the Badger 2040 starts up, it calls the launcher Python script, which is used to display pages of links of other scripts that can be launched as well as things like the battery level, name of the OS, etc. Below is how my launch script looks.
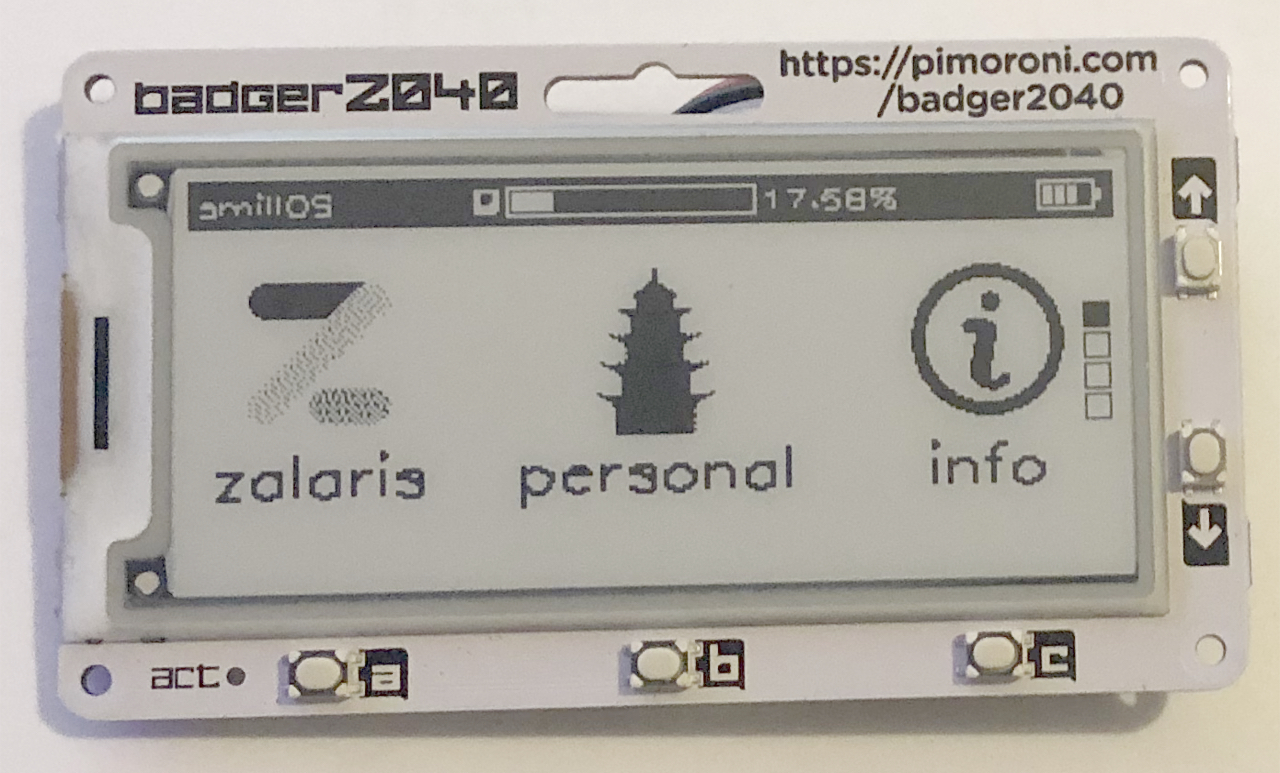
The most notable difference to the usual launcher is the inclusion of two new script options - “zalaris” and “personal”. These relate to the display of badges for my professional and non-professional life respectively. Another thing that may not be so obvious is I also tweaked the OS name to be “smillOS” rather than “badgerOS”.
The code being used is listed below and is an adjusted version of the “launcher.py” script. However, with the early releases of the Badger 2040 firmware there was definitely an issue in trying to override the launcher script and so I ended up heading it off by creating this as “main.py” in the root directory. The behaviour may be better now with “launcher.py”, but for historical purposes, mine has simply remained in “main.py”.
In regards to the changes I have made, I specified max/min voltages for the LiPo battery, and changed the OS name - both of which should be easy to find. The addition of the new scripts is a little more involved. You can probably see the examples array has some new entries in t and has been reordered. These additions correspond to my new scripts (“zalaris” and “personal” at the start), as well as the addition of a link to the “conway” game of life script, which is a usually unlinked standard example script.
Looking just above this array definition, you can also see where I have increased the icons_width variable from 576 to 704. This is to accommodate making available two different icons.
import gc
import time
import math
import badger2040
from badger2040 import WIDTH
import launchericons
import badger_os

# Reduce clock speed to 48MHz
badger2040.system_speed(badger2040.SYSTEM_NORMAL)

changed = False
exited_to_launcher = False
woken_by_button = badger2040.woken_by_button()  # Must be done before we clear_pressed_to_wake

if badger2040.pressed_to_wake(badger2040.BUTTON_A) and badger2040.pressed_to_wake(badger2040.BUTTON_C):
    # Pressing A and C together at start quits app
    exited_to_launcher = badger_os.state_clear_running()
else:
    # Otherwise restore previously running app
    badger_os.state_launch()

# for e.g. 2xAAA batteries, try max 3.4 min 3.0
MAX_BATTERY_VOLTAGE = 3.7
MIN_BATTERY_VOLTAGE = 3.2

display = badger2040.Badger2040()
display.led(128)

state = {
    "page": 0,
    "font_size": 1,
    "inverted": False,
    "running": "launcher"
}

badger_os.state_load("launcher", state)

display.invert(state["inverted"])

icons = bytearray(launchericons.data())
#icons_width = 576
icons_width = 704

examples = [
    ("_zalaris", 10),
    ("_personal", 9),
    ("_info", 6),
    ("_ebook", 2),
    ("_image", 3),
    ("_list", 4),
    ("_badge", 5),
    ("_qrgen", 8),
    ("_led", 1),
    ("_conway", 6),
    ("_clock", 0),
    ("_fonts", 1),
    ("_help", 7)
]

font_sizes = (0.5, 0.7, 0.9)

# Approximate center lines for buttons A, B and C
centers = (41, 147, 253)

MAX_PAGE = math.ceil(len(examples) / 3)


def map_value(input, in_min, in_max, out_min, out_max):
    return (((input - in_min) * (out_max - out_min)) / (in_max - in_min)) + out_min


def draw_battery(level, x, y):
    # Outline
    display.thickness(1)
    display.pen(15)
    display.rectangle(x, y, 19, 10)
    # Terminal
    display.rectangle(x + 19, y + 3, 2, 4)
    display.pen(0)
    display.rectangle(x + 1, y + 1, 17, 8)
    if level < 1:
        display.pen(0)
        display.line(x + 3, y, x + 3 + 10, y + 10)
        display.line(x + 3 + 1, y, x + 3 + 11, y + 10)
        display.pen(15)
        display.line(x + 2 + 2, y - 1, x + 4 + 12, y + 11)
        display.line(x + 2 + 3, y - 1, x + 4 + 13, y + 11)
        return
    # Battery Bars
    display.pen(15)
    for i in range(4):
        if level / 4 > (1.0 * i) / 4:
            display.rectangle(i * 4 + x + 2, y + 2, 3, 6)


def draw_disk_usage(x):
    _, f_used, _ = badger_os.get_disk_usage()

    display.image(
        bytearray(
            (
                0b00000000,
                0b00111100,
                0b00111100,
                0b00111100,
                0b00111000,
                0b00000000,
                0b00000000,
                0b00000001,
            )
        ),
        8,
        8,
        x,
        4,
    )
    display.pen(15)
    display.rectangle(x + 10, 3, 80, 10)
    display.pen(0)
    display.rectangle(x + 11, 4, 78, 8)
    display.pen(15)
    display.rectangle(x + 12, 5, int(76 / 100.0 * f_used), 6)
    display.text("{:.2f}%".format(f_used), x + 91, 8, 0.4)


def render():
    display.pen(15)
    display.clear()
    display.pen(0)
    display.thickness(2)

    max_icons = min(3, len(examples[(state["page"] * 3):]))

    for i in range(max_icons):
        x = centers[i]
        label, icon = examples[i + (state["page"] * 3)]
        label = label[1:].replace("_", " ")
        display.pen(0)
        display.icon(icons, icon, icons_width, 64, x - 32, 24)
        w = display.measure_text(label, font_sizes[state["font_size"]])
        display.text(label, x - int(w / 2), 16 + 80, font_sizes[state["font_size"]])

    for i in range(MAX_PAGE):
        x = 286
        y = int((128 / 2) - (MAX_PAGE * 10 / 2) + (i * 10))
        display.pen(0)
        display.rectangle(x, y, 8, 8)
        if state["page"] != i:
            display.pen(15)
            display.rectangle(x + 1, y + 1, 6, 6)

    display.pen(0)
    display.rectangle(0, 0, WIDTH, 16)
    display.thickness(1)
    draw_disk_usage(90)
    vbat = badger_os.get_battery_level()
    bat = int(map_value(vbat, MIN_BATTERY_VOLTAGE, MAX_BATTERY_VOLTAGE, 0, 4))
    draw_battery(bat, WIDTH - 22 - 3, 3)
    display.pen(15)
    display.text("smillOS", 3, 8, 0.4)

    display.update()


def wait_for_user_to_release_buttons():
    pr = display.pressed
    while pr(badger2040.BUTTON_A) or pr(badger2040.BUTTON_B) or pr(badger2040.BUTTON_C) or pr(badger2040.BUTTON_UP) or pr(badger2040.BUTTON_DOWN):
        time.sleep(0.01)


def launch_example(index):
    wait_for_user_to_release_buttons()

    file = examples[(state["page"] * 3) + index][0]

    for k in locals().keys():
        if k not in ("gc", "file", "badger_os"):
            del locals()[k]

    gc.collect()

    badger_os.launch(file)


def button(pin):
    global changed
    changed = True

    if not display.pressed(badger2040.BUTTON_USER):  # User button is NOT held down
        if pin == badger2040.BUTTON_A:
            launch_example(0)
        if pin == badger2040.BUTTON_B:
            launch_example(1)
        if pin == badger2040.BUTTON_C:
            launch_example(2)
        if pin == badger2040.BUTTON_UP:
            if state["page"] > 0:
                state["page"] -= 1
            render()
        if pin == badger2040.BUTTON_DOWN:
            if state["page"] < MAX_PAGE - 1:
                state["page"] += 1
            render()
    else:  # User button IS held down
        if pin == badger2040.BUTTON_UP:
            state["font_size"] += 1
            if state["font_size"] == len(font_sizes):
                state["font_size"] = 0
            render()
        if pin == badger2040.BUTTON_DOWN:
            state["font_size"] -= 1
            if state["font_size"] < 0:
                state["font_size"] = 0
            render()
        if pin == badger2040.BUTTON_A:
            state["inverted"] = not state["inverted"]
            display.invert(state["inverted"])
            render()


if exited_to_launcher or not woken_by_button:
    wait_for_user_to_release_buttons()
    display.update_speed(badger2040.UPDATE_MEDIUM)
    render()

display.update_speed(badger2040.UPDATE_FAST)

while True:
    if display.pressed(badger2040.BUTTON_A):
        button(badger2040.BUTTON_A)
    if display.pressed(badger2040.BUTTON_B):
        button(badger2040.BUTTON_B)
    if display.pressed(badger2040.BUTTON_C):
        button(badger2040.BUTTON_C)

    if display.pressed(badger2040.BUTTON_UP):
        button(badger2040.BUTTON_UP)
    if display.pressed(badger2040.BUTTON_DOWN):
        button(badger2040.BUTTON_DOWN)

    if changed:
        badger_os.state_save("launcher", state)
        changed = False

    display.halt()
By default, there are nine 64px x64px icons stored in a single set. This is initially defined as an image 576px wide and 64px high. This image is available from the Pimoroni GitHub repository, but it is converted to a bytearray allowing the Python code to reference each icon as a separate (zero-based) array element.
To add my own script icons, I extended the existing image canvas by 128px (to 704px), and then appended my own 64px x 64px images to the end.

Encoding the Launcher Icons
The launcher icons are not loaded directly from a PNG file, but rather they have to be encoded into an array.
They can be encoded using Thonny, but first of all we need to make the Python Image Library available.
- In Thonny, select Tools > Manage Packages….
- Search for “Pillow” on PyPi.
- Select “Pillow-PIL”.
- Select “Install”.
- Select “Close”.
Next, get a copy of “convert.py” from Pimoroni’s GitHub repository, and save it locally.
Place the “launchericons.png” file in the same directory as the script, and open the “convert.py” script in Thonny.
In the bottom right corner of Thonny switch to the local environment (“The same interpreter that runs Thonny (default)”).
In the top right corner of Thonny is a field called “Program Arguments”. In here type launchericons.png --py, and then run the script. This will generate a new file in the same directory called “launchericons.py”. You will probably have to navigate out and back in to the directory in Thonny to see the file, but once you can, upload it into the root directory on the Badger 2040. This will then make the icons accessible (by index reference) to the modified launcher script.
Cloning the Image Script
As you probably expect by now, I have taken a copy of the “image.py” script to use for my own badge scripts. I made some minor adjustments to the script to make it a little easier to reuse. Specifically, I can specify two variables, IMGDIR (the root path of the directory where the images for the badge will be stored), and STATEFILE, the name of the state file for the script. Below is the full script used for the “zalaris.py” script that I uploaded into the root of the Badger 2040.
import os
import sys
import time
import badger2040
from badger2040 import HEIGHT
import badger_os

OVERLAY_BORDER = 40
OVERLAY_SPACING = 20
OVERLAY_TEXT_SIZE = 0.5

IMGDIR = "zal"
STATEFILE = "zalaris"

TOTAL_IMAGES = 0

# Turn the act LED on as soon as possible
display = badger2040.Badger2040()
display.led(128)

try:
    os.mkdir(IMGDIR)
except OSError:
    pass

# Load images
try:
    IMAGES = [f for f in os.listdir("/" + IMGDIR) if f.endswith(".bin")]
    TOTAL_IMAGES = len(IMAGES)
except OSError:
    pass


image = bytearray(int(296 * 128 / 8))

state = {
    "current_image": 0,
    "show_info": False
}


def show_image(n):
    file = IMAGES[n]
    name = file.split(".")[0]
    open(IMGDIR + "/{}".format(file), "r").readinto(image)
    display.image(image)

    if state["show_info"]:
        name_length = display.measure_text(name, 0.5)
        display.pen(0)
        display.rectangle(0, HEIGHT - 21, name_length + 11, 21)
        display.pen(15)
        display.rectangle(0, HEIGHT - 20, name_length + 10, 20)
        display.pen(0)
        display.text(name, 5, HEIGHT - 10, 0.5)

        for i in range(TOTAL_IMAGES):
            x = 286
            y = int((128 / 2) - (TOTAL_IMAGES * 10 / 2) + (i * 10))
            display.pen(0)
            display.rectangle(x, y, 8, 8)
            if state["current_image"] != i:
                display.pen(15)
                display.rectangle(x + 1, y + 1, 6, 6)

    display.update()


if TOTAL_IMAGES == 0:
    display.pen(15)
    display.clear()
    badger_os.warning(display, "Create a /" + IMGDIR + " directory on your device and upload some 1bit 296x128 pixel images.")
    time.sleep(4.0)
    sys.exit()


badger_os.state_load(STATEFILE, state)

changed = not badger2040.woken_by_button()


while True:
    if display.pressed(badger2040.BUTTON_UP):
        if state["current_image"] > 0:
            state["current_image"] -= 1
            changed = True
    if display.pressed(badger2040.BUTTON_DOWN):
        if state["current_image"] < TOTAL_IMAGES - 1:
            state["current_image"] += 1
            changed = True
    if display.pressed(badger2040.BUTTON_A):
        state["show_info"] = not state["show_info"]
        changed = True
    if display.pressed(badger2040.BUTTON_B) or display.pressed(badger2040.BUTTON_C):
        display.pen(15)
        display.clear()
        display.update()
        print(state["current_image"])
        time.sleep(4)
        changed = True

    if changed:
        badger_os.state_save(STATEFILE, state)
        show_image(state["current_image"])
        changed = False

    # Halt the Badger to save power, it will wake up if any of the front buttons are pressed
    display.halt()
The “personal.py” file is of course almost identical, with just those two variables being different.
IMGDIR = "personal"
STATEFILE = "personal"
I could of course have just used one variable for this and had the content identical. I may well switch to that in future, but once again, there’s a bit of historical baggage here from my early dabbling pre-firmware updates, and so there are two variables in use.
This gives me two scripts that when launched will attempt to load and manually cycle through badge images (order determined by image file names) stored in separate directories.
Adding Badge Images with QR Codes
As well as my basic work badge image illustrated previously, I also have a more interesting one that uses a different logo and adds a QR (quick reference) code.
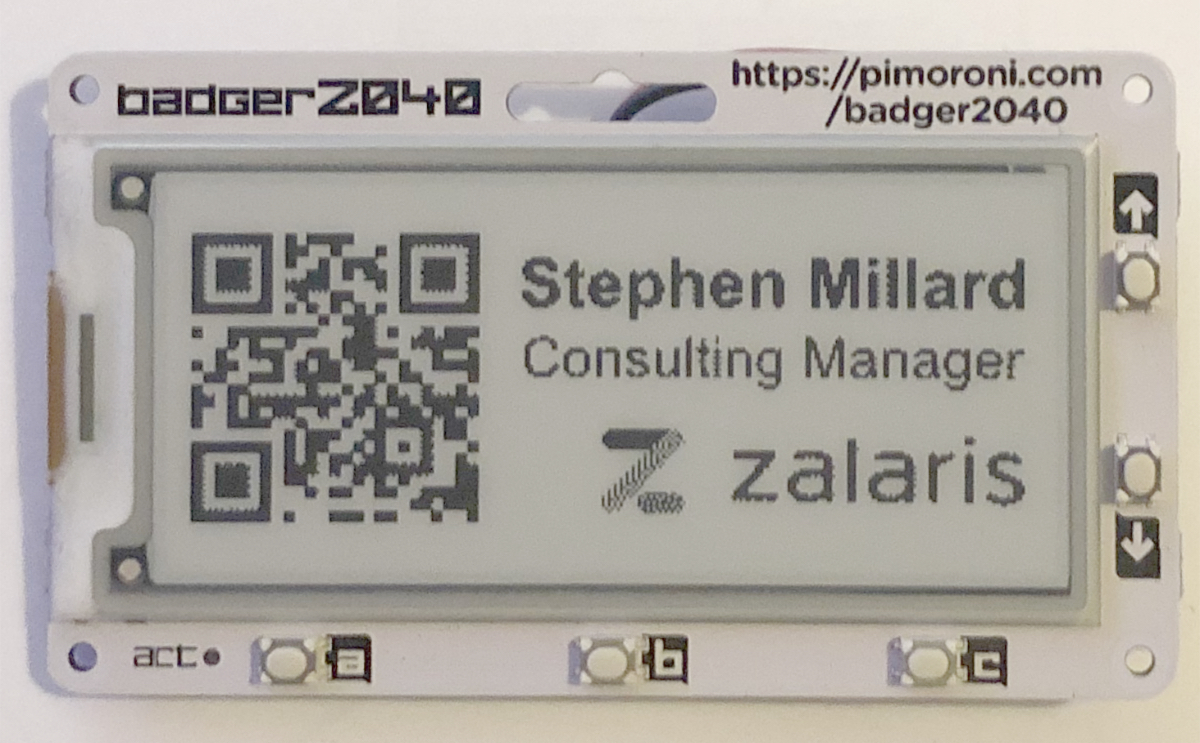
The QR code was generated using an online service, and links to a file that I host on one of my web sites. The URL to access the file however was quite long, and the longer the URL, the more complex and larger the QR code becomes in order to encode it. Because the space is rather limited on the Badger’s screen, what I did instead was encode a bit.ly link for the real URL. It means that the file link has an additional relay step in it, but it means that the QR code can work in the available space.
The QR code ultimately links through to a vCard file, which mobile devices can recognise and import into people’s contact apps. This saves exchanging business cards, which are in my opinion, one of today’s least effective and most outdated means of information transfer. For my vCard, I used the vcardmaker.com site as it allowed me to not only encode my basic details into a vCard, but also a photo. While I don’t think having a picture of me on my eInk badge is advantageous, I do think people having a picture of me on their contact record is.
The QR code was just added to my simple badge design, and the resulting composition was then output as a PNG.
Similar to the launcher icons, the “convert.py” script can be used to produce the requisite image file for the “image.py” script and its clones to use. The process is the same, but the parameters are a little different this time.
For this particular badge, I named it “zalaris_2.png”, and the resulting “convert.py” parameters I used to convert the file when co-located with the conversion script were as follows.
zalaris_2.png --binary
This results in a file named “zalaris_2.bin” being generated in the same directory as the original image file and conversion script. This file can then be uploaded into the requisite directory on the Badger 2040. In this case the /zal directory.
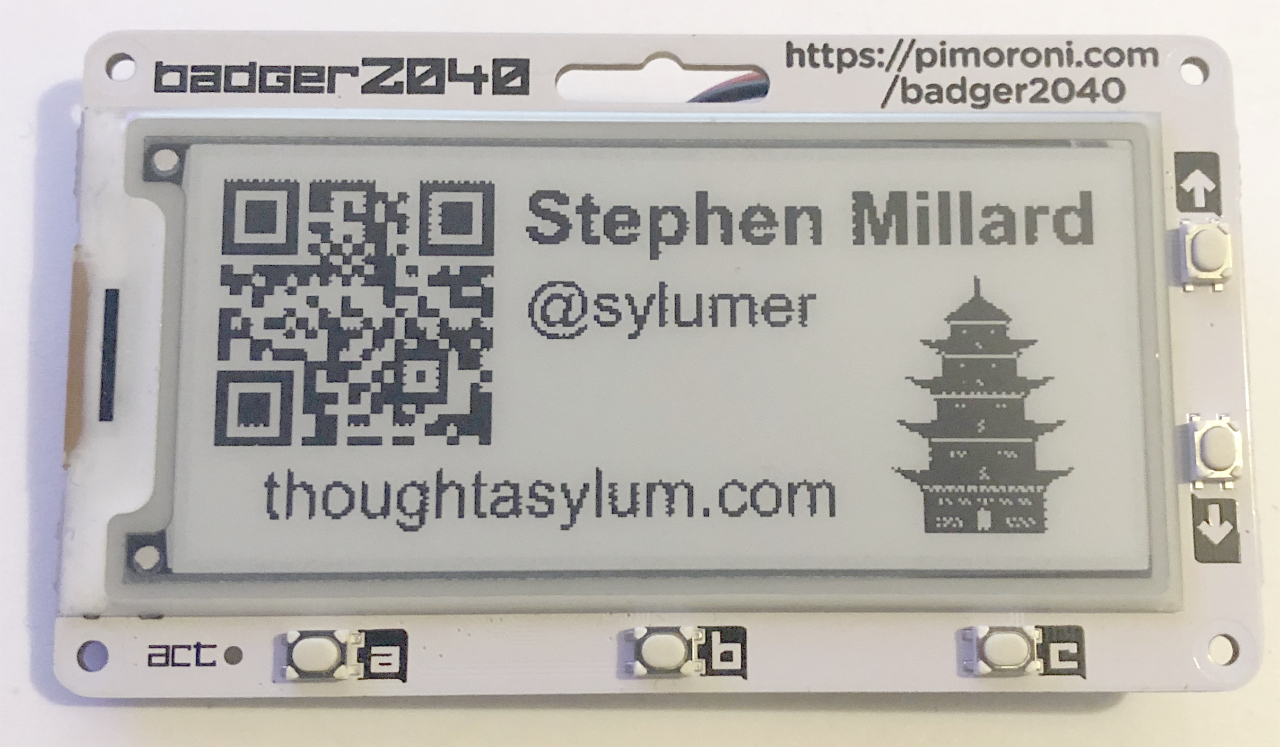
The same process was followed for my non-professional badge which has a different layout and set of information; linking off to a different vCard.
Summary
That covers my primary use set up and configuration for my Pimoroni Badger 2040. I am still toying with some of the set up of other scripts and generally improving my passing and rather rudimentary knowledge of Python. I have the functionality in it that I have been searching for, for many years, all at a reasonable price, and as well as being fun, I think it makes for a good talking point - particularly as I work in a technologically focused sphere, and much of my personal time outside of my family revolves around uses of technology. That in and of itself makes things a little easier for me as I have never been particularly gifted at small talk and networking.
I hope these introductory articles about the Pimoroni Badger 2040 have been interesting and informative, and that it inspires you to perhaps create your own personalised version based on at least some of the points that I have outlined.
And maybe, just maybe, I will bump into you at some event one day where we are both wearing our Badger 2040’s?
