Automating Adding Screenshots to Blog Posts
23 Nov 2021When I am writing blog posts for this web site, I frequently need to take screenshots on my Mac and put them into the relevant assets directory to enable them to be included in my post. While I had a way of doing this that was relatively quick and easy, I found that I always needed to subsequently rename the screenshot to something meaningful and in a format that conformed to my naming standards. I recently addressed this by developing my workflow a little and creating something new in the process.
How I Take Screenshots on the Mac
While the Mac has screenshot functionality built-in, I prefer instead to use a dedicated app. For many years I used Capto for this, but I switched in 2020 to Cleanshot X. The app provides me with handy menu bar access as well as additional tools for annotating my screenshots, and a floating thumbnail of screenshots. Both are excellent tools, and if you take lots of screenshots, I would highly recommend taking a look at what they offer.
Adding Screenshots to Asset Folder
After a few years of publishing on a SquareSpace site I realised I needed a folder structure to manage my blog images. The list was growing ever longer, and Squarespace’s web interface to manage the files at that time was dire and getting slower with each addition. I therefore began using sub-folders for holding new images; a folder per year being sufficient in practice. When I moved from Squarespace to hosting a static website, I went back and modified the posts and image locations to conform across the board and I noted down a new naming convention that I’ve been using since. Effectively just one to always include the datestamp to identify which blog post an image belongs to (I very rarely choose to post more than once per day), and to use hyphens where I might otherwise use spaces.
My initial workflow was as follows:
- Take a screenshot using Cleanshot X.
- Apply any annotations to the screenshot in Cleanshot X.
- Drag the on screen floating thumbnail of the screenshot displayed by Cleanshot to the relevant year in my images assets folder.
- I tend to have this open in Path Finder, a Finder alternative. This is because I have a special profile set up there for working with the local copy of my website).
- Rename the file in Path Finder, but leave it selected.
- In my text editor (usually Sublime Text 3 for blog work at this point), I then include a Jekyll Markdown image link (it includes some Liquid tags) in my post.
- I actually do this using Keyboard Maestro and some AppleScript to insert the link for the selected image file in Path Finder.
Revising my Workflow Using Dropzone
After a while, I realised that most the time I was just generating and inserting one screenshot at a time, and I figured I could streamline this a little.
I have been a user of Dropzone for many years. It is a Mac utility application that allows you to drag and drop content such as text and files onto a menu area ‘drop zone’, and have that content held there as though putting it on a shelf for later use, or have it immediately processed. I’ve often used it for moving files around, hanging onto images I want to drag into a document, or even for automatically installing application downloads.
One of the processing options that Dropzone provides is to move files to a particular folder location. That meant that I could simply add an entry for the current year’s images and have that as a destination I could then drag screenshots to.
This changed my workflow a little further in that I generally switched to adding in the images at the end of my writing so that I could just bulk process them, at the end - an approach I often take when writing blog posts for my day job at my work PC. But, this wasn’t ideal, and I added it as something to come back to on my to do list to finish this off. I finally got round to doing this over the course of the last few weeks.
My revised workflow now generally focuses on preparing and inserting screenshots as I go, and foregoes the need to switch in and out of Path Finder.
- Take a screenshot using Cleanshot X.
- Apply any annotations to the screenshot in Cleanshot X.
- Drag the on screen floating thumbnail of the screenshot displayed by Cleanshot to a special action in Dropzone.
- The Dropzone action allows me to rename the screenshot as it is dragged in.
- In my text editor, insert a special Markdown image link, to be processed by Jekyll.
- Rather than inserting a link for the currently selected image file in Path Finder, a link for the last updated image in the current year’s image folder is inserted.
The Dropzone action I created is called “Rename and Move Files” - it is listed in the third-party actions on the Aptonic website.
It is a Ruby-based action that will allow you to rename a file before it is moved to the folder you specify when installing the action. It utilises Dropzone’s Pashua integration to allow you to rename files prior to them being moved, but is otherwise a pretty straight forward action that just moves the files to the specified destination.
The Ruby script it uses is as follows:
# ACTION: FILE(S) DRAGGED ONTO ICON
def dragged
  # Rsync will provide progress updates, so set action to show progress
  $dz.determinate(true)

  # Log if we are copying or moving
  bMove = true
  if ENV['OPERATION'] == "NSDragOperationCopy"
    strOperation = "Copying"
    bMove = false
  else
    strOperation = "Moving"
  end

  # Rename all passed in files
  astrFileRenamed = Array.new
  for intIndex in 0 ... $items.size

    # Display dialog to rename file
    strPashuaConfig = "
    *.title = Rename File
    p.type = textfield
    p.label = File Name
    p.default = #{File.basename($items[intIndex])}
    "
    objResult = $dz.pashua(strPashuaConfig)

    # Useful for debugging
    puts objResult['p']
    puts $items[intIndex]
    puts File.dirname($items[intIndex])

    # Rename the file
    strRenamedFilePath = File.dirname($items[intIndex]) + "/" + objResult['p']
    File.rename($items[intIndex], strRenamedFilePath)

    # Add the new file path to an array
    astrFileRenamed.push(strRenamedFilePath)
  end

  # Move/copy files
  # Uses the new set of file paths in the array
  $dz.begin("#{strOperation} files...")
  Rsync.do_copy(astrFileRenamed, ENV['EXTRA_PATH'], bMove)
  finish_op = (bMove ? "Move" : "Copy")

  # Notification with option to open the file path
  last_component = ENV['EXTRA_PATH'].split('/').last.gsub(/^(.{30,}?).*$/m,'\1...')
  $dz.finish("Click here to open the '#{last_component}' folder")
  $dz.url(false)
end


# ACTION: ICON CLICKED
def clicked
  # Open the folder path this action is set to move/copy to
  escaped_path = ENV['EXTRA_PATH'].gsub(/["`$\\]/){ |s| '\\' + s }
  system("open \"#{escaped_path}\"")
end
Note that this uses Dropzone’s implementation for Rsync to do the file move and it will open the destination folder if you click on the action in Dropzone.
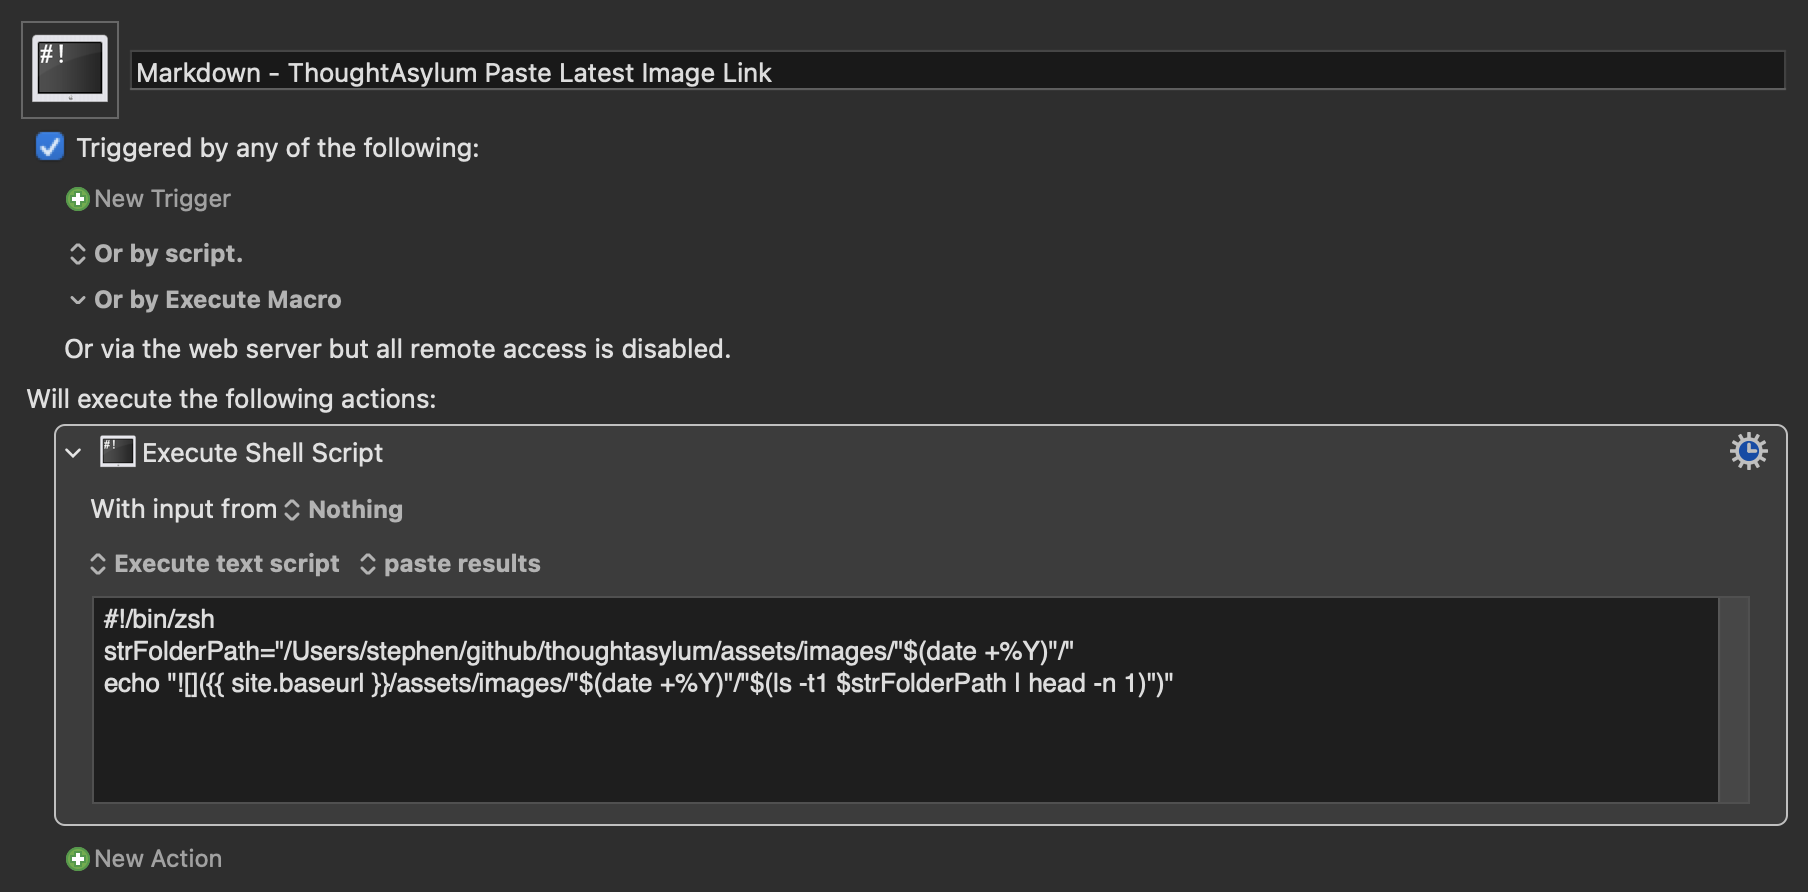
The script to insert my special Markdown link for an image file is tailored to my particular local set up, but I have included it below so that you get an idea of how it works.
#!/bin/zsh
strFolderPath="/Users/stephen/github/thoughtasylum/assets/images/"$(date +%Y)"/"
echo ""/"$(ls -t1 $strFolderPath | head -n 1)")"
I’ve put this in a Keyboard Maestro macro, which I then trigger from my Elgato Stream Deck or from my Macbook Pro’s Touch Bar(via Better Touch Tool)
Conclusion
While this is almost certainly a bit inside baseball about my blogging process and automations, I figured I would share it more as an example of how you can reduce the friction in even small tasks. I love pulling together little automations like this that make my life a little bit easier. As well as being something I find fun, over time it will mean I can just get things done that little bit quicker and the process will feel smoother, which is a rewarding feeling.
If my Dropzone action might be of use to you, remember to grab a copy and next time you find a bit of friction in an everyday process, see if you can figure out an automation to make it better.