Home Assistant Automation Test Buddy
30 Sep 2023I recently moved into a new house and have finally been able to begin looking more seriously at my home automation options. I have invested some time and resources into using Home Assistant as my underlying automation control platform. I had run it several years ago and had given up on it due to a lack of stability, but these days it is a much more reliable and capable product.
In my experimentation to date, I found I had a bit of friction in testing my automations, and so I set to work on finding something to help make things easier. The result was something I have subsequently found to be massively convenient.
Am I the Only One with This Problem?
When building my automations in Home Assistant, I found I had two needs other than figuring out the logic of the automation.
The first was where I needed to trigger an automation, but the trigger was not something convenient to access. For example, someone pressing the doorbell or something triggered at a particular time of day. In both cases, to develop the automation, I had to substitute in an alternate trigger. I could manually run scripts, and I could create toggles and buttons in the Home Assistant dashboard to act as stand ins, but the latter meant multiple independent browser instances and swapping windows around if I was away from my multi-monitor desk set up.
The second was when I wanted to test the result of an automation and verify the output. Again, I could add something to the Home Assistant dashboard, but I did note that in many YouTube videos, people experimenting with Home Assistant often demonstrated using a smart light bulb or a light bulb in a holder with some automation smarts.
I decided to try and find something simple I could use to help me with my testing. Something with a button to trigger an automation, and a light that could be used to indicate a result using light pulses and/or colours.
ESPHome
ESPHome is an amazing extension platform that integrates with Home Assistant. Using relatively cheap ESP8266/ESP32 or even RP2040 micro controllers, you can build out a wide variety of solutions. I am far from an electrical engineer by training, but having built PCs, (badly) soldered a few things here and there, and pulled a few home appliances apart, this was something I was willing to look into if I needed to. The great news was however was that for a good many uses I could use off the shelf hardware with no circuit building required.
The solution for this particular problem for me came in the form of an ESP32-based device that I could load up with ESPHome to integrate it into Home Assistant.
The M5Stack Atom Lite
ESP32 boards in general are relatively cheap to get your hands on, and as most sources will indicate online, if you order them direct from China on a good deal, you can get them at what must be close to cost price (it was less than 10 GBP for me from The PiHut).
But, you can also find more developed devices that are built on ESP32. Some of these are produced by a Chinese company called M5Stack. They specialise in stackable components that make prototyping and building Internet of Things (IoT) solutions quick and easy, and it is one of their solutions that I opted for - the M5Stack Atom Lite.
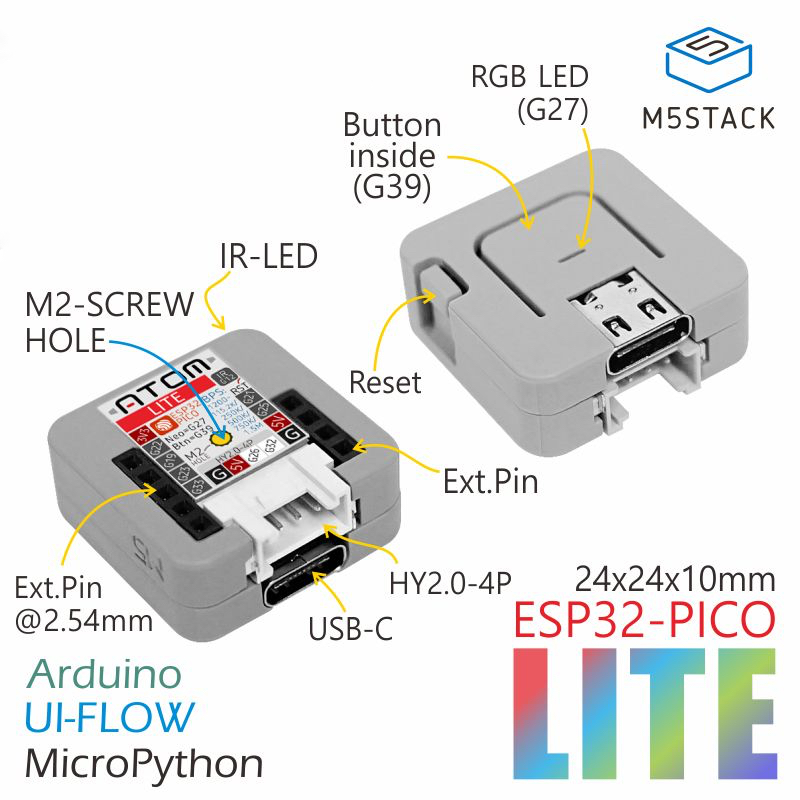
This tiny little box, barely bigger than my thumbnail included everything I needed - an ESP32, a button, and an RGB LED. It was also far easier to take around with me when working from other rooms in the house than the sorts of bulbs I see in use on YouTube - though I will admit they are visually more significant to view in a video than an LED.
Configuration of the Atom Lite for ESPHome
I already had the ESPHome integration installed in Home Assistant from some other automations I had been working on, so all I needed to do was to get the base install of ESPHome onto the Atom Lite and then update the configuration so I could expose the button and the LED to Home Assistant to allow me to work them into the automations.
All of the installation information (Home Assistant integration and adding ESPHome to your microcontroller) is covered in the installation guide on the ESPHome web site. You then have to configure the device using a set of YAML statements. This was relatively straight forward to do, but I’ve posted my configuration below so you can just copy it for use with your own Atom Lite.
# Specify substitutions to allow easy name re-use
substitutions:
  device_name: espbuster
  friendly_name: ESPBUSTER

# Main config begins
esphome:
  name: ${device_name}
  friendly_name: ${friendly_name}
  project:
    name: "sylumer.test_buddy"
    version: "1.0.0"
  # When everything is ready give a quick traffic light style light display to show readiness
  on_boot:
    priority: -100
    then:
      - light.turn_on:
          id: rgb_led
          brightness: 50%
          red: 100%
          green: 0%
          blue: 0%
      - delay: 1 s
      - light.turn_on:
          id: rgb_led
          brightness: 50%
          red: 100%
          green: 74.9%
          blue: 0%
      - delay: 1 s
      - light.turn_on:
          id: rgb_led
          brightness: 50%
          red: 100%
          green: 0%
          blue: 0%
      - delay: 0.25 s
      - light.turn_on:
          id: rgb_led
          brightness: 50%
          red: 0%
          green: 100%
          blue: 0%
      - delay: 1 s
      - light.turn_off: rgb_led

esp32:
  board: m5stack-atom
  framework:
    type: esp-idf

# Enable logging
logger:

# Enable Home Assistant API
api:
  encryption:
    key: !secret api_encryption_key
ota:
  password: !secret ota_password

# Wifi access - home and fallback
wifi:
  ssid: !secret wifi_ssid
  password: !secret wifi_password

  # Enable fallback hotspot (captive portal) in case wifi connection fails
  ap:
    ssid: ${friendly_name} Fallback Hotspot
    password: !secret ap_password

# Portal
captive_portal:

# Define the IR LED
# Should default to channel 0
remote_transmitter:
  - pin: GPIO12
    carrier_duty_percent: 50%
    id: ir_transmitter_led

# Define the RGB LED
# Explicitly set this to channel 3
light:
  - platform: esp32_rmt_led_strip
    chipset: SK6812
    rgb_order: GRB
    pin: 27
    num_leds: 1
    rmt_channel: 3
    id: rgb_led
    name: ${friendly_name} RGB LED
    effects:
      - random:
      - flicker:
      - addressable_rainbow:
      - strobe:
      - flicker:
          name: Broad Flicker
          alpha: 95%
          intensity: 10%
      - addressable_rainbow:
          name: Fast Rainbow
          speed: 50
      - strobe:
          name: Traffic Light Strobe
          colors:
            - state: true
              brightness: 100%
              red: 100%
              green: 0%
              blue: 0%
              duration: 500ms
            - state: false
              duration: 250ms
            - state: true
              brightness: 100%
              red: 100%
              green: 75%
              blue: 0%
              duration: 500ms
            - state: false
              duration: 250ms
            - state: true
              brightness: 100%
              red: 0%
              green: 100%
              blue: 0%
              duration: 500ms
            - state: false
              duration: 250ms

# Define the button
# Bounce the LED status as the button is pressed and again when released
# We want Home Assistant to be setting the state. This is just an interaction
binary_sensor:
  - platform: gpio
    pin:
      number: 39
      inverted: true
    name: ${friendly_name} Button
    on_multi_click:
    - timing:
        - ON for at most 1s
        - OFF for at most 1s
        - ON for at most 1s
        - OFF for at least 0.2s
      then:
        - logger.log: \[Double Click\] Calling script.${device_name}_double_click ...
        - homeassistant.service:
              service: script.${device_name}_double_click
    - timing:
        - ON for 1s to 2s
        - OFF for at least 0.5s
      then:
        - logger.log: \[Long Click\] Calling script.${device_name}_long_click ...
        - homeassistant.service:
              service: script.${device_name}_long_click
    - timing:
        - ON for at most 1s
        - OFF for at least 0.5s
      then:
        - logger.log: \[Short Click\] Calling script.${device_name}_short_click ...
        - homeassistant.service:
              service: script.${device_name}_short_click

# Sensors to make available in Home Assistant
sensor:
  # WiFi signal strength (RSSI) : dB
  - platform: wifi_signal
    name: "WiFi Signal Strength"
    id: wifi_signal_db
    update_interval: 60s
    entity_category: diagnostic
    icon: mdi:router-wireless

# Other sensors
text_sensor:
  - platform: wifi_info
    ip_address:
      name: IP Address
      id: host_ip
      entity_category: diagnostic
      icon: mdi:router-wireless
    ssid:
      name: SSID
      id: ssid
      icon: mdi:router-wireless
    bssid:
      name: BSSID
      id: bssid
      icon: mdi:router-wireless
    mac_address:
      name: MAC Address
      id: mac_address
      icon: mdi:router-wireless
    scan_results:
      name: WiFi Scan Results
      id: wifi_scan
      icon: mdi:router-wireless
    dns_address:
      name: DNS IP
      id: dns
      icon: mdi:router-wireless

# Switch - SONY TV
switch:
  - platform: template
    name: "Sony TV Power"
    turn_on_action:
      - remote_transmitter.transmit_sony:
          data: 0xA90
          nbits: 12

  - platform: template
    name: "Sony TV Sleep"
    turn_on_action:
      - remote_transmitter.transmit_sony:
          data: 0x5d0
          nbits: 12

  - platform: template
    name: "Sony TV Volume Up"
    turn_on_action:
      - remote_transmitter.transmit_sony:
          data: 0x490
          nbits: 12

  - platform: template
    name: "Sony TV Volume Down"
    turn_on_action:
      - remote_transmitter.transmit_sony:
          data: 0xc90
          nbits: 12
There are several aspects to this configuration file to highlight.
Substitutions and Secrets
At the top of the file are a couple of substitution entries. These values are used later in the file to specify names of things. You should set these to whatever you want to name your device. I named mine “ESPBuster” in homage to the crash test dummy in the MythBusters TV show (who was called “Buster”) as I created it to help me test things and I’m sure some of my tests will be spectacular - in a bad way.
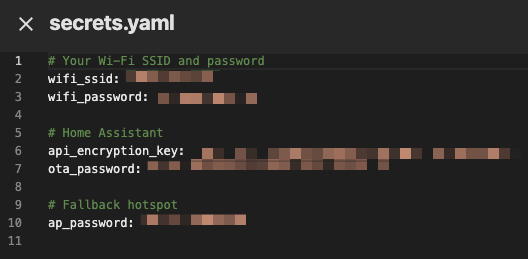
There are also a number of substitutions that I specify as entries in my ESPHome secrets file. This is a different secrets file to the usual Home Assistant secrets file, and you can access it from the top right of the ESPHome integration user interface in Home Assistant.

You set it up with the key values you want to keep outside of your device configuration, and then include them with !secret statements.
RGB LED
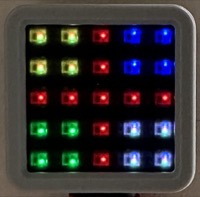
For the LED in the centre of the Atom Lite’s main button I have added some standard and custom effects that you can make use of when using the LED from Home Assistant. I added these as it gave me yet another way for distinguishing different feedback from automations.
The available effects are as follows.
| Effect | Type | Description |
|---|---|---|
| Random | Standard | Transition to a new random colour every five seconds. |
| Flicker | Standard | Vary the colour channels a little to flicker the LED slightly. |
| Broad Flicker | Custom | Vary the colour channels to obviously flicker the LED. |
| Strobe | Standard | Flash a white light. |
| Traffic Light Strobe | Custom | Flash alternately between red, amber, and green. |
| Addressable Rainbow | Standard | Cycles through a continuous loop of rainbow of colours. |
| Fast Rainbow | Custom | Quickly cycles through a continuous loop of rainbow of colours. |
Button
The button is set up to trigger three different click actions - a single short click, a double short click and a single long click. The actions it is set to take are specifically to run scripts based on the device’s name and the type of click.
Since I named the device “ESPBuster”, the scripts for my device are as follows.
| Click Type | Home Assistant Script Name |
|---|---|
| Single Short | script.espbuster_short_click |
| Double Short | script.espbuster_double_click |
| Single Long | script.espbuster_long_click |
If you name your device differently, the name of the script call would change to match.
Infrared LED
I also configured the infrared LED and configured it for my very old Sony TV. I haven’t actually got it working yet, but I suspect that is more to do with the age of my TV than the configuration - we really don’t watch the TV much these days (mostly we watch things on our tablets), and I’m betting the TV will reach a legal age to drink in the not too distant future!
If you don’t plan to tinker with the infrared capabilities, then I would suggest removing or commenting out those lines.
Wifi Information
A set of information about the wifi connect has also been made available as text sensors.
This will not only allow you to access the following information about the wifi connection.
- IP address.
- SSID (Service Set Identifier) of the wifi network - the network name.
- BSSID (Basic Service Set Identifier) for the access point being connected to - the access point MAC address
- MAC address of the device.
- Wifi scan results listing the recently available SSIDs.
- IP address of the DNS server being used.
Button Presses
Once discovered and you have added the device in your Devices list in Home Assistant, you will be able to access the various sensors noted above for the Atom Lite, and you will be able to use the Atom Lite to trigger actions in Home Assistant. There is however a security step to address first.
First of all navigate to Settings > Devices and Services > Integrations > ESPHome > {Your Device} > Configure in Home Assistant and set the option to make calls to Home Assistant.
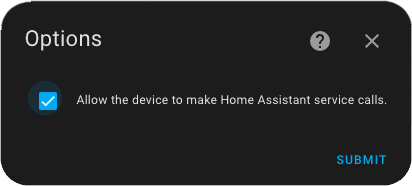
I noted above that there are three types of button click (short/double/long) that are set to trigger scripts, so we have to ensure the device has permission to do this.
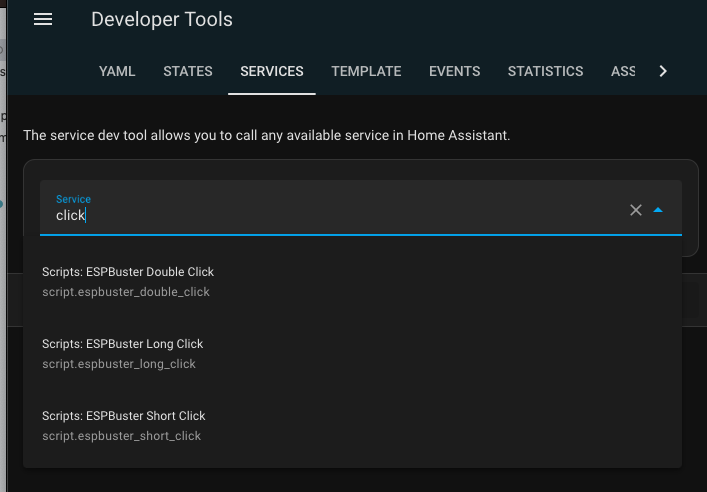
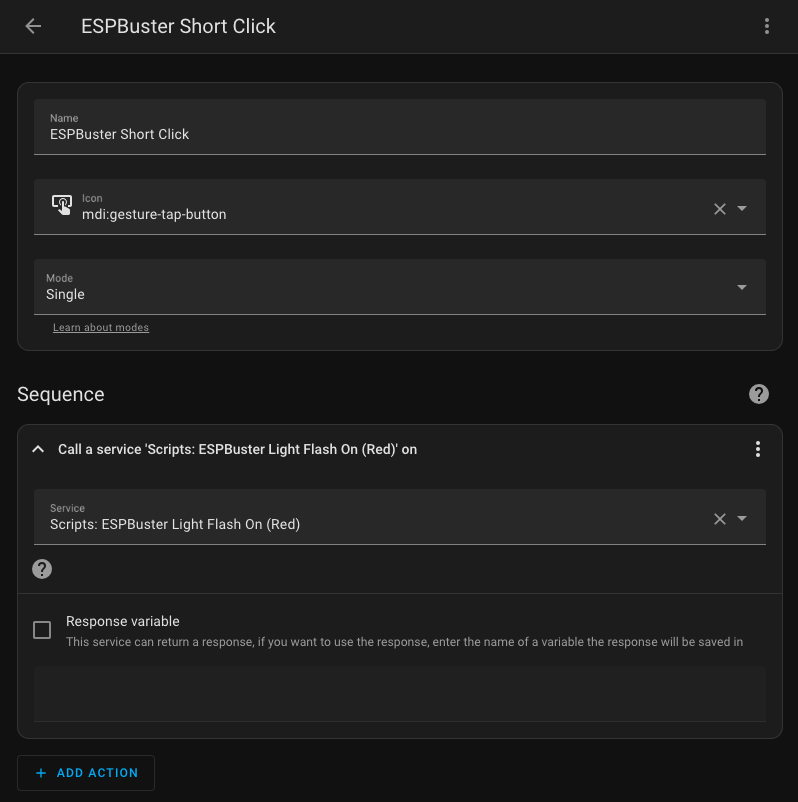
With that in place, we can go ahead and create those three scripts. You just need to ensure your script names match the names specified by the YAML. For “ESPBuster”, mine look like this.
I can then set up those scripts to take whatever action I wish.
Light Displays
With variable input taken care of, we can also take care of our variable output. It is easy to just have the light turn on or off, but we have an RGB LED, so it is useful to be able to automatically set the colour of the light or even trigger a light display. I have created a few relatively straight forward scripts that can be triggered as part of a Home Assistant automation that will allow you to receive varying visual feedback via the RGB LED on the Atom Lite.
Rather than stepping you through the manual set up process, I have just provided the YAML direct from my system. You can create a new script, edit it as YAML and just paste in one of the scripts below, with one caveat. When the scripts are created, they need to be associated with the Atom Lite directly by its unique ID. When you do this through the graphical interface for script building, the ID is added manually, but when editing as YAML, you will need to specify it yourself.
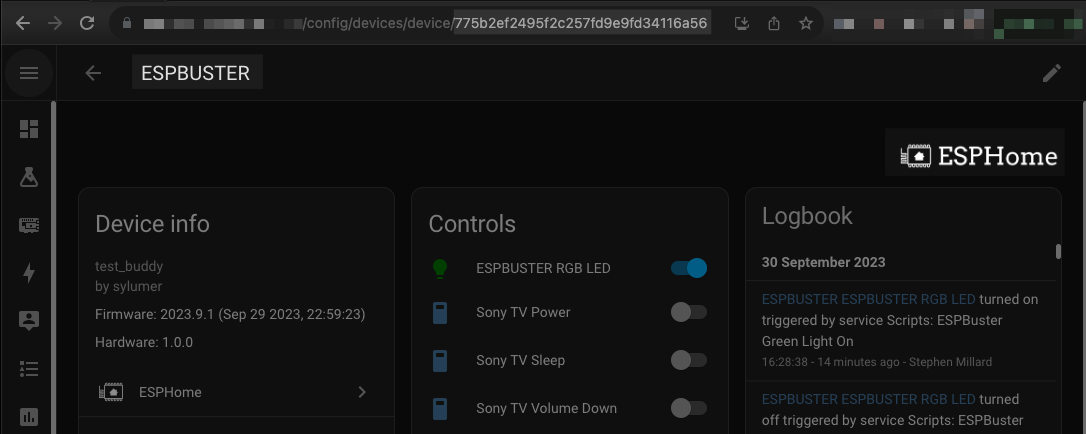
To get the ID of your device, navigate to Settings > Devices and Services > Devices > {Your Device} in Home Assistant, and it will be the last part of the URL. For example, in my system, device ID for “ESPBuster” is 775b2ef2495f2c257fd9e9fd34116a56.
Once you have your ID, just substitute it in for my device ID for each script you wish to use.
You can create any number of scripts you can then reuse across automations, and the examples below should help get you started.
Green Light On
This script turns on the LED and sets it to green. This is accomplished simply by instructing the LED to turn on and specify the colour to be ‘green’.
alias: ESPBuster Green Light On
sequence:
  - service: light.turn_on
    data:
      color_name: green
    target:
      device_id: 775b2ef2495f2c257fd9e9fd34116a56
mode: single
icon: mdi:alarm-light
Turn Light Off
Because we have already have a script to turn the LED on, it seems logical to have one to turn the LED off.
alias: ESPBuster Light Off
sequence:
  - service: light.turn_off
    data: {}
    target:
      device_id: 775b2ef2495f2c257fd9e9fd34116a56
mode: single
icon: mdi:alarm-light-off-outline
Flash Light Red
Turning a light on and off for a short period produced a ‘flash of light’. While we could combine elements of the previous two scripts we can utilise a built in “flash” option to make things super easy.
At first glance you might think the script below turns on the LED briefly, making it red, then turns it off again. That isn’t quite the whole truth. If the LED is off and the script is run, that is what will happen. However, if you run the first script to turn the LED on and set it to green, then run this script, the LED will switch for a short time from green to red, then switch back to green. The original state and colour are respected and restored.
alias: ESPBuster Light Flash On (Red)
sequence:
  - service: light.turn_on
    data:
      color_name: red
      flash: short
    target:
      device_id: 775b2ef2495f2c257fd9e9fd34116a56
mode: single
icon: mdi:alarm-light-outline
Fast Rainbow Effect
You may recall I defined some standard and some custom effects to be available for the LED. To call one of these we just need to specify an effect by name, just like a colour. In the script below, I have set it to call the “Fast Rainbow” effect.
alias: ESPBuster Fast Rainbow
sequence:
  - service: light.turn_on
    data:
      effect: Fast Rainbow
    target:
      device_id: 775b2ef2495f2c257fd9e9fd34116a56
mode: single
icon: mdi:looks
Calling a Script
Calling one of the above scripts is easy to do as they all appear as services. Just add the “Call a Service” action to your script sequence or to an automation. You can even have a button press on the Atom Lite trigger a light effect - though that’s not all that useful compare to the broader test scenarios I use this form, unless of course you use the light effects to indicate when different action steps are completed.
Conclusion
That’s my run down on my test buddy, ESPBuster, an M5Stack Atom Lite configured for the ESPHome integration in Home Assistant. Primarily using the button and the RGB LED it provides me with an easily portable piece of hardware that can be used to trigger automations and show basic visual events that can stand in for other inputs and outputs as I develop and test my home automations.
I have been blown away by the power that lies inside this little bit of hardware, and what is possible in Home Assistant via ESPHome. The features are entirely approachable without a degree in electrical engineering, and are providing me with a brilliant little set up for my exploration of the wider platform at a very low cost of entry for a robust and versatile little piece of hardware.
If you are dipping your toe into Home Assistant, or even if you are a veteran, I hope you find this approach useful to consider or even to try for yourself.
I’m looking forward to sharing some of my other ESPHome and Home Assistant experiments with everyone over the coming months.