Home Assistant Info Display
28 Dec 2023Contents
- Background
- Hardware
- ESP32 Device Configuration
- Home Assistant Configuration
- Example Notification Uses
- Conclusion
A few months ago I wrote a post about my tiny Home Assistant powered desk clock, and in that I mentioned that while it would be possible to have little notifications pop up on it, I actually had a separate set up for that. In this post I am going to cover the details of my set up for this additional display, including the details of how to configure both the device and Home Assistant aspects, and also setting out some use cases.
Background
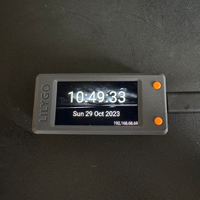
Due to some constraints around what I can and cannot do with my work PC, I found having a small desk clock just below the bottom right corner of my screen was useful. Currently it gives me the time down to the second, the date, the temperature in my office and outside, and the IP address of the clock. Its buttons also let me trigger additional information to be read to me via a nearby Amazon Echo.
Because I want to be able to see the time at any time, and screen space is (purposefully) limited, I didn’t want to have additional information disrupting or cluttering things. Hence an additional screen was desirable.
I do get Home Assistant notifications on my iPhone (which sits on a MagSafe charger on my desk when I am working), but these are important notifications. Things to be actioned. The purpose of this other information display is more for time-insensitive information. Things that are not as important to know right away, but useful to know when I next happen to glance at the screen - like a mini-dashboard of key information.
Hardware
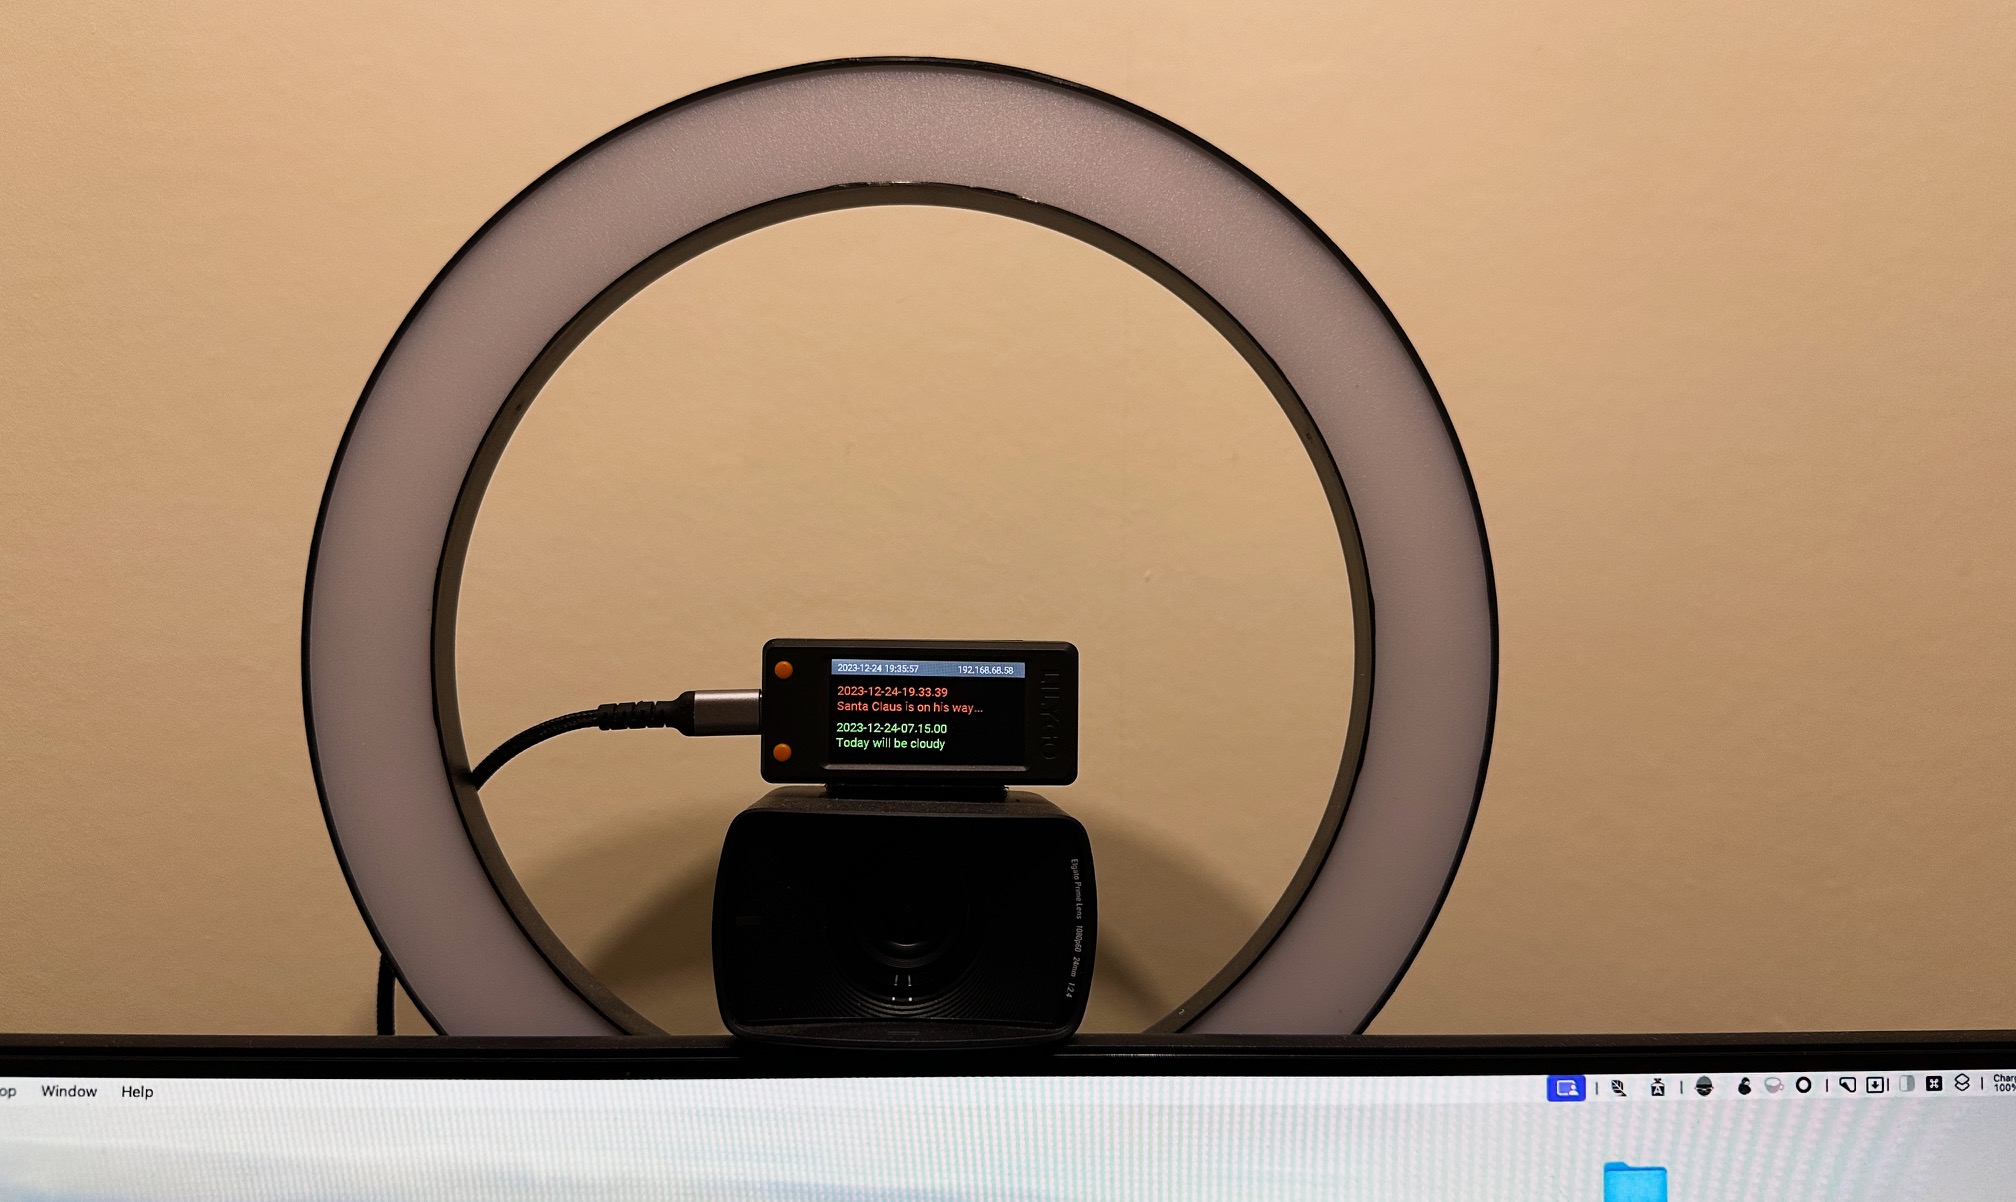
Exactly like the desk clock, I opted to use a LILYGO® T-Display-S3 ESP32-S3 Development Board ST7789. I mounted this on top of my web cam (using some Velcro tape) above my main monitor. This is a convenient placement and is an otherwise unused space.
ESP32 Device Configuration
Just like the desk clock, I am using the ESPHome integration with Home Assistant to configure and link up the LILYGO® module. I already had the ESPHome integration installed in Home Assistant, so you will need to ensure that you have that installed. ESPHome has a nice little walk through for getting started should you not already have it in place.
With ESPHome in place on Home Assistant and an initial install of ESPHome firmware on the LILYGO® module, we just need to build up our configuration in the YAML configuration file for the device.
TIP: Don’t forget (like I almost always do) to hold the BOOT button when flashing the device to set the device mode to receive the new firmware.
Again, like I did for the desk clock, I will step through the various sections to explain what it does and how you might want to modify it. At the end everything will be put together so you have a single source to copy and paste into your actual configuration and start modifying.
Substitutions
For ease of reuse, I try and use substitutions at the top of my ESP32 configurations. This allows me to specify data once and reuse it via a template elsewhere in the configuration - something that is particularly useful for things like names as I have here.
# Substitutions for use elsewhere in content
substitutions:
  device_name: esptickermain
  friendly_name: ESPTICKERMAIN
Once again my lack of imagination comes to the fore when naming things. I imagine the display as my little rolling ticker of generally useful information and since it is an ESP32 device and my main (currently only) such display, I effectively named it ESP Ticker Main. You should of course amend these to something meaningful for you.
ESPHome
The next section is the set-up of the ESPHome configuration for the device. Here, we start to use the substitutions from the previous section, and I also set an action to be carried out on boot up. When setting up the desk clock I found the backlight for the T-Display to be overly bright for the lighting in the room I was working in. I simply set the ticker display to the same 60% brightness, but I would recommend that you experiment with this setting to find the best level for your display based on where it is being placed.
I will return to setting up the definition of the backlight in a later section of the configuration.
# ESPHome
esphome:
  name: ${device_name}
  friendly_name: ${friendly_name}
  # On boot set the backlight to 60%
  on_boot:
    then:
      - light.turn_on:
          id: backlight
          brightness: 60%
Of course, because this module is tied into Home Assistant, you could have the brightness level change based on time of day, whether you have lights in the room on or off, or even the value of a light sensor in the room. This is a big advantage of having Home Assistant be the logical controller of devices.
ESP32 Board
This section defines what type of board we are using to Home Assistant’s ESPHome integration. The LILYGO® module utilises an S3 chip, and if you dig into the documentation for the module you will discover that it supports the Arduino framework. The configuration reflects these details.
esp32:
  board: esp32-s3-devkitc-1
  variant: esp32s3
  framework:
    type: arduino
Logging
During the development of the desk clock configuration, I found the device logs were filled with warnings from the display. This made it noisy when looking for errors during development, so I applied the following configuration settings to filter out the display warnings, but allow errors to surface.
# Enable logging
logger:
  level: DEBUG
  # Quieten the warnings about delays
  logs:
    tdisplays3.display: ERROR
    component: ERROR
Display Preparation
This section is a essential and provides a way to enable the display component for ESPHome. It loads in some component code from a GitHub repository that defines to the ESPHome firmware build how to interact with the display component.
# Load in component to allow use of the LCD screen
external_components:
  - source: github://landonr/lilygo-tdisplays3-esphome
    components: [tdisplays3]
WiFi Connectivity
Utilising the substitutions again, these sections set up a fallback WiFi access point, and I utilise some ‘secrets’ to set up my over the air updates and local Wifi network settings.
# Over the air
ota:
  password: !secret ota_password

# Details of default Wifi and fallback hotspot
wifi:
  ssid: !secret wifi_ssid
  password: !secret wifi_password

  # Enable fallback hotspot (captive portal) in case wifi connection fails
  ap:
    ssid: ${device_name} Fallback Hotspot
    password: !secret ap_password

# No captive portal defined
captive_portal:
It is good practice to put reused, sensitive information into a /conf/esphome/secrets.yaml file on your Home Assistant server. This works the same way the secrets.yaml file does for your Home Assistant configuration does.
To support the above, an example secrets.yaml file might look something like this.
# Your Wi-Fi SSID and password
wifi_ssid: "HomeNetwork"
wifi_password: "67TG^*Vh_0"

# Home Assistant
ota_password: 3fff3ffe000000a11111f00f5e0fffaa"

# Fallback hotspot
ap_password: "E-S_p.32-WIFIpwd"
You can probably copy most of these from your original firmware configuration that ESPHome generates when you connect and set-up your device, and any missing ones you can specify yourself, though for the API encryption key, I would suggest visiting the Native API Component page on the ESPHome website as it will give some useful background to using the API and will generate a suitable encryption key for you to use.
Global Variables
When I was originally developing the ticker, I began by defining a variable to hold the content to be used for the display. While I changed the approach to always pull data directly from Home Assistant, I have left the variable (and later the service to set it) in place. So in effect, the code below does nothing and can be safely omitted, but if you want to have content local to the device, then this is an option you could utilise.
# Global variable set that could be used in the display, but is not actively in use
globals:
  - id: global_text
    restore_value: no
    type: std::string
    initial_value: '"-- Awaiting Data --"'
Home Assistant API
In this section, I use another secret for the Home Assistant API key (so you would add this to the same secrets.yaml file as above for the WiFi). Alongside this I have also defined a service to set the value of the global_text variable defined in the previous section.
# Enable Home Assistant API
api:
  encryption:
    key: !secret api_encryption_key
  # Home Assistant service that can set the global variable
  services:
    - service: set_text
      variables:
        text_display: string
      then:
        - globals.set:
            id: global_text
            value: !lambda 'return text_display;'
Time Source
Even though I have the desk clock, I found it useful to have the time displayed as a minor data component on the screen. This is primarily because when I post content to the display I am posting it with a time, so having the current time available gives me a relative sense of how long ago the information posted.
Rather than utilise a time server, Home Assistant has already readied itself with the correct local time, so I use that as the time source.
# Get the time from home assistant
time:
  - platform: homeassistant
    id: ha_time
Backlight
Earlier I set the backlight to begin at 60% on device boot, but in this section I actually define the backlight itself.
Referring back to that desk clock post where I set out a lot of the basics for working with the LILYGO® T-Display-S3 ESP32-S3 Development Board ST7789, we know that GPIO pin 38 is the control pin for the display backlight, and that we can configure this as an LED control (LEDC) to set pulse-width modulation (PWM) signals for controlling the backlight. The first section succinctly defines this in a handful of lines of configuration.
The second section then defines the backlight and associates it with the LEDC’s ID (led_pmw). The backlight light can then be controlled by Home Assistant and by the device itself, thus the backlight brightness can be set dynamically in response to a button press or any of the more automated options noted above.
# Set pin for backlight
output:
  - platform: ledc
    pin: GPIO38
    id: ledc_pmw

# Set backlight controller
light:
  - platform: monochromatic
    output: ledc_pmw
    name: "Backlight"
    id: backlight
    restore_mode: ALWAYS_OFF
Fonts
The Roboto font from Google works well on these displays and of the dozens of fonts I tried was the clearest for me to read. I defined two sizes. Size 20 to be used for key information, and size 15 to use in a title bar I put at the top of the display.
# Fonts
font:
  - file: "gfonts://Roboto"
    id: roboto
    size: 20
  - file: "gfonts://Roboto"
    id: robotosmall
    size: 15
IP Address and Sensors
In this section I define a plethora of sensors that are used to set up the content to be displayed in the display, as well as the IP address of the device.
There are effectively two sets of sensors alongside the IP address, that define two text outputs for the display. Set one defines the sensors used for the upper text output, and set two defines the sensors for the lower text output. Each of these sets consists of:
- The text to be displayed.
- The colour to display the text in.
- The time the text was set with separate components for year, month, day, hour, minute, and second.
The configuration looks like this:
# Ticker and IP Address sensors
text_sensor:
  - platform: homeassistant
    id: ticker1_text
    entity_id: input_text.ticker1_text
  - platform: homeassistant
    id: ticker1_colour
    entity_id: input_select.ticker1_colour
  - platform: homeassistant
    id: ticker1_year
    entity_id: input_datetime.ticker1_time
    attribute: year
  - platform: homeassistant
    id: ticker1_month
    entity_id: input_datetime.ticker1_time
    attribute: month
  - platform: homeassistant
    id: ticker1_day
    entity_id: input_datetime.ticker1_time
    attribute: day
  - platform: homeassistant
    id: ticker1_hour
    entity_id: input_datetime.ticker1_time
    attribute: hour
  - platform: homeassistant
    id: ticker1_minute
    entity_id: input_datetime.ticker1_time
    attribute: minute
  - platform: homeassistant
    id: ticker1_second
    entity_id: input_datetime.ticker1_time
    attribute: second
  - platform: homeassistant
    id: ticker2_text
    entity_id: input_text.ticker2_text
  - platform: homeassistant
    id: ticker2_colour
    entity_id: input_select.ticker2_colour
  - platform: homeassistant
    id: ticker2_year
    entity_id: input_datetime.ticker2_time
    attribute: year
  - platform: homeassistant
    id: ticker2_month
    entity_id: input_datetime.ticker2_time
    attribute: month
  - platform: homeassistant
    id: ticker2_day
    entity_id: input_datetime.ticker2_time
    attribute: day
  - platform: homeassistant
    id: ticker2_hour
    entity_id: input_datetime.ticker2_time
    attribute: hour
  - platform: homeassistant
    id: ticker2_minute
    entity_id: input_datetime.ticker2_time
    attribute: minute
  - platform: homeassistant
    id: ticker2_second
    entity_id: input_datetime.ticker2_time
    attribute: second
  - platform: wifi_info
    ip_address:
      name: ${device_name} IP Address
      id: host_ip
      entity_category: diagnostic
      icon: mdi:router-wireless
You may have noticed that the IP address is coming from wifi_info, which is on the device), and that the text-related sensors are coming from homeassistant. This means that all of the text data needs to be made available on Home Assistant.
I will cover exactly how we can set that up in the Home Assistant configuration section below.
Displaying Content
Unlike the desk clock, I opted not to put any background image on this device - just plain text output was the aim of this one, but if you so wanted, you could add a background image.
The display section outlined below specifies a single page, and it is set as rotated 270°. The desk clock was rotated 90°, but because I wanted my power/data connection on the opposite side, I added an extra 180° to the rotation. You should take care to set this to the orientation offset you require for your preferred set up.
A lambda function specifies the entire layout of the page. While it is commented, the key features of the configuration are:
- A number of standard colours are specified.
- These are RGB definitions, so if you want to use different or additional colours, you should find it relatively straight forward to amend them.
- A title bar at the top of the display shows the time on the left and the device’s IP address on the right.
- The time format is “YYYY-MM-DD hh:mm:ss”, so you could amend this to your preference to by amending the
strftimefunction’s output string.
- The time format is “YYYY-MM-DD hh:mm:ss”, so you could amend this to your preference to by amending the
- The text that is specified in Home Assistant (using those sensors defined earlier) is matched to one of the colours defined in this lambda function - i.e. whatever name is defined in Home Assistant for some text must also be defined in this function, and any revisions to the available colours must be reflected throughout this function, not just in the definition of the colours.
- Each of the two ticker text entries is output in the specified colour with the first line of the text being a timestamp of the format “YYYY-MM-DD-hh.mm.ss”, and the second line being the actual informational text.
- Ticker 1 is displayed above ticker 2.
- The display is updated roughly once every second.
- If you are happy with less immediate updates, you can increase the
update_intervalsetting in the configuration.
- If you are happy with less immediate updates, you can increase the
- The content for a particular ticker is only displayed if the text content is not an empty string.
- This means that you will never get just the time displaying. If the text is entry neither the text nor the time elements will be displayed.
# 320 x 170 pixel display
display:
  - platform: tdisplays3
    id: lcd
    update_interval: 1s
    rotation: 270
    pages:
      - id: page1
        lambda: |-
          //Base Colours
          auto Black = Color(0, 0, 0);
          auto DarkGrey = Color(105, 105, 105);
          //Selection options
          auto Red = Color(255, 0, 0);
          auto White = Color(255, 255, 255);
          auto Green = Color(0, 255, 0);
          auto Cyan = Color(0, 255, 255);

          //Build title bar
          it.filled_rectangle(0, 0, 320, 25, DarkGrey);
          it.printf(10, 5, id(robotosmall), White, id(ha_time).now().strftime("%Y-%m-%d %H:%M:%S").c_str());
          it.printf(200, 5, id(robotosmall), White, "%15s", id(host_ip).state.c_str());

          //Initialise colors as black so the output does not show
          auto colour1 = Black;
          auto colour2 = Black;

          //Set colour for ticker 1 content
          if(id(ticker1_colour).state == "Red") {colour1 = Red;}
          if(id(ticker1_colour).state == "White") {colour1 = White;}
          if(id(ticker1_colour).state == "Green") {colour1 = Green;}
          if(id(ticker1_colour).state == "Cyan") {colour1 = Cyan;}

          //Set colour for ticker 2 content
          if(id(ticker2_colour).state == "Red") {colour2 = Red;}
          if(id(ticker2_colour).state == "White") {colour2 = White;}
          if(id(ticker2_colour).state == "Green") {colour2 = Green;}
          if(id(ticker2_colour).state == "Cyan") {colour2 = Cyan;}

          //it.printf(10, 60, id(roboto), White, "Local: %s", id(global_text).c_str());

          //Display ticker contents
          //Ticker entry 1
          if(id(ticker1_text).state != "")
          {
            it.printf(10, 40, id(roboto), colour1, "%s-%02s-%02s-%02s.%02s.%02s", id(ticker1_year).state.c_str(), id(ticker1_month).state.c_str(), id(ticker1_day).state.c_str(), id(ticker1_hour).state.c_str(), id(ticker1_minute).state.c_str(), id(ticker1_second).state.c_str());
            it.printf(10, 65, id(roboto), colour1, id(ticker1_text).state.c_str());
          }
          //Ticker entry 2
          if(id(ticker2_text).state != "")
          {
            it.printf(10, 100, id(roboto), colour2, "%s-%02s-%02s-%02s.%02s.%02s", id(ticker2_year).state.c_str(), id(ticker2_month).state.c_str(), id(ticker2_day).state.c_str(), id(ticker2_hour).state.c_str(), id(ticker2_minute).state.c_str(), id(ticker2_second).state.c_str());
            it.printf(10, 125, id(roboto), colour2, id(ticker2_text).state.c_str());
          }
Buttons
In the same way as for the desk clock, I also set up the two buttons so that they can be accessed by Home Assistant and used as triggers. I haven’t set any of these to anything in my particular case as currently the module is atop my web cam and I don’t want to accidentally move the camera by pressing buttons on an attached device.
One important thing to notice is that the names are inverted compare to the desk clock configuration. This is because of the different orientation.
# Push Buttons
# 270 degree  screen rotation, so boot (GPIO0) is at the top.
binary_sensor:
  - platform: gpio
    pin:
      number: 14
      inverted: true
    name: ${friendly_name} Bottom Button
  - platform: gpio
    pin:
      number: 0
      inverted: true
    name: ${friendly_name} Top Button
Full Configuration File
Below is what the amalgamated configuration file looks like. If you skipped down to this section and did not bother reading the above sections, I would recommend that you go back and check out the details as there will probably be some aspects of the configuration you would want to tailor to your own requirements.
# Substitutions for use elsewhere in content
substitutions:
  device_name: esptickermain
  friendly_name: ESPTICKERMAIN

# ESPHome
esphome:
  name: ${device_name}
  friendly_name: ${friendly_name}
  # On boot set the backlight to 60%
  on_boot:
    then:
      - light.turn_on:
          id: backlight
          brightness: 60%

# ESP32 Board
esp32:
  board: esp32-s3-devkitc-1
  variant: esp32s3
  framework:
    type: arduino

# Enable logging
logger:
  level: DEBUG
  # Quieten the warnings about delays
  logs:
    tdisplays3.display: ERROR
    component: ERROR

# Load in component to allow use of the LCD screen
external_components:
  - source: github://landonr/lilygo-tdisplays3-esphome
    components: [tdisplays3]

# Over the air
ota:
  password: !secret ota_password

# Details of default Wifi and fallback hotspot
wifi:
  ssid: !secret wifi_ssid
  password: !secret wifi_password

  # Enable fallback hotspot (captive portal) in case wifi connection fails
  ap:
    ssid: ${device_name} Fallback Hotspot
    password: !secret ap_password

# No captive portal defined
captive_portal:

# Global variable set that could be used in the display, but is not actively in use
globals:
  - id: global_text
    restore_value: no
    type: std::string
    initial_value: '"-- Awaiting Data --"'

# Enable Home Assistant API
api:
  encryption:
    key: !secret api_encryption_key
  # Home Assistant service that can set the global variable
  services:
    - service: set_text
      variables:
        text_display: string
      then:
        - globals.set:
            id: global_text
            value: !lambda 'return text_display;'

# Get the time from home assistant
time:
  - platform: homeassistant
    id: ha_time

# Set pin for backlight
output:
  - platform: ledc
    pin: GPIO38
    id: ledc_pmw

# Set backlight controller
light:
  - platform: monochromatic
    output: ledc_pmw
    name: "Backlight"
    id: backlight
    restore_mode: ALWAYS_OFF

# Fonts
font:
  - file: "gfonts://Roboto"
    id: roboto
    size: 20
  - file: "gfonts://Roboto"
    id: robotosmall
    size: 15

# Ticker and IP Address sensors
text_sensor:
  - platform: homeassistant
    id: ticker1_text
    entity_id: input_text.ticker1_text
  - platform: homeassistant
    id: ticker1_colour
    entity_id: input_select.ticker1_colour
  - platform: homeassistant
    id: ticker1_year
    entity_id: input_datetime.ticker1_time
    attribute: year
  - platform: homeassistant
    id: ticker1_month
    entity_id: input_datetime.ticker1_time
    attribute: month
  - platform: homeassistant
    id: ticker1_day
    entity_id: input_datetime.ticker1_time
    attribute: day
  - platform: homeassistant
    id: ticker1_hour
    entity_id: input_datetime.ticker1_time
    attribute: hour
  - platform: homeassistant
    id: ticker1_minute
    entity_id: input_datetime.ticker1_time
    attribute: minute
  - platform: homeassistant
    id: ticker1_second
    entity_id: input_datetime.ticker1_time
    attribute: second
  - platform: homeassistant
    id: ticker2_text
    entity_id: input_text.ticker2_text
  - platform: homeassistant
    id: ticker2_colour
    entity_id: input_select.ticker2_colour
  - platform: homeassistant
    id: ticker2_year
    entity_id: input_datetime.ticker2_time
    attribute: year
  - platform: homeassistant
    id: ticker2_month
    entity_id: input_datetime.ticker2_time
    attribute: month
  - platform: homeassistant
    id: ticker2_day
    entity_id: input_datetime.ticker2_time
    attribute: day
  - platform: homeassistant
    id: ticker2_hour
    entity_id: input_datetime.ticker2_time
    attribute: hour
  - platform: homeassistant
    id: ticker2_minute
    entity_id: input_datetime.ticker2_time
    attribute: minute
  - platform: homeassistant
    id: ticker2_second
    entity_id: input_datetime.ticker2_time
    attribute: second
  - platform: wifi_info
    ip_address:
      name: ${device_name} IP Address
      id: host_ip
      entity_category: diagnostic
      icon: mdi:router-wireless

# 320 x 170 pixel display
display:
  - platform: tdisplays3
    id: lcd
    update_interval: 1s
    rotation: 270
    pages:
      - id: page1
        lambda: |-
          //Base Colours
          auto Black = Color(0, 0, 0);
          auto DarkGrey = Color(105, 105, 105);
          //Selection options
          auto Red = Color(255, 0, 0);
          auto White = Color(255, 255, 255);
          auto Green = Color(0, 255, 0);
          auto Cyan = Color(0, 255, 255);

          //Build title bar
          it.filled_rectangle(0, 0, 320, 25, DarkGrey);
          it.printf(10, 5, id(robotosmall), White, id(ha_time).now().strftime("%Y-%m-%d %H:%M:%S").c_str());
          it.printf(200, 5, id(robotosmall), White, "%15s", id(host_ip).state.c_str());

          //Initialise colors as black so the output does not show
          auto colour1 = Black;
          auto colour2 = Black;

          //Set colour for ticker 1 content
          if(id(ticker1_colour).state == "Red") {colour1 = Red;}
          if(id(ticker1_colour).state == "White") {colour1 = White;}
          if(id(ticker1_colour).state == "Green") {colour1 = Green;}
          if(id(ticker1_colour).state == "Cyan") {colour1 = Cyan;}

          //Set colour for ticker 2 content
          if(id(ticker2_colour).state == "Red") {colour2 = Red;}
          if(id(ticker2_colour).state == "White") {colour2 = White;}
          if(id(ticker2_colour).state == "Green") {colour2 = Green;}
          if(id(ticker2_colour).state == "Cyan") {colour2 = Cyan;}

          //it.printf(10, 60, id(roboto), White, "Local: %s", id(global_text).c_str());

          //Display ticker contents
          //Ticker entry 1
          if(id(ticker1_text).state != "")
          {
            it.printf(10, 40, id(roboto), colour1, "%s-%02s-%02s-%02s.%02s.%02s", id(ticker1_year).state.c_str(), id(ticker1_month).state.c_str(), id(ticker1_day).state.c_str(), id(ticker1_hour).state.c_str(), id(ticker1_minute).state.c_str(), id(ticker1_second).state.c_str());
            it.printf(10, 65, id(roboto), colour1, id(ticker1_text).state.c_str());
          }
          //Ticker entry 2
          if(id(ticker2_text).state != "")
          {
            it.printf(10, 100, id(roboto), colour2, "%s-%02s-%02s-%02s.%02s.%02s", id(ticker2_year).state.c_str(), id(ticker2_month).state.c_str(), id(ticker2_day).state.c_str(), id(ticker2_hour).state.c_str(), id(ticker2_minute).state.c_str(), id(ticker2_second).state.c_str());
            it.printf(10, 125, id(roboto), colour2, id(ticker2_text).state.c_str());
          }

# Push Buttons
# 270 degree  screen rotation, so boot (GPIO0) is at the top.
binary_sensor:
  - platform: gpio
    pin:
      number: 14
      inverted: true
    name: ${friendly_name} Bottom Button
  - platform: gpio
    pin:
      number: 0
      inverted: true
    name: ${friendly_name} Top Button
Now we have a configuration for our ESP32 device to display content, we need to do some configuration in Home Assistant to make content available.
Home Assistant Configuration
Helper Creation
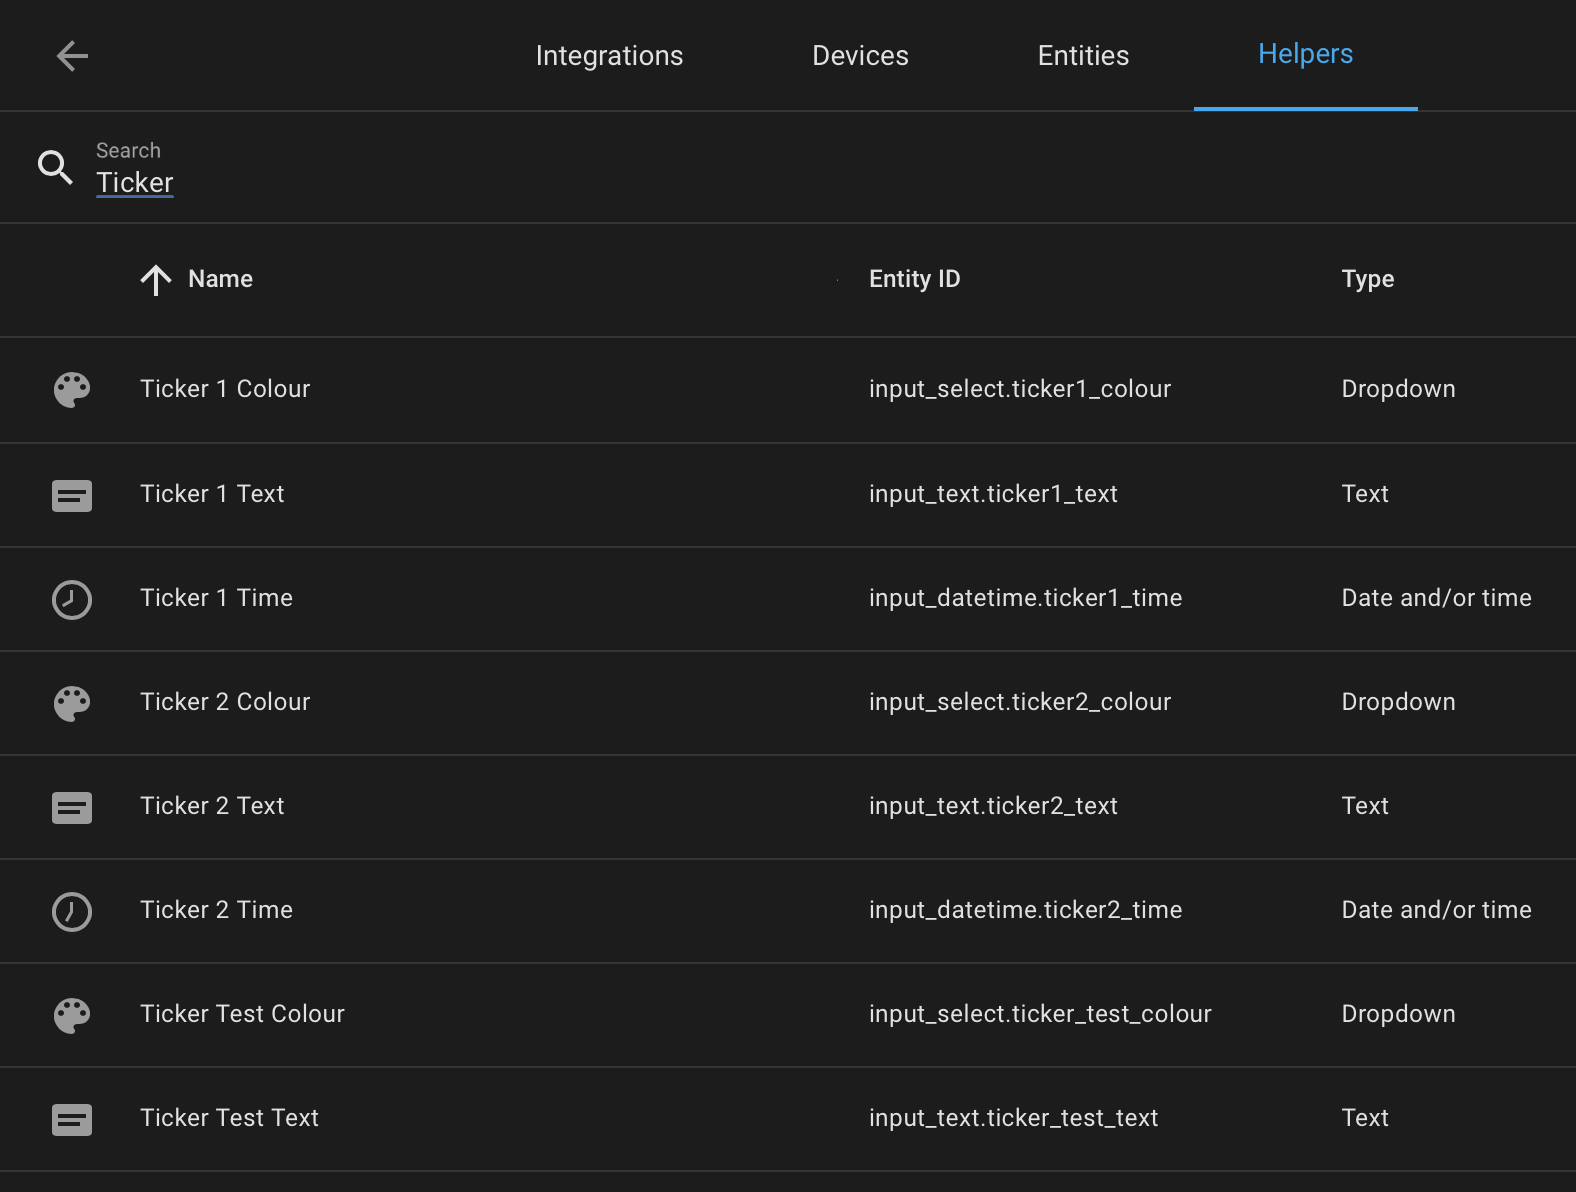
The sensors I set up in the configuration of the ESP32 module now need to be defined in Home Assistant. This is done within Settings > Devices and Services > Helpers.
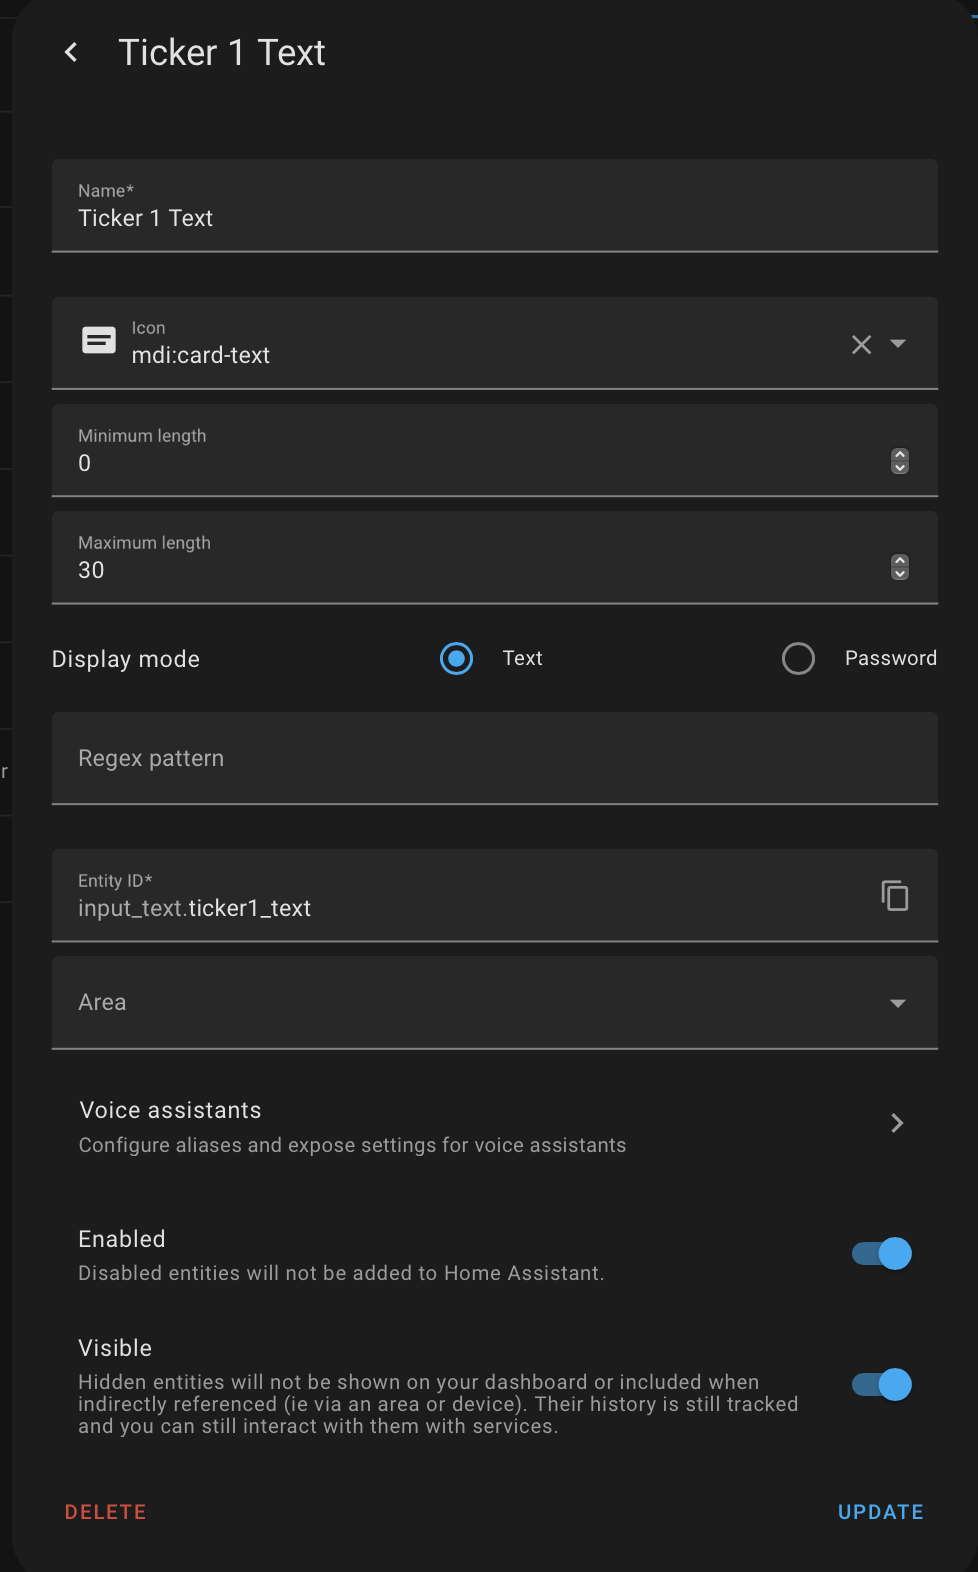
Text Helper
The text sensors to hold the text to be output are set up as “text” helpers.
The most notable part of the configuration is to set an upper and lower limit on the length. I sometimes have no text showing, so a minimum length of 0 characters is logical, and based on the font and size I have chosen for the text, a 30 character limit seems to be fine for my information messages - it is always a good idea to keep them brief.
Date/Time Helper
The date/time sensors to hold the time at which the text output was added are set up as “date and/or time” helpers. There is just one time helper for each item of text output, but they each have attributes that correspond to the component parts. It is these attributes that were defined in the ESP32 device configuration as sensors and it allows us the highest level of control in that configuration as to how we output the time information on the display.

Colour Helper
The colour sensors to specify the colour of the text being output are set up as “dropdown” helpers. Each colour defined in the ESP32 configuration is added by name as a text entry in the list of available items to be displayed in a drop down list. We could let it just be free text, but making it a drop down ensures we only use “known colours”.
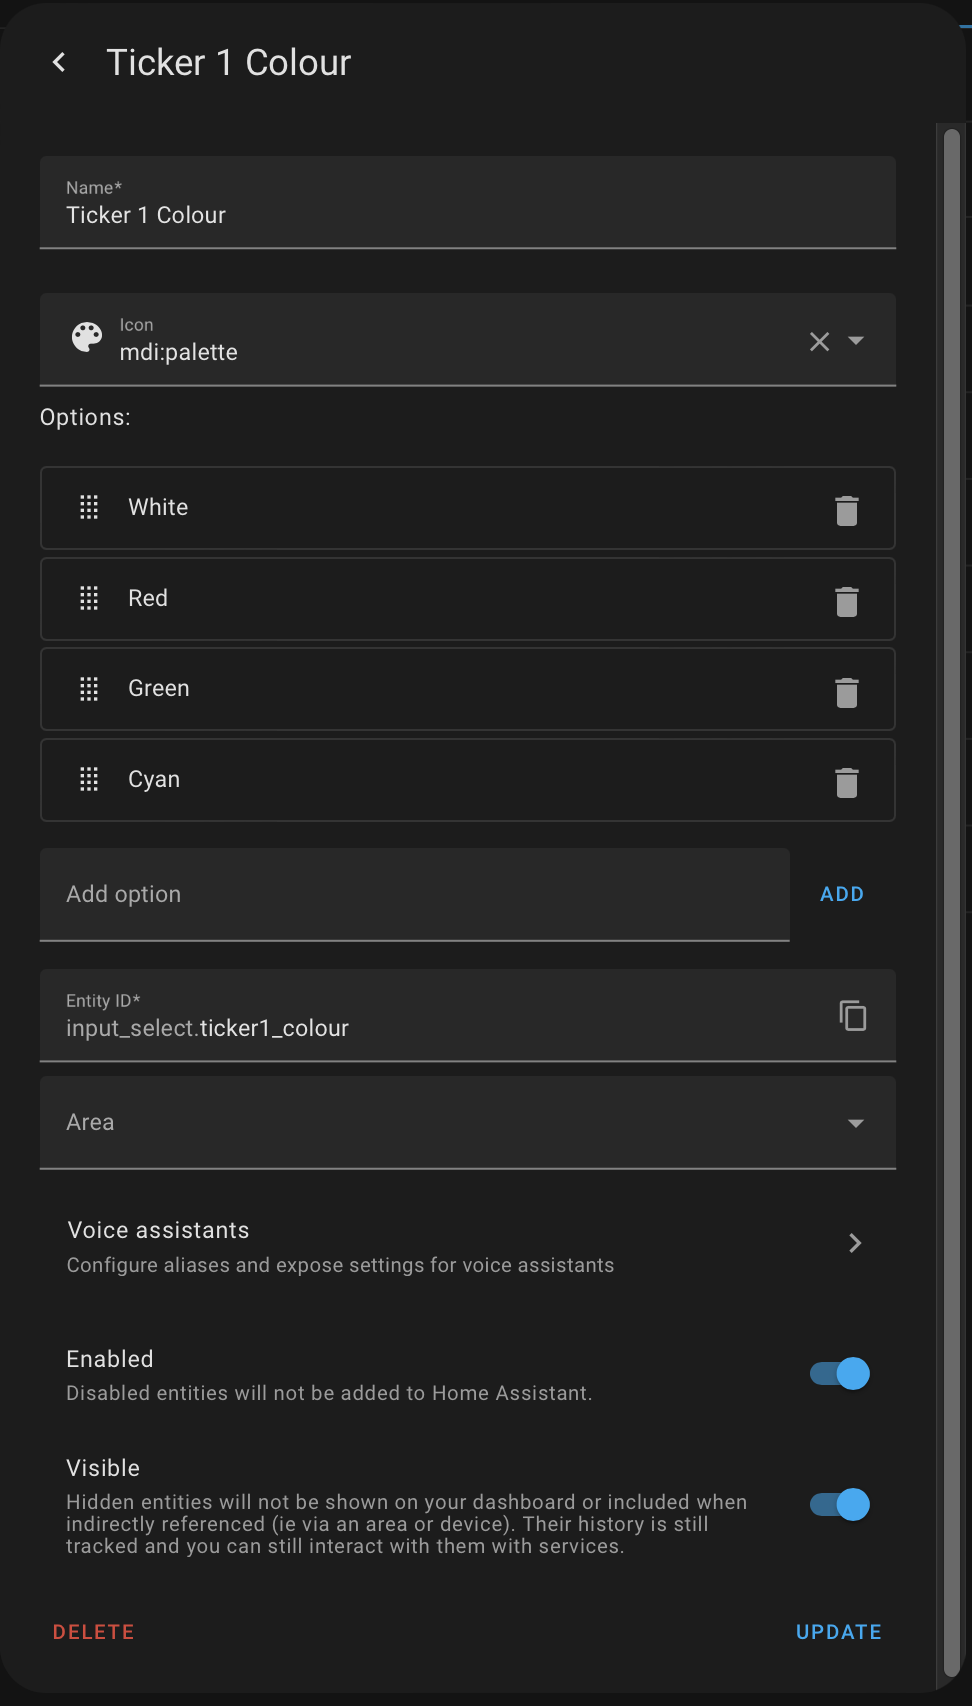
While colours could also have been defined as separate RGB integers, limiting the number and making them available by name simply makes things easier to use in general - but you could amend to that approach if you know your RGB triplets particularly well.
Test Helpers
If you were looking closely at that list of ticker helpers, you may have spotted a couple of ‘test’ ticker helpers at the bottom of the list. One for colour, and one for text. But not one for time.
These are set up in exactly the same way as the others, and were created to allow me to do some testing when developing this configuration.
They are entirely optional, but I will come back to them below to explain a particular piece of functionality.
Helper Display
With the helpers defined, they can then be added top a dashboard like any other entities.
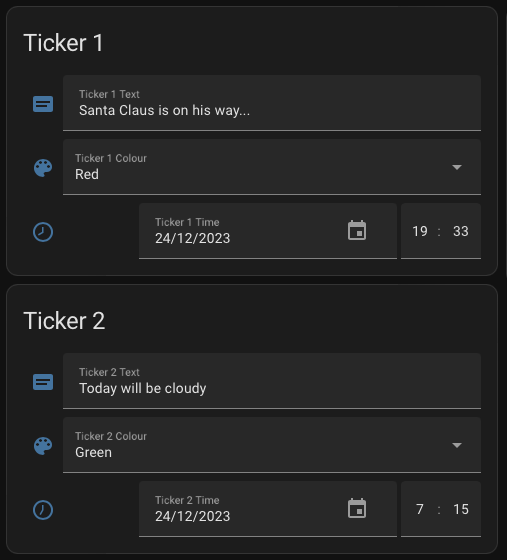
Here is the YAML definition for the stack
type: vertical-stack
cards:
  - type: entities
    entities:
      - entity: input_text.ticker1_text
      - entity: input_select.ticker1_colour
      - entity: input_datetime.ticker1_time
    title: Ticker 1
  - type: entities
    entities:
      - entity: input_text.ticker2_text
      - entity: input_select.ticker2_colour
      - entity: input_datetime.ticker2_time
    title: Ticker 2
As the content in these fields is updated, the content will be updated on the ticker device’s display - the update frequency in the default configuration is 1 second, so if you left it as that, the updates should occur pretty swiftly.
This is great for manual updates and for a bit of testing, but that is not really what we are ultimately looking for here.
Pushing Information to the Display Like a Ticker
What we have so far is a small display with two entries, but I have been referred to it a few times as a ticker. This is because, like a ticker, I want to roll the messages.
I don’t mean in a loop. I do not push information frequently enough to warrant that. What I mean is like an original ticker tape machine. The message is printed, and the machine stops until the next one comes in and the prior message is pushed along.
What I wanted was the most recent message to appear at the top. When a new message, X, comes in, it immediately appears in the ticker 1 position at the top of the display. Some time later, message B comes in. Message A drops down to the ticker 2 position and message B takes the ticker 1 position. When message C comes in, message A is lost to the ether, message B moves into the ticker 2 position, and message C takes the ticker 1 position.
So how do we do that?
My solution was to create a script:
alias: Push Ticker
sequence:
  - service: input_text.set_value
    data:
      value: "{{ states('input_text.ticker1_text') }}"
    target:
      entity_id: input_text.ticker2_text
  - service: input_datetime.set_datetime
    data:
      datetime: "{{ states(\"input_datetime.ticker1_time\") }}"
    target:
      entity_id: input_datetime.ticker2_time
  - service: input_select.select_option
    data:
      option: "{{ states(\"input_select.ticker1_colour\") }}"
    target:
      entity_id: input_select.ticker2_colour
    enabled: true
  - service: input_text.set_value
    data:
      value: "{{ message }}"
    target:
      entity_id: input_text.ticker1_text
  - service: input_datetime.set_datetime
    data:
      datetime: "{{ now() }}"
    target:
      entity_id: input_datetime.ticker1_time
  - service: input_select.select_option
    data:
      option: "{{ colour }}"
    target:
      entity_id: input_select.ticker1_colour
    enabled: true
mode: single
icon: mdi:alert-box-outline
When called, the script automatically copies the ticker 1 helper entries into the ticker 2 helper entries (text, colour, and date/time). It expects two parameters when called, message, and colour. The ticker 1 helper entries for text and colour respectively get set to these. The ticker 1 date/time helper entry gets set to the current date and time.
This effectively carries out the push for the ticket - hence naming the script “Push Ticker”.
To be able to test this function, I created the ticker test entities I mentioned earlier. I created a dashboard card containing these helper entities for the text and colour, and a button to run a test script.
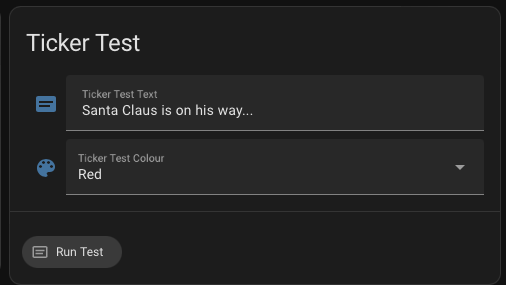
Here is the YAML for the card containing these three items.
type: entities
entities:
  - entity: input_text.ticker_test_text
  - entity: input_select.ticker_test_colour
title: Ticker Test
footer:
  type: buttons
  entities:
    - entity: script.ticker_test
      name: Run Test
The test script calls a service to run the Push Ticker script using the two test entity values as the data for the script.
alias: Ticker Test
sequence:
  - service: script.push_ticker
    data:
      message: "{{ states('input_text.ticker_test_text') }}"
      colour: "{{ states('input_select.ticker_test_colour') }}"
mode: single
icon: mdi:card-text-outline
If you wish to try it yourself, all you need to do is add the above to your own Home Assistant set up.
Clean Slate
One final addition I wanted was a way to quickly clear the contents entirely. This was not only useful for testing, but also for allowing me to reset the ticker at the start of each day.
The YAML definition for the script is as follows.
alias: Clear Ticker
sequence:
  - service: input_text.set_value
    data:
      value: ""
    target:
      entity_id: input_text.ticker2_text
  - service: input_datetime.set_datetime
    data:
      datetime: "1970-01-01 00:00:00"
    target:
      entity_id: input_datetime.ticker2_time
  - service: input_select.select_option
    data:
      option: White
    target:
      entity_id: input_select.ticker2_colour
    enabled: true
  - service: input_text.set_value
    data:
      value: ""
    target:
      entity_id: input_text.ticker1_text
  - service: input_datetime.set_datetime
    data:
      datetime: "1970-01-01 00:00:00"
    target:
      entity_id: input_datetime.ticker1_time
  - service: input_select.select_option
    data:
      option: White
    target:
      entity_id: input_select.ticker1_colour
    enabled: true
mode: single
icon: mdi:trash-can
Example Notification Uses
With all of the components now in place, what can be done with it? Well, there is no limitation here other than your own needs and imagination. But to help get you started, here are some examples of a few triggers I have:
A Home Assistant Update is Available
I don’t login to Home Assistant every single day. I prefer to drive action through triggered automations over dashboard interactions. Because of this I may not notice if there are any updates to be applied. For example, an update to the core Home Assistant.
It isn’t normally critical to apply these straight away, and so a notification via ticker gives me that gentle heads up on the update.
The automation looks like this.
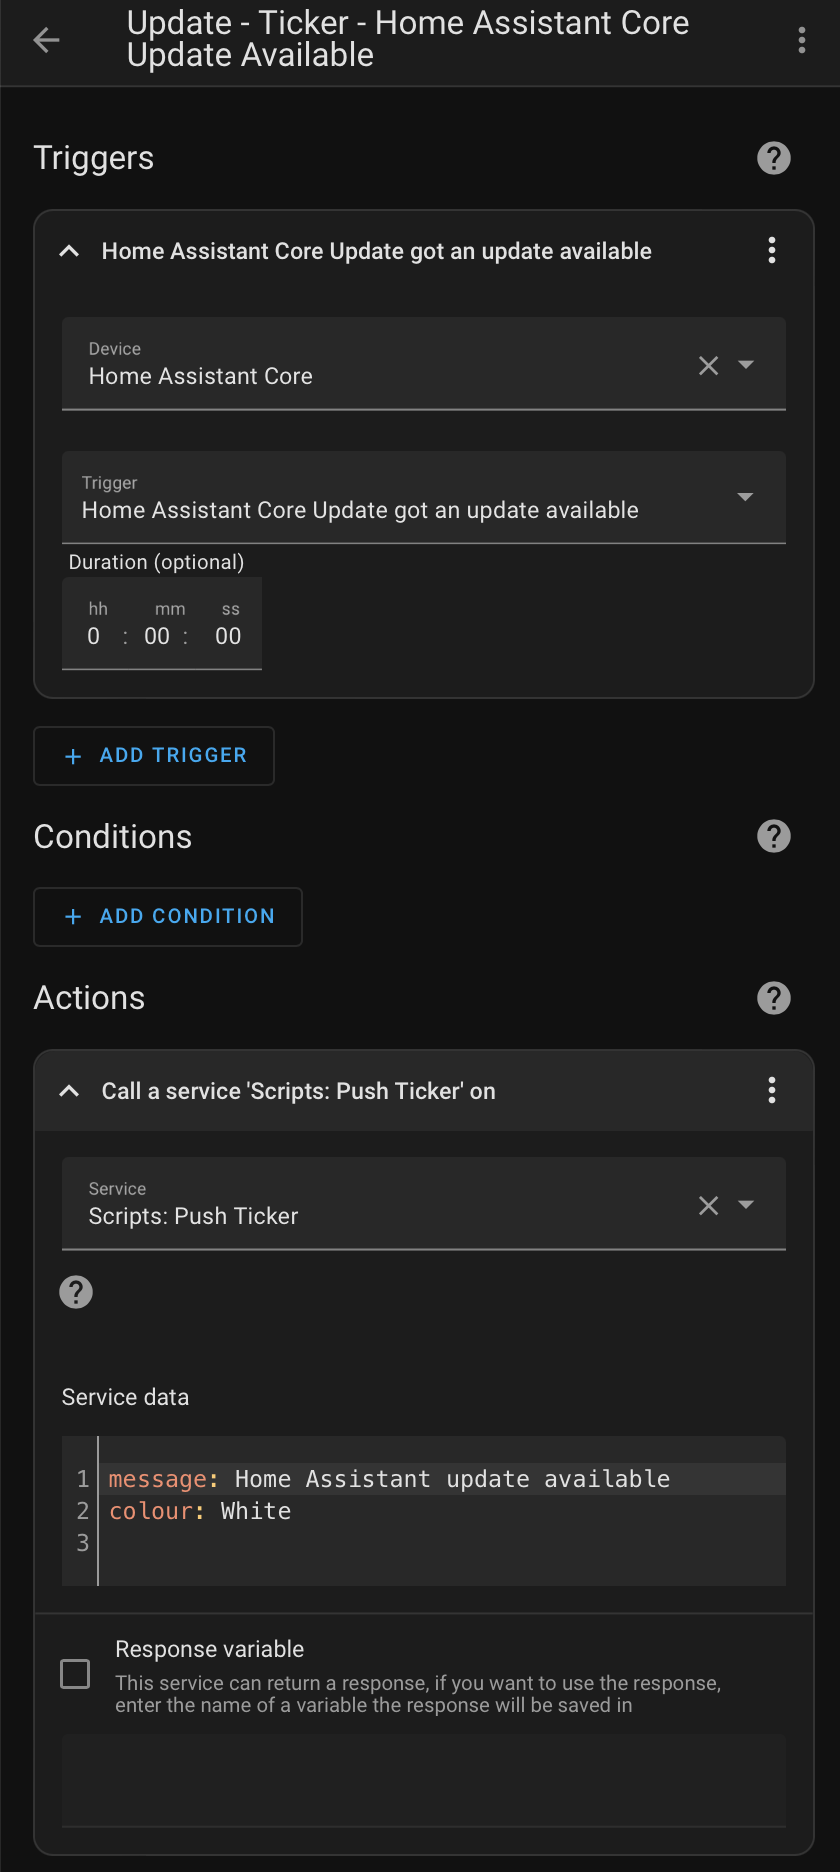
I also have similar automations for other updates related to and available via Home Assistant.
Daily Weather Outlook
Each morning, Home Assistant clears the tickers at about 5 AM, and then at 7:15 AM I pull the general weather outlook from the UK meteorological office’s forecast for the south of York where I live.
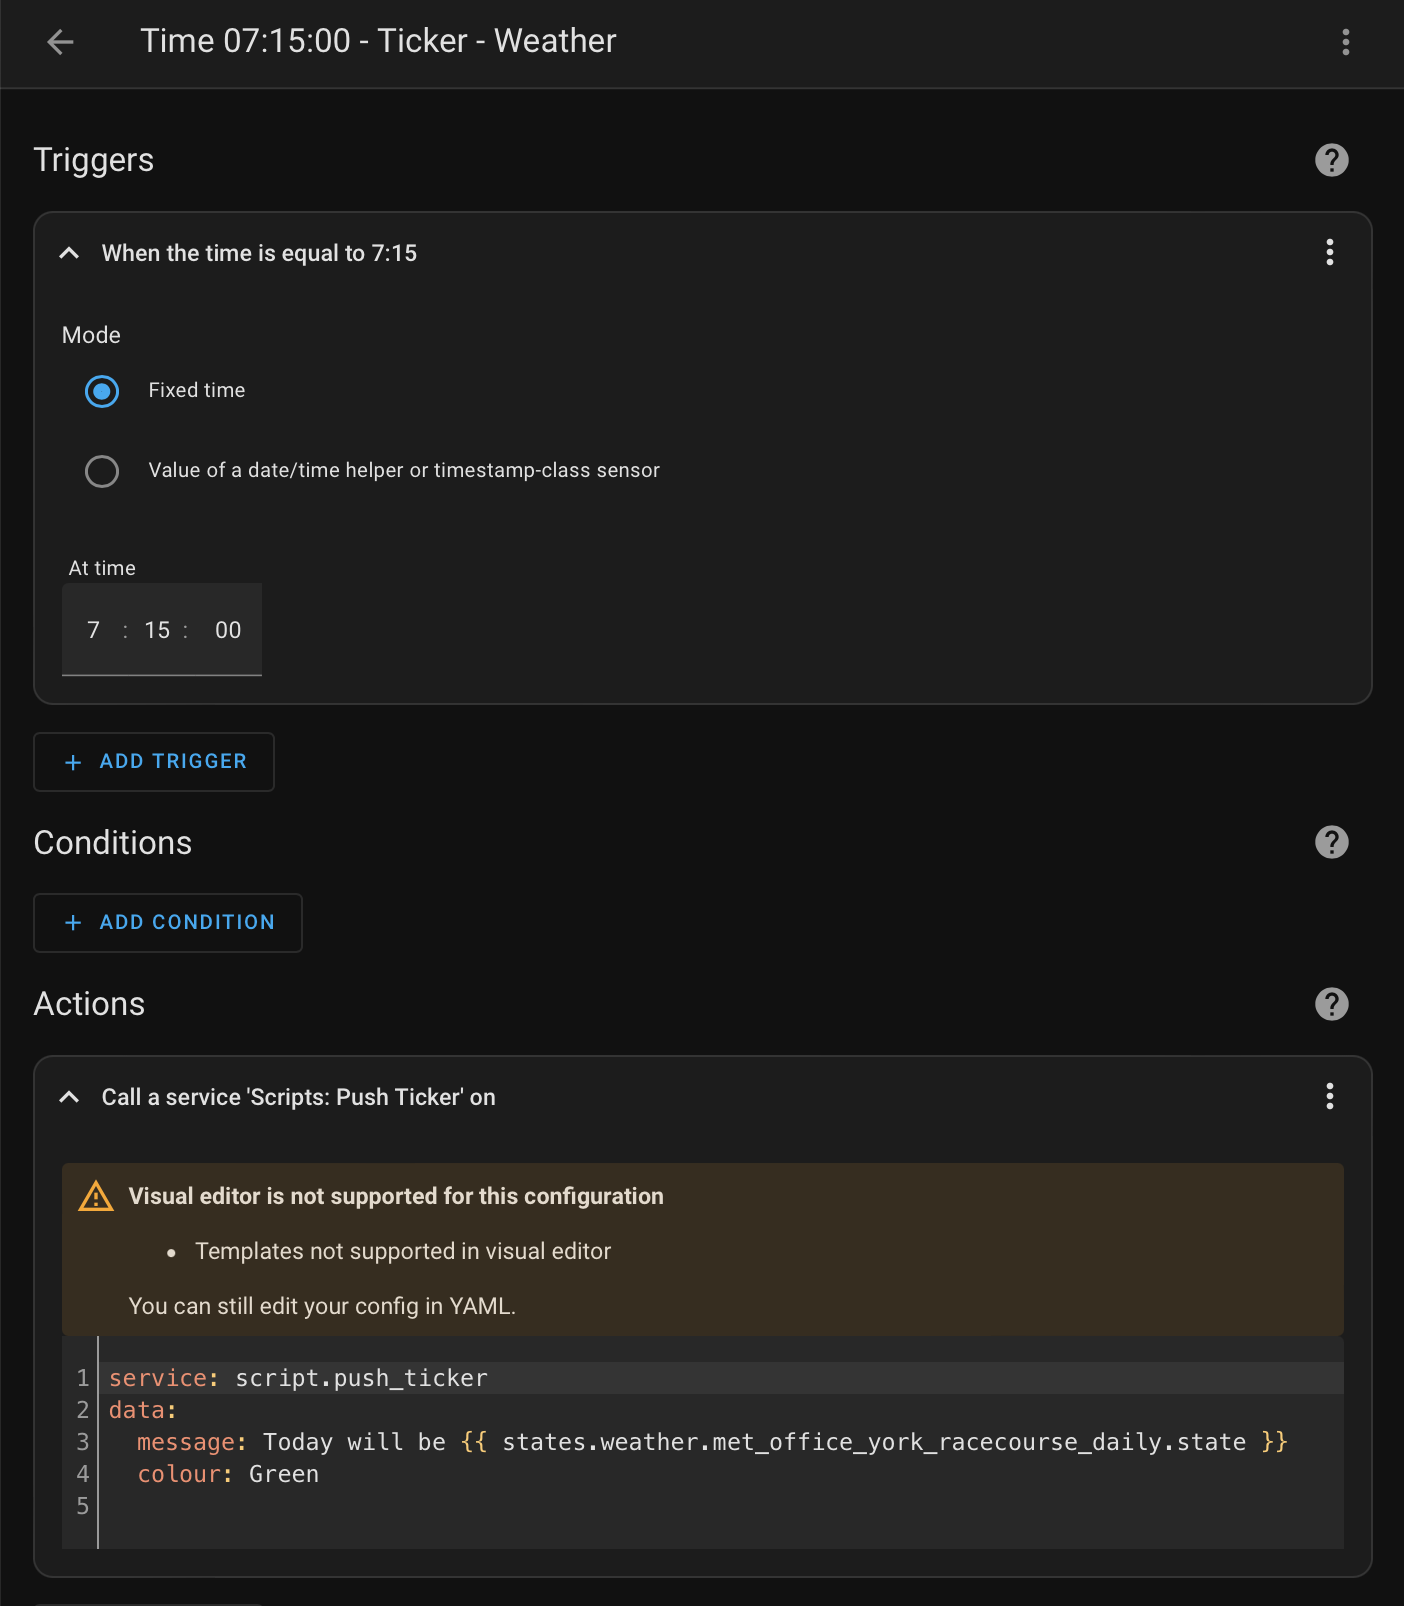
I actually get a more detailed weather from a weather station in the village where I live on York’s outskirts, but for a general outlook for the day, the MET Office daily state gives a good brief view of the primary type of weather to expect.
School Bus Stop
One of my children catches a school bus service each day to his school in the next town over. He has an iPhone, and while everyone in the family makes use of Apple’s “Find My” service to follow child and parent travels, I use a geo location trigger and the time of day to push a ticker update for my child’s location. That way I can get a confirmation he made the bus stop on time, or that he is back in the village safely without actively tracking his movement. It’s just a bit of extra peace of mind.
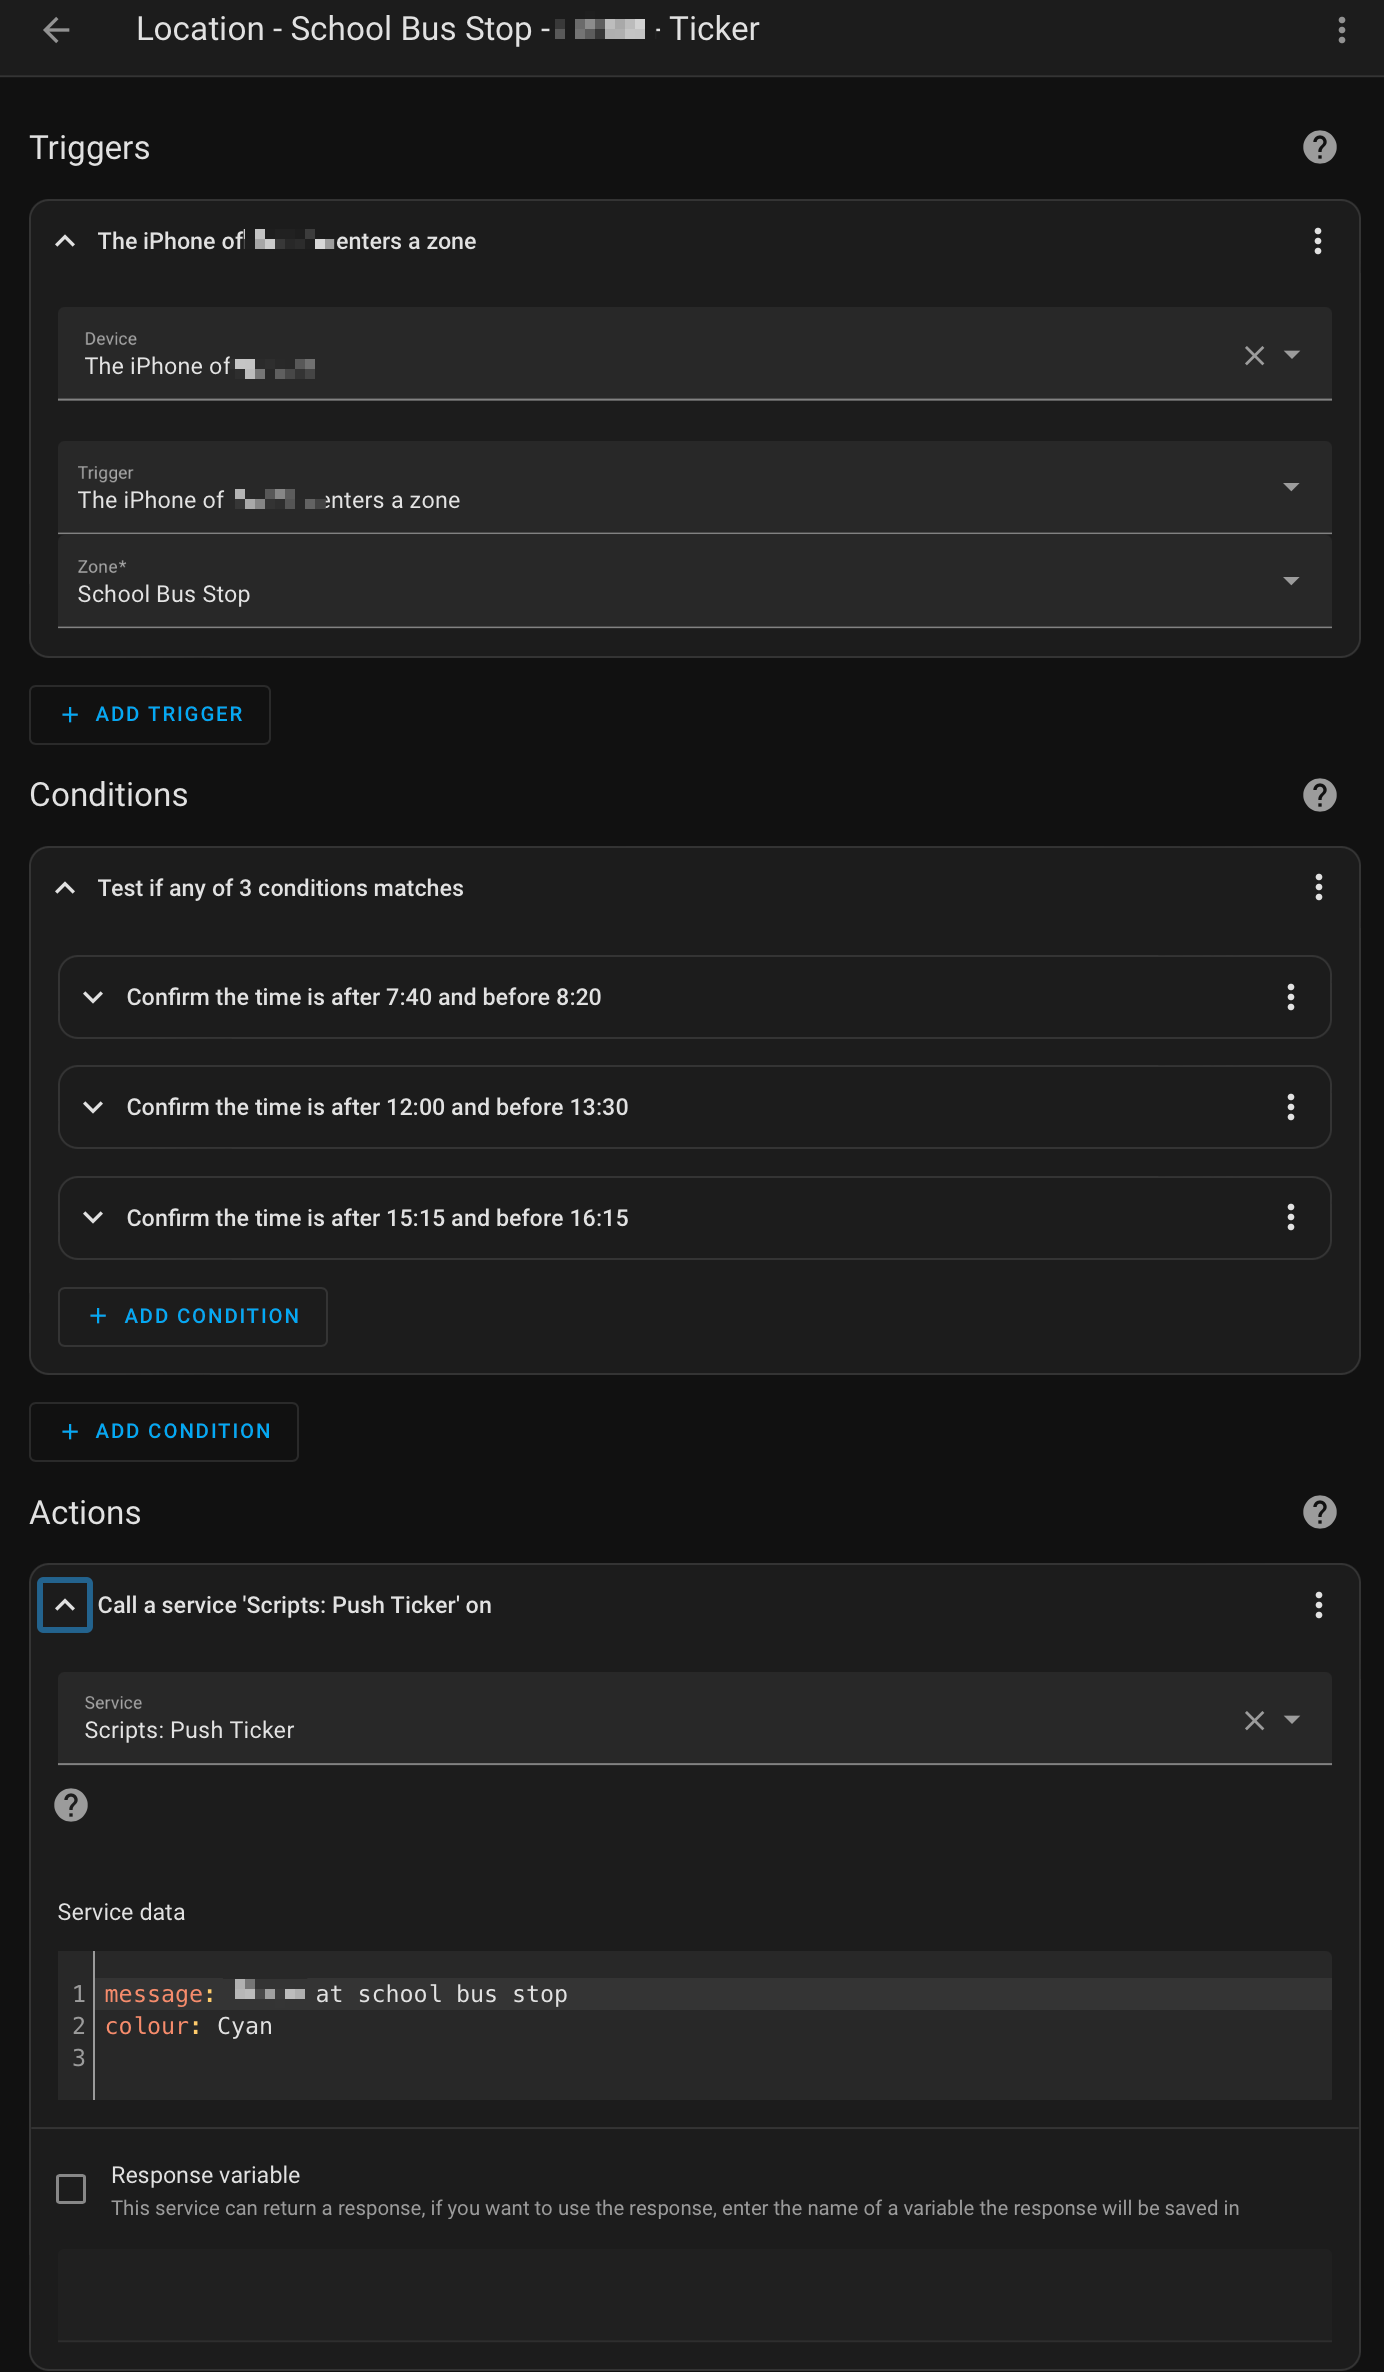
The inclusion of times means that during school breaks, it will reduce false positives (though I may also link it into a school calendar I have recently set up in Home Assistant for school day morning alarms), and there is a lunch time slot as occasionally special events mean the school just has half days and my son gets a return school bus at a lunch time rather than mid to late afternoon as usual.
Conclusion
A little more complex than the desk clock, this implementation utilises Home Assistant helper entities as well as the ESP32 device configuration. I have done what I can to break this down, and I’ve provided a small selection of example ticker update triggers to give you some inspiration of what could you could set up yourself.
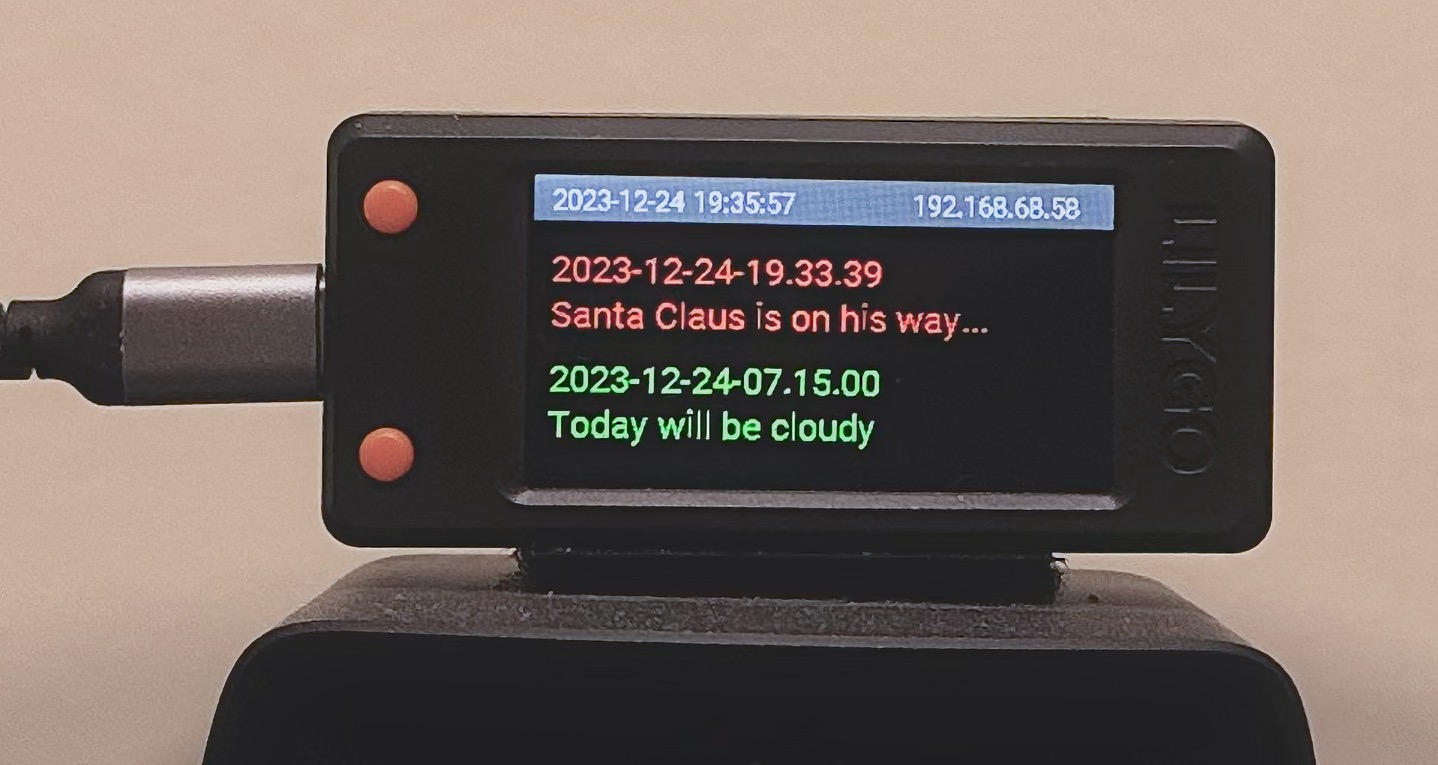
Zooming in on one of the earlier placement images, here we can see how the ticker looks after receiving a couple of pieces of information. You can also see the time and the IP address in the title bar.
Hopefully, you found the walk through interesting and the details valuable, if not for creating your own ticker, then in helping you understand how you might do something of your own using similar techniques and configurations.
Regardless of how it has helped you, I’d love to hear how you have used the details above and how it is benefiting you. The easiest way to do this is just to reach out on Mastodon.