A Drafts Workflow for Conferences
31 Mar 2024This past month I attended my first conference of the year. It was actually a forum of several hundred people, but I have a couple of other similar events coming up. A two day exhibition at the London Expo this coming month and an SAP HR event in May. At this first event all of the non-networking events were taking place in a single large room and I just captured everything on my phone and my work laptop. The next events however are going to be bigger venues with multiple locations for sessions, and even though my laptop is pretty light I’d like to travel lighter still. Dumping the laptop, spare USB C battery pack & cable and replacing them with my iPad and a keyboard (but keeping my iPhone) would be better.
To that end I set about coming up with a new workflow for capturing information at conferences.
Setting Out My Requirements
What I envisaged when embarking on finding a solution for this issue was that I would need to be able to capture content in a couple of different ways.
The first would be when I am in sessions, where I would find myself sat on some uncomfortable basic frame chair with no table and my iPad in my lap with a keyboard for capturing content. While my KeyChron K3 is my travel keyboard of choice, and is configured for use with my iPad, it isn’t suitable to use with the iPad on my lap. However, its predecessor was a Logitech K480 keyboard, which is bigger and incorporates a slot to put the iPad in - so that would form my data entry system.
However, in these sessions there are often sets of information being projected up on screens. Something from a slide deck, video, or system demo. For this data I want to be able to capture photographs. While my iPad does have a built in camera, I don’t want to be the guy waving an iPad in the air to get a photo of something. My iPhone is a much better size and has much better optics, so I would much rather use that
That effectively gives me the equivalent of what I already had with my work laptop and phone in combination. However, I also want to take it a step further. My photos and typed notes have been totally separate previously, but with my iPad and iPhone being in the same ecosystem, I can utilise things a little more easily. While I could have still done something with a locked down Windows laptop and my iPhone, my options were certainly much more limited and the automation and apps available on iOS & iPadOS give me easier ways to do more interesting things.
The second situation would be when I am talking to vendors or partners at booths, or chatting to colleagues as we huddle together on stools at a make shift coffee bar stand. These are not so easy scenarios to whip out an iPad and take notes, but jotting a few key prompt notes on my iPad and then expanding them later on my iPad is something much easier to pull off.

Capturing Notes
Previously, I have captured my content to Obsidian, and since that is cross platform, that might seem like an ideal choice. However, I tend to keep my Obsidian lean on images and massively focused on text, so the images I captured on my phone in the past would always sit in a separate silo, and cross referencing them to get details out of would be a to do that often never found itself the priority to be done as it meant sorting and sifting. And so I decided for this solution I would use Drafts.
Now that probably sounds like I have things switched around a little there. Drafts is a plain text only app (no images possible), so why on earth would anyone pick that over Obsidian, which supports including the images?
Well there are actually a number of reasons for this.
- The mobile experience for Drafts is much better than the mobile experience for Obsidian.
- Drafts’ raison d’être is quick capture, and Drafts is really fast at this.
- I find it easier to tailor Drafts with custom actions and automations than I do Obsidian - if you have read my Obsidian posts and Drafts posts you will know I can do both, but Drafts is quicker for me to build things in.
- While Drafts cannot show image content inline, it can show them in preview.
There’s no reason the workflow could not be translated to Obsidian, but for me, it makes more sense to base all of the capture around Drafts and then when I’ve finished prepping everything into primarily text-based notes (with additional Mermaid diagrams and the occasional image), I can push it out into Obsidian to cross-reference into my daily note for that day and any other relevant notes.
Taking a Photo
To date, I have been snapping photos with the standard iOS camera app. I have previously used an app (I can’t even recall the name of it) that was for document and whiteboard scanning, but this sometimes didn’t cope so well for being in an audience a ways back with heads creeping into shot, or for system demos. The one downside I wanted to address from this was that I was siloing these photographs off. Away from the notes.
To address this I decided I could build an Apple Shortcuts shortcut. I could use it to take a photograph and place it somewhere Drafts could reference it. Doing this was relatively straight forward. I could use a Take Photo action, to capture the photograph and then save it out to a folder where Drafts could access it. Since I have iCloud sync enabled on both my iPhone and iPad, this felt as though it would be pretty trivial to do.
However, there were a couple of limitations.
The first was one I had simply not been aware of, but at some point in a previous release, Apple had withdrawn the ability to use a volume control button to take a photograph with the Take Photo action. It still works with the camera app, but not with this action in Shortcuts. This seems to be something I’ll just have to deal with and use the on screen shutter button like an animal.
The second one is something I knew coming in. Internet connectivity at events is poor. Wifi and cellular data bandwidth is flooded due to high volumes of people and devices. Some large venues have so much metal in their structure that they form giant Faraday cages forcing everyone onto the wifi and making it even worse. This meant that it could take several minutes for a photograph to sync from my iPhone to my iPad and so my solution would need to cater for that.
i.e. I can’t sit for 10 minutes waiting for the shortcut to update a draft, save a photo, sync them both up to the cloud, then wait for my iPad to sync them down, all before I start adding more notes to the draft I am working on.

Tackling the Sync Limitation
The way I decided to tackle this sync challenge was two-fold.
First I wanted to minimise the amount of data I needed to sync. Because I write in Markdown in Drafts, all I really need to know is what the image file is called. Then I can create a Markdown image link for the location it is stored in.
Second, I didn’t want to necessarily get bogged down waiting for something to sync if at that moment it was important to capture a bit of information on the iPad by typing it in.
To tackle the first one, all I needed was to identify how to get a small amount of data quickly from my iPhone to my iPad, and for the second it would simply be a case of allowing me to choose when to update the draft with the image link so I could choose the right moment. At least that’s what I though was all that was required. It turns out reliability was also a key factor for the first aspect.
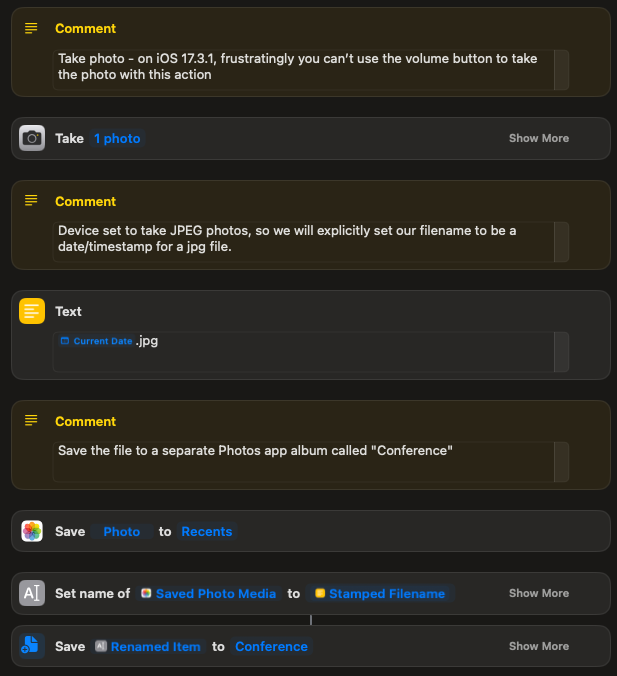
In Apple Shortcuts, it was a straight forward task to take a photograph, squirrel a copy away into a separate album in photos (as a backup and for easy sharing on), and to save it to a file in iCloud in Drafts’ /Documents/Library/Previews/images/ directory structure, where it can then be accessed by draft previews. I actually chose to save it in a Conferences subfolder to help manage the various images I keep in this area. I used a date/timestamp to uniquely name the file and give me a way to very easily confirm a chronological ordering.
To get the filename from the iPhone to the iPad I first of all tried the clipboard. I regularly copy and paste between devices, so I knew this was an easy choice. I tried it a few times and it worked fine. Until it didn’t.
To make accessing the shortcut easy, I have created a lock screen to use at conferences. It incorporates a shortcuts lock screen widget that runs my ‘Conference Camera’ shortcut. Now, it turns out that the background sync of the clipboard is not all that reliable if your device is locked. The shortcut will still run to completion (I added a Vibrate action to the end of the shortcut for some tactile feedback on this), but it won’t necessarily sync that clipboard change across devices.
I needed something more reliable.
The next approach was to use Drafts. I decided to try creating a new draft to have that data sync across via Drafts. This turned out to be more reliable than the clipboard sync. However, both are based on Apple’s iCloud based sync architecture and neither proved to be reliable enough. Apple is abstracting so much away and controlling things to optimise factors such as battery life and you just get to sit back and let them handle it. Which is great, until you get to a point where you need more control. Where you need to dictate the priority.
At this point I was able to rule out many other solutions, like Data Jar and writing direct to a file in iCloud Drive. They would ultimately all be constrained by my inability to override Apple’s control. This meant I had to start looking at other data stores outside the Apple ecosystem.
I ruled out storage providers like Dropbox and Google Drive as I know from past experience they tend to be slow. I did consider choosing something hosted on my local network that I could tap into remotely, but that was likely to be as slow if not slower. in the end I decided to use a bit of a sledgehammer option. I decided to use an online database to hold one filename.
Airtable is an online database system with a simple REST API I could access from Shortcuts, inbuilt integration in Drafts, and a free tier of usea free tier of use. Overkill, and yet ideal.
I created an Airtable ‘base’ (their terminology for a database) and a table to hold the filename. I then modified the shortcut to save the filename to the table in the base. As part of doing this I needed to create a Personal Access Token1, which I have then stored in a Data Jar variable so I can share my shortcut without “the access key”, and also reuse it in other shortcuts in the future.
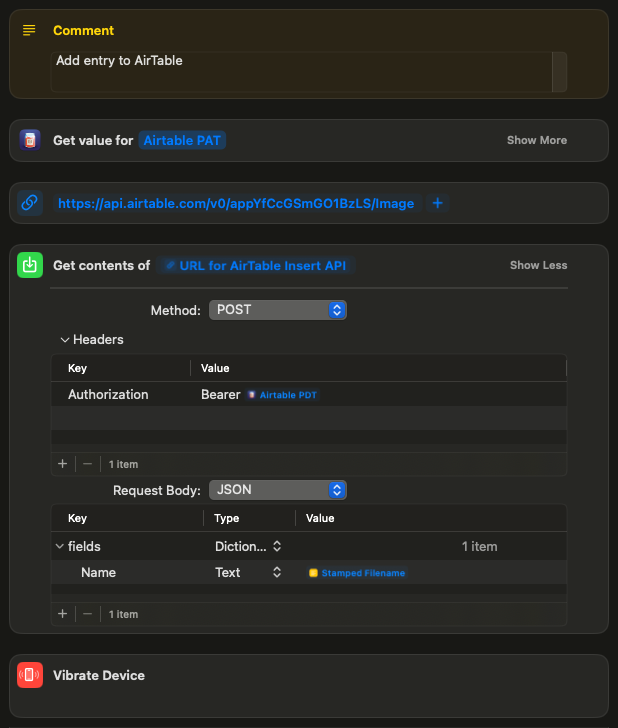
This has been reliable. As long as I have an Internet connection, my iPhone will always update Airtable when the shortcut is run from the lock screen.
One thing I will note is that the first time you run the shortcut it needs to request permissions. This needs to be done with the iPhone unlocked. After the permissions have been given, the shortcut will be able to run when the phone is locked.
You can download a copy of my shortcut to study it or to use as the basis for your own similar workflow.
⬇ Download Shortcut: Conference Camera
Setting Up My Drafts Workspace
Before we get to inserting the images into a draft, I’ll describe a little about the Drafts workspace I set up.
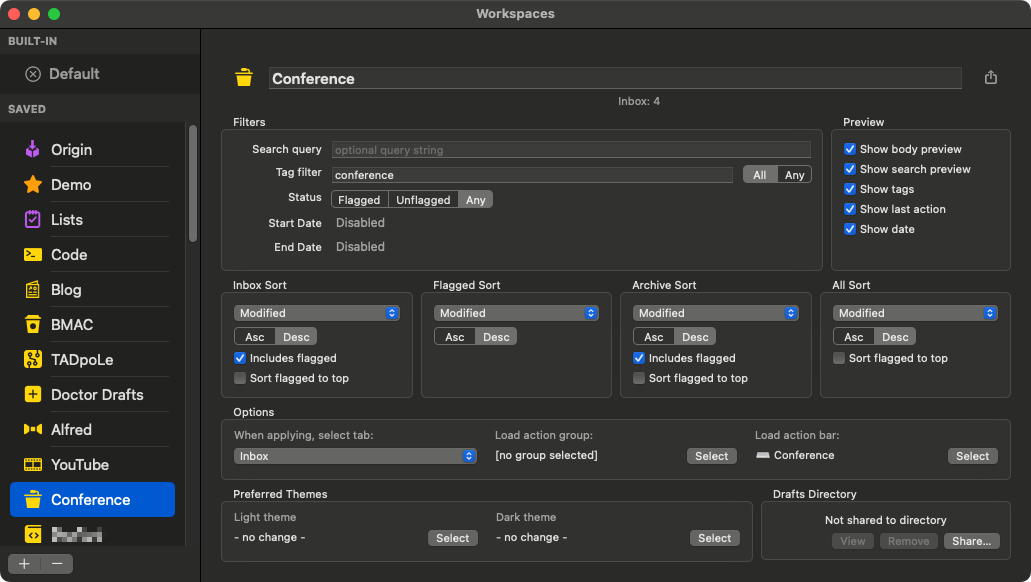
The workspace is unsurprisingly named “Conference”, and I have set it up to list drafts tagged “conference”. Notably, I have also set it to load an action group into my action bar. The group is called “⌨️ Conference”.
All of my action bar only action groups are prefixed with a keyboard emoji to help me distinguish them in a list. Since I potentially want to be able to capture notes on my phone for the conference and I may have both a draft and a preview open at the same time on my iPad, I wanted to ensure I had access to the core functionality in as little on screen space as possible. This also gives me the advantage of being able to switch around through a variety of other powerful action groups I have, and this is a common approach I have for my workspaces in general.
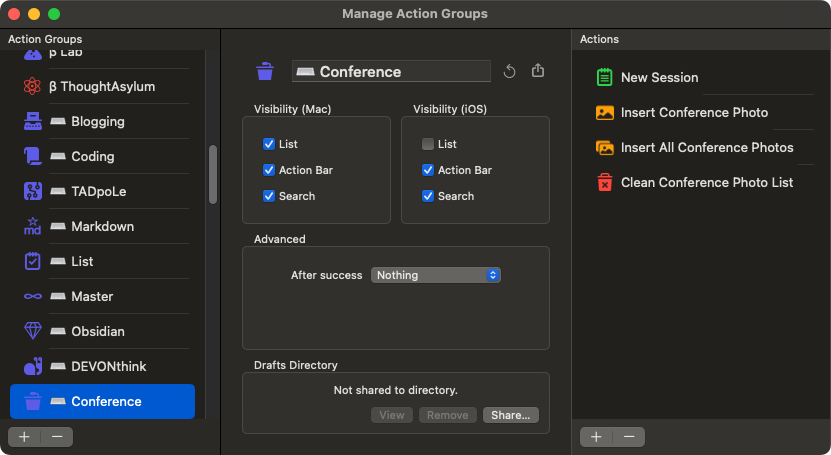
I consider the ⌨️ Conference action group a work in progress, but it currently has a handful of actions.
Drafts Actions
New Session
The first action in the action group is “New Session”. This will create a new draft for me for a conference session. It first prompts me for the title of the session. The text entered is then prefixed by a single octothorpe (to identify it as a level one Markdown heading),followed by a datestamp for the current date.
e.g. entering “Drafts 101” would generate “# 2024-03-31 Drafts 101”.
A new line is appended, and then a new draft created with this as the content, tagged with “conference”, and is loaded into the Drafts editor.
As a convenience I also added a script step to place the cursor at the end of the draft ready to start taking notes straight away.
⬇ Download Drafts Action: New Session
Insert Conference Photo
This action is predominantly a script step that utilises Drafts’ built in Airtable functionality. It does however also rely on some code in my TADpoLe library, so if you have not already downloaded the incredibly popular core ThoughtAsylum action group, you should do so before working with this action as it is a pre-requisite.
The main script is shown below. The expectation is that only one filename record will be available in Airtable, and so it will display warnings or errors if it does not find an entry or if it finds too many entries. When it finds just one, it will build a Markdown link based on it, insert it into the draft at the current cursor position, and place the cursor immediately after the link. Once inserted, the action deletes the filename from Airtable.
// Initialise
const BASEID = "appYfCcGSmGO1BzLS"
const TABLE = "Image"
// Get image link from Airtable
let at = new Airtable()
let recImage = at.listRecords(BASEID, TABLE);
// No records
if(recImage.records.length == 0) app.displayWarningMessage("No image data available");
// One record
if(recImage.records.length == 1)
{
// Insert the link
editor.TA_insertTextPosAtEnd("");
// Delete the entry in Airtable
let atSettings = {};
atSettings.url = `https://api.airtable.com/v0/${BASEID}/${TABLE}/${recImage.records[0].id}`
atSettings.method = "DELETE";
let respAT = at.request(atSettings);
if (respAT) console.log(`${recImage.records[0].id} deleted from ${BASEID}/${TABLE}`);
else context.fail(`Error deleting ${recImage.records[0].id}from ${BASEID}/${TABLE}`);
}
// More than one record
if(recImage.records.length >=2) app.displayErrorMessage("Too many matches!");
If you wanted to use this action yourself, you would need to modify the BASEDID and the TABLE to match your own set up in Airtable, and when you first run an Airtable-enabled action, you will be prompted top authenticate.
⬇ Download Drafts Action: Insert Conference Photo
Insert Conference Photos
It occurred to me that sometimes when I take photos I might actually need to take a few in fairly rapid succession, or I might take a few photos of some printed materials when walking the floor.
For these instances I created a modified version of the previous action. This action does the same thing, but outputs the photo links in order (fortunately Airtable orders in sequence by default which made things easy) with blank lines between them.
Again, it has the core ThoughtAsylum action group as a prerequisite.
// Initialise
const BASEID = "appYfCcGSmGO1BzLS"
const TABLE = "Image"
// Get image link from Airtable
let at = new Airtable()
let recImage = at.listRecords(BASEID, TABLE);
// No records
if(recImage.records.length == 0) app.displayWarningMessage("No image data available");
// More than one record
if(recImage.records.length >=2)
{
// Insert all of the links
let astrContent = [];
recImage.records.map(recImage => astrContent.push(""));
editor.TA_insertTextPosAtEnd(astrContent.join("\n\n"));
// Delete each entry in Airtable
recImage.records.map(recRow =>
{
let atSettings = {};
atSettings.url = `https://api.airtable.com/v0/${BASEID}/${TABLE}/${recRow.id}`
atSettings.method = "DELETE";
let respAT = at.request(atSettings);
if (respAT) console.log(`${recImage.records[0].id} deleted from ${BASEID}/${TABLE}`);
else context.fail(`Error deleting ${recImage.records[0].id}from ${BASEID}/${TABLE}`);
});
}
⬇ Download Drafts Action: Insert Conference Photos
Clean Conference Photo List
The last conference workflow specific action I have created so far is one I used during testing, and where I could see a possible need in a real world scenario. I have seen several presentations where it looks like everything on a slide has been revealed (so you take a snapshot), only to reveal some additional critical element (so you take another snapshot).
I could insert all photos and then delete one, but instead, and again because it helped me in testing, I created an action to clear down the filename list in Airtable to just leave the most recently added filename.
If you have one or more filenames in Airtable when this action is run, then at the end you will have just one, ready for inserting when you are ready to do so.
// Initialise
const BASEID = "appYfCcGSmGO1BzLS"
const TABLE = "Image"

// Clear down all images bu the last one
let at = new Airtable()
let recImage = at.listRecords(BASEID, TABLE);

// No Processing required
let intCount = recImage.records.length;
if(intCount == 0) app.displayWarningMessage("No need to clean up - no images found");
if(intCount == 1) app.displayWarningMessage("No need to clean up - one image found");

// Processing required = last image will be the last one in the array
if(intCount > 1)
{
	// Delete all but the most recent entry in Airtable
	recImage.records.slice(0,-1).map(recRow =>
	{
		let atSettings = {};
		atSettings.url = `https://api.airtable.com/v0/${BASEID}/${TABLE}/${recRow.id}`
		atSettings.method = "DELETE";
		let respAT = at.request(atSettings);
		if (respAT) console.log(`${recImage.records[0].id} deleted from ${BASEID}/${TABLE}`);
		else context.fail(`Error deleting ${recImage.records[0].id}from ${BASEID}/${TABLE}`);
	});
	app.displayInfoMessage(`Removed ${intCount - 1} records of ${intCount}`);
}
⬇ Download Drafts Action: Clean Conference Photo List
Conclusion
I am sure I will make some revisions to this as I put it into practice, but I thought that there were a few interesting things here worth sharing and that it would make an interesting.
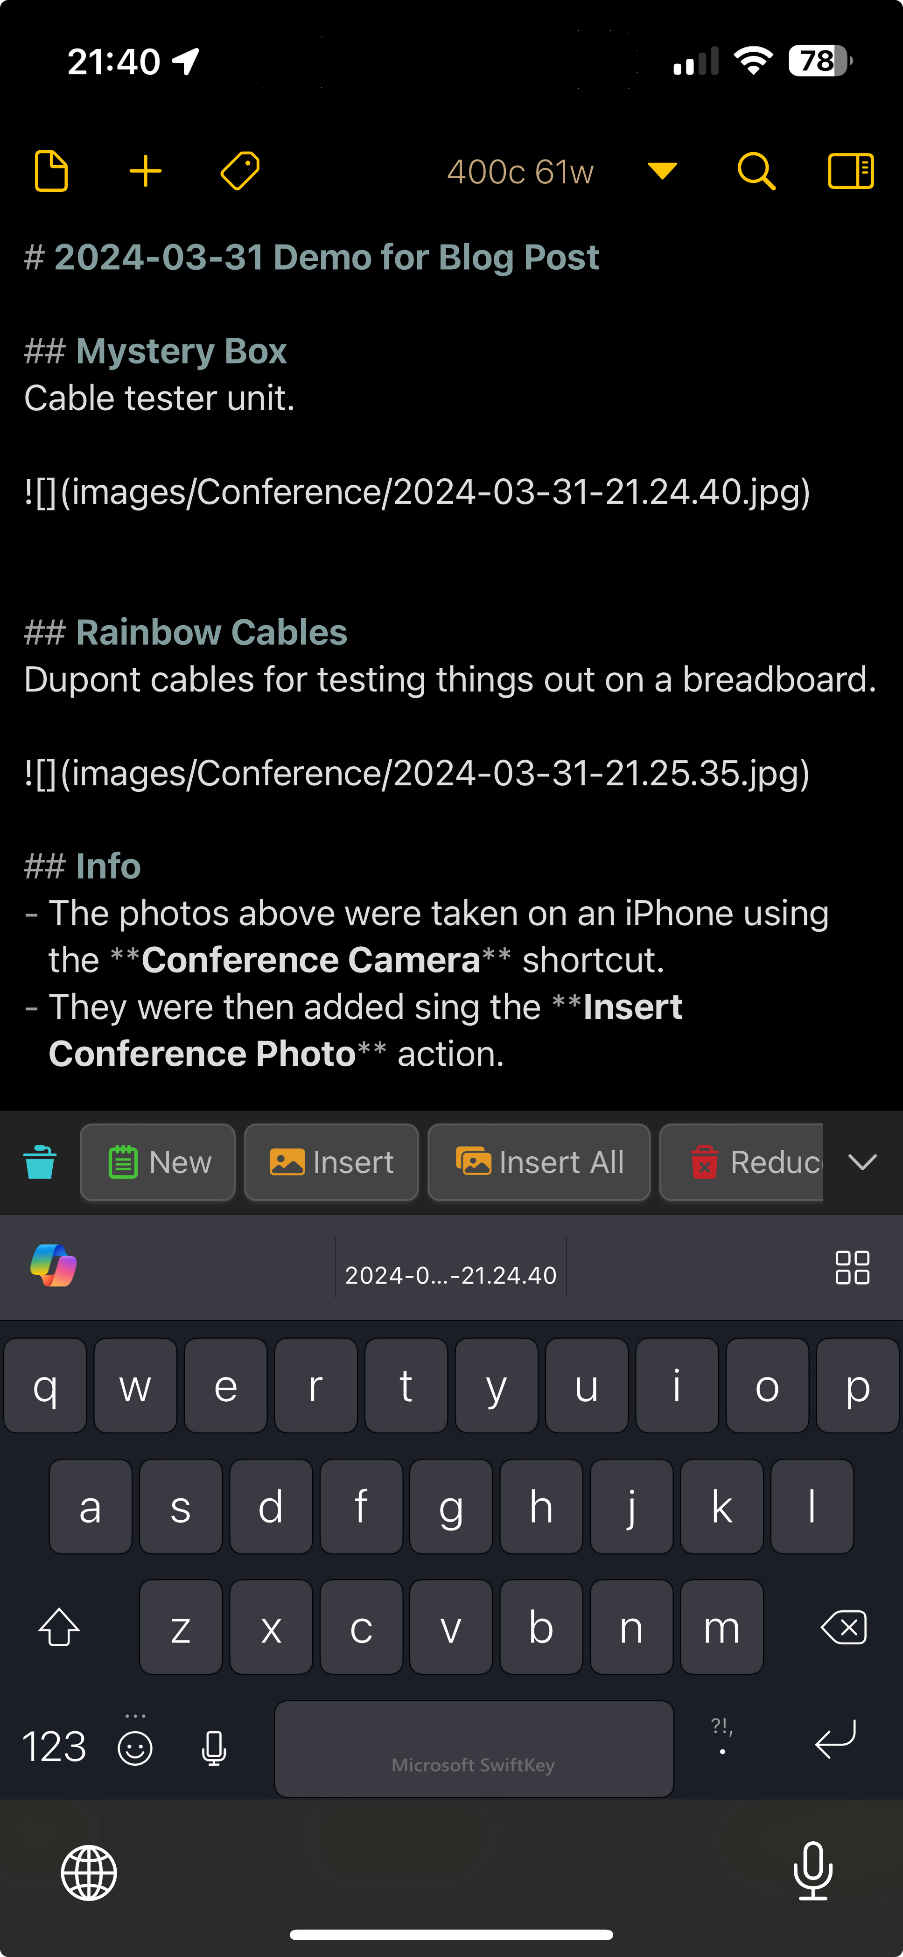
To round things out, here is how it looks on my iPad.

You can see in the bottom left how the action bar appears, and on the left side, the draft being edited and on the right the preview of the draft.
On the iPhone we obviously have even less screen estate available, but I am still able to get my action bar buttons in view for those bits of editing on the go around a conference.
Would this workflow work for you? What would you change or do entirely differently?
This is a new workflow for me that I haven’t had chance to try in the wild yet. so if anyone has any suggestions, why not shoot me a ‘toot’ over on Mastodon, where I post as @sylumer@mastodon.social, with your ideas?
-
Equivalent to an API key for use with the API - though it supersedes Airtable’s original API key usage. ↩