PowerPoint - Seamless Switchboard for Non-linear Presentations
26 Apr 2024All of my jobs have involved me communicating information to people during presentations, and during the last decade I have regularly found myself building out non-linear slide decks in Microsoft PowerPoint. These are slide decks that bring together multiple sets of small ‘micro’ presentations on a very narrow and specific topic. I can then use the slide deck to cover any of these topics in any order via a ‘switch board’ slide that simply lets me jump out to these presentations in any order I choose.
I have found this type of deck invaluable for workshops, training sessions, and ad hoc meetings. Being able to jump around seamlessly makes things easier for me and looks slick and professional too. In this post I am going to set out my approach in setting up this sort of slide deck.
A Worked Example
Usually I leave my worked examples to the end of the post, but this time, I think it is more useful to get it right at the start. You can download it from the link below.
⬇ Download PowerPoint Slide Deck: Example Switch Board Deck
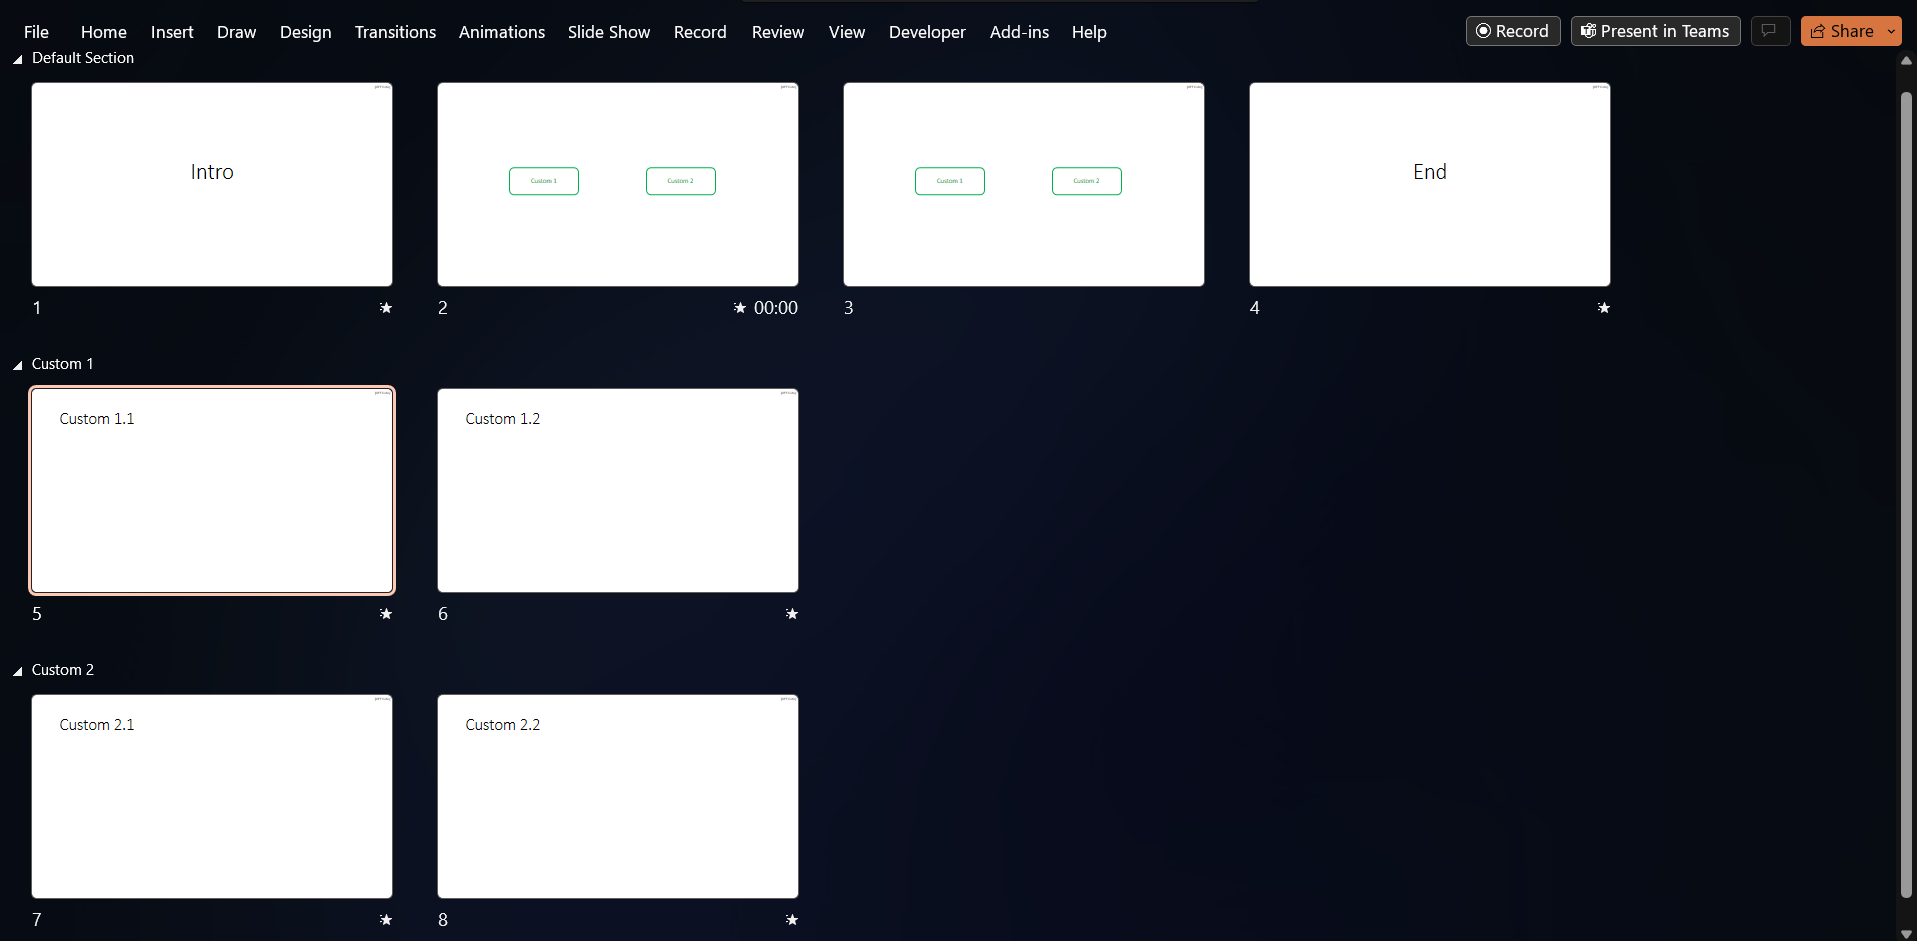
This example slide deck consists of eight slides that I have grouped into three sections to help delineate between the “main” switch board presentation and the two micro presentations.
- An introduction slide.
- Switch board launcher slide.
- Switch board slide.
- An end slide.
- The first slide for the first micro presentation.
- The second slide for the first micro presentation.
- The first slide for the second micro presentation.
- The second slide for the second micro presentation.
Configuring a Micro Presentation
As you may have already guessed from the section names, the two micro presentations (slides 5-6 and slides 7-8) are set up as custom presentations, and this really is the core functionality to be able to structure the whole slide deck to support non-linear presentation.
While technically I can jump to any slide I like by keying in the slide number and pressing the enter key, this is an overhead you do not want as a presenter to have to remember entry points. That is where the switch board and the custom presentations come into play. The switch board simply allows you to jump out to a custom presentation.
Okay, there is a little bit more nuance to it than that, but that is why I’m documenting it in this post.
The first step in setting up a custom slide show is to select the Custom Slide Show button on the Slide Show tab in the ribbon. This will allow you to trigger any existing custom slide shows by selecting their name, but you can also select the final option of Custom Shows… to amend or review the set up of any existing custom shows, or create a new one.
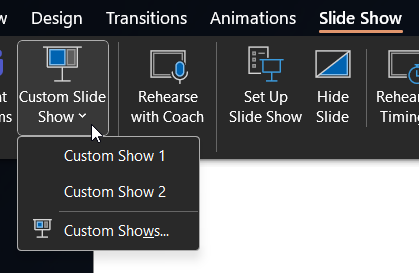
The options for this are self explanatory, but if we edit the first custom slide show, we can see what it contains.

As you can see in the screenshot below, the custom show actually contains three slides. This is obviously one more than the above notes on the slides might have suggested.
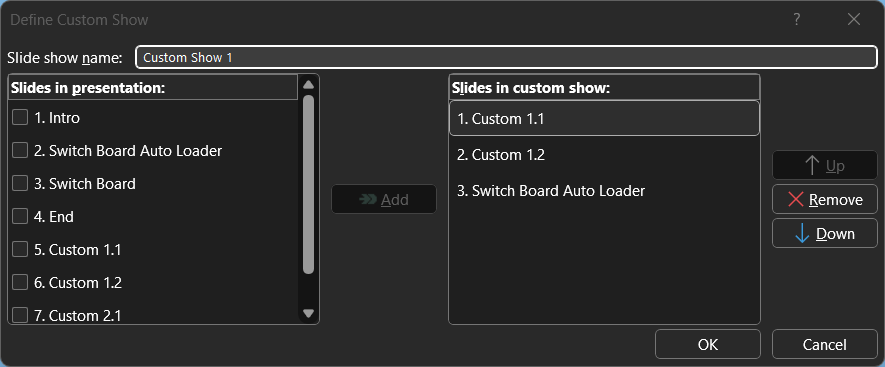
The first two slides are the slides that make up the micro presentation, but the third slide is actually the second slide of the main presentation, the switch board launcher slide. I will go into more detail about this later as this was the change that I made this past year that addressed something that had been bugging me since I started working with non-linear slide decks like this.
The second custom show is set up in exactly the same way, with its two slides, and the same switch board launcher slide as the final slide.
Set Up The Main Presentation
For the custom slide shows to work, the slides have to remain unhidden, so when we get to the last slide in our main presentation (slide 4), we don’t want PowerPoint to be able to advance to the next slide, slide 5, the first slide in the first custom show. Fortunately, PowerPoint lets us configure this quite easily.
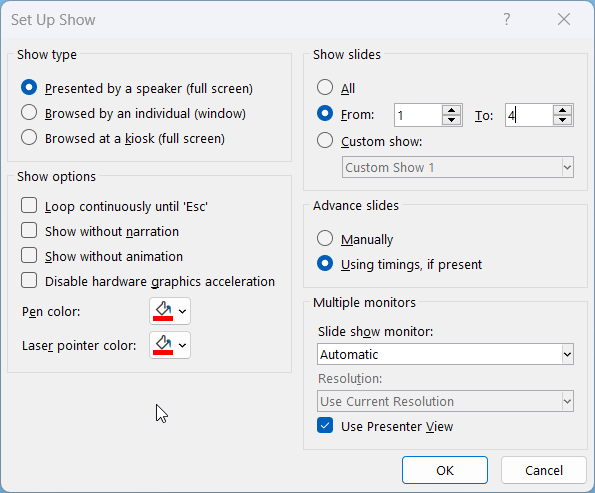
On the Slide Show tab of the ribbon, there is a Set Up Slide Show button.
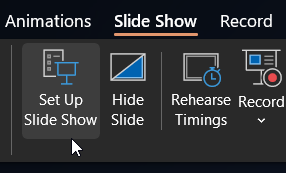
Selecting this displays a dialog box, and here we can set which slides we want to use for our main presentation. Setting this to be slides 1-4 stops PowerPoint from including any of our custom slides in the presentation; until they are displayed explicitly via a custom slide show.
Switch Board Set Up
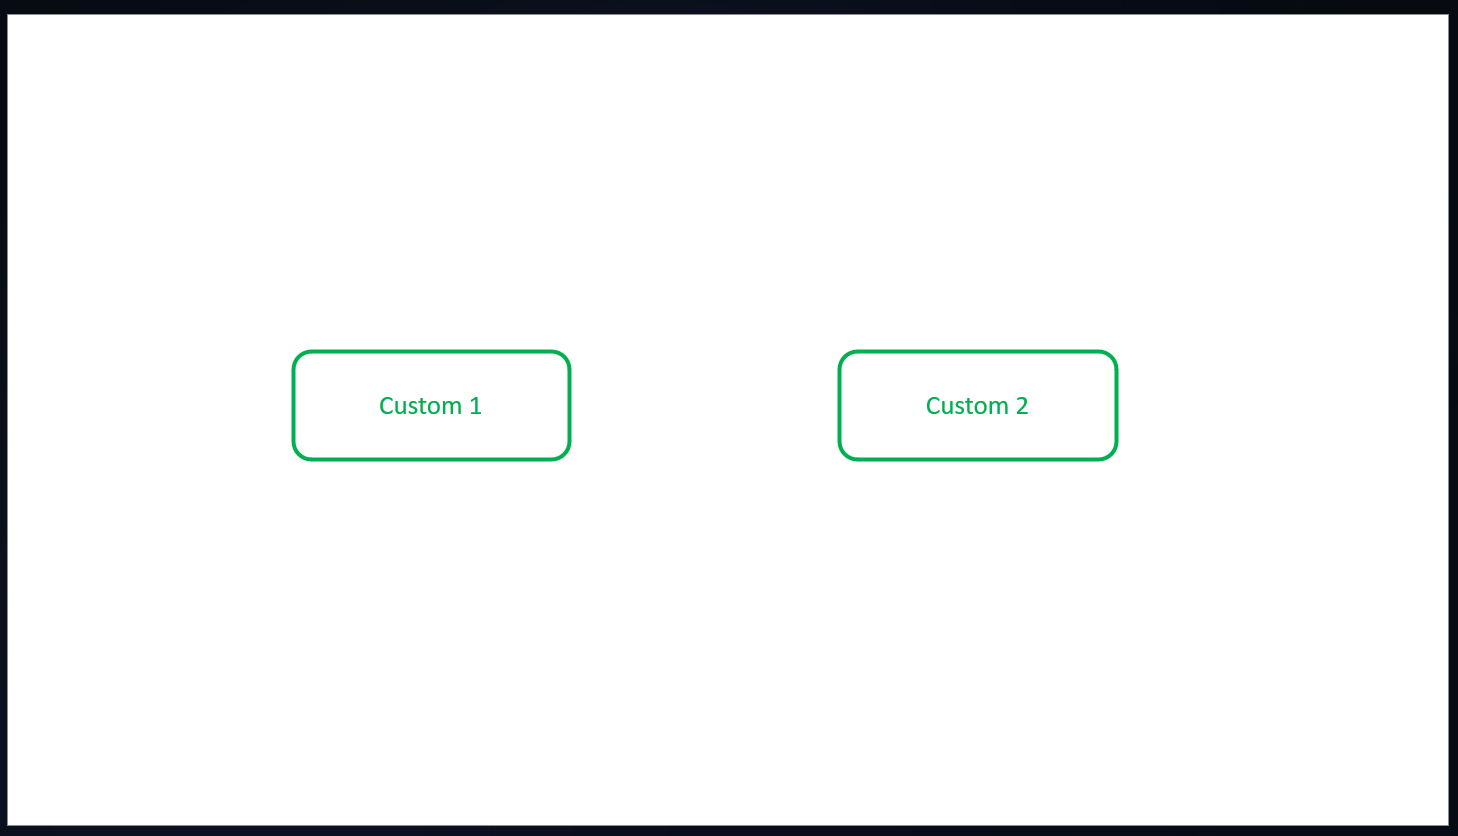
The switch board slide (slide 3) I always try to make interesting. For example, for a deck about learning management system training I actually mocked up the screen to look like the system and made each micro presentation look like a course in the system. It is worth a little bit of effort to make it look slick as this will be the slide you manage everything from and jump out to each custom show.
For this example though I have provided something very basic to demonstrate how this works. There are two rounded rectangles on the slide, and each is set up with a hyperlink action.
The quickest way (on Windows) to add a custom slide show hyperlink is to select the item to link and press CTRL + k to bring up the Edit Hyperlink dialog.
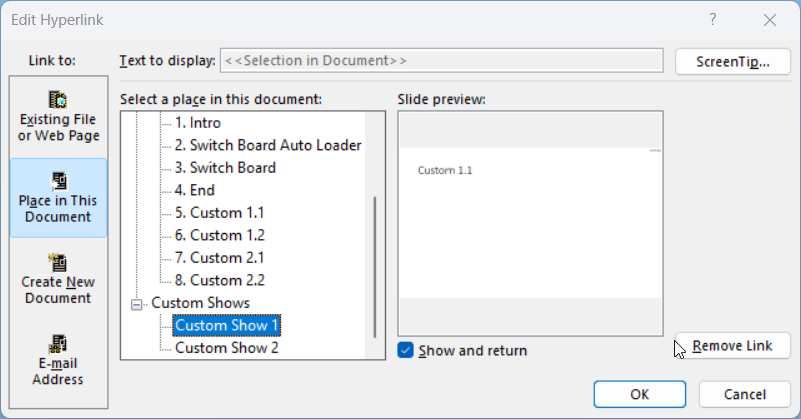
The hyperlink has been set up to link to a Place in This Document, and specifically to the custom show “Custom Show 1”. The check box to Show and return has also been set.
Clicking on the hyperlinked box labelled “Custom 1” during the presentation of the switch board slide will trigger the hyperlink and PowerPoint will begin presenting “Custom Show 1”. When that show reaches the end it will return to the main presentation.
The Switch Board Launcher
Everything covered so far is all you really need, and this is how I set up my presentations for years. However, as I noted above something bugged me until I made an addition of the switch board launcher.
I like using transitions between my slides, particularly when they are being presented live. I have always leaned towards using the fade transition as it is quite subtle and works well for online presentations, but the morph transition is something I use a lot now too. I find these sorts of transitions ease people between slides and topics whereas no transition always feels a bit stark and sudden to me. Unfortunately, when you reach the end of a presentation, such as a custom slide show, there is no final transition in PowerPoint.
The resulting abrupt switch I always found unsettling - even if others didn’t. I figured one day I would take some time and figure out a way around it, and some time last year I did, and so now I felt I was in a position to share the whole set up as a solution because I’m sure I would not be the only person out there who finds the alternative an unpleasant jarring experience.
If you recall earlier, we noted the switch board launcher slide is found as the final slide in each custom show. It is also the slide that precedes the switch board slide. If you look at this slide, you might notice it looks quite familiar.
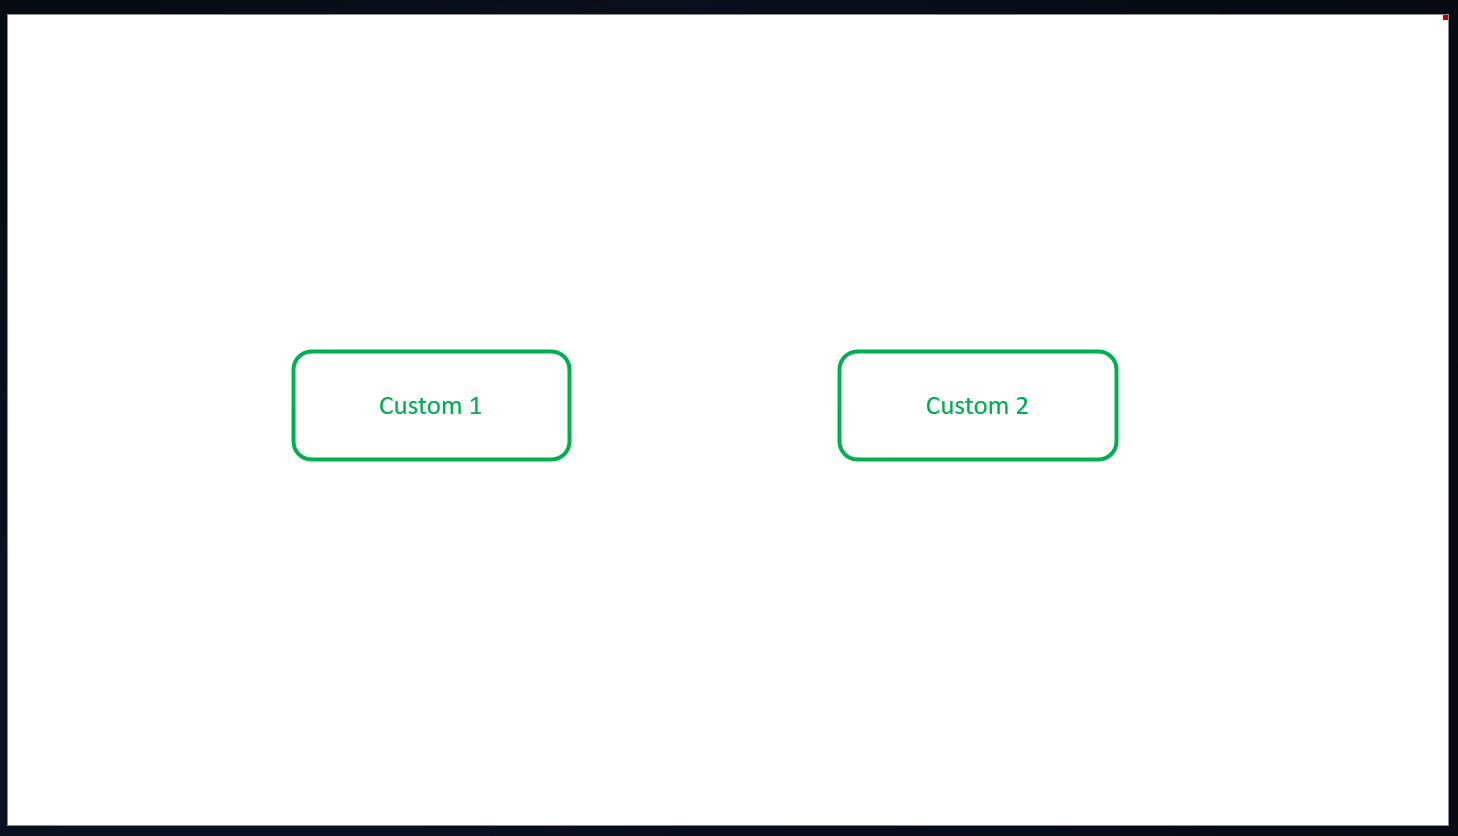
It looks like the switch board slide. When I use it in my own presentations, it looks exactly the same, but in this example I have added a small red mark to the top right corner. This is so when you run through the presentation you can get the right impression of how everything works seamlessly, while still having some indication of when the switch board launcher slide is being displayed versus when the switch board slide is being displayed.
The switch board launcher slide has been set up to use the morph transition (like every other slide in the example deck), but unlike the others which are set to advance slide on mouse click, the switch board launcher has been set to auto advance immediately (after 0 seconds).
![]()
That may sound useless at first, and for the main presentation it absolutely is.
In the main presentation we advance from the intro slide, and are then immediately transitioned to the switch board slide.
From the switch board slide, if we launch “Custom Show 1”, we display slide 5, followed by slide 6. Each slide so far has transitioned to the next using the morph transition. We next transition to slide 2, the switch board launcher slide, which immediately advances to the next slide, but because this is the end of the custom show there is no transition. Because the custom show was hyperlinked to show and return, we are returned to the originating slide, the switch board slide. Because the switch board launcher slide is (nearly) identical to the switch board slide, the sudden return without transition looks like nothing happened at all.
The overall result is it looks like we are always transitioning smoothly and professionally between slides and custom shows.
Conclusion
I still create plenty of linear presentations for one off occasions, but I also have several slide decks that I gear towards meeting the needs of multiple audiences over time. These are the non-linear ones, and for the way I work, I find them invaluable. I also feel that producing quality presentations goes a long way to building trust with people when you are dealing with technical things as I do.
If you made it this far, then I assume that you have some interest in applying this approach to your own non-linear slide decks in PowerPoint, or maybe in another application such as Keynote. I suspect the same basic principles would apply. All that’s left to say is that I hope you do find it useful too.