Github Pages Post Scheduling
27 May 2020Back in November last year, I finally made the switch away from SquareSpace to Jekyll and Github Pages. One of the changes for the worse that I highlighted in that was the lack of scheduling of posts. SquareSpace’s functionality enabled me to create posts in advance to be published at some point in the future. This allowed me a hands-off way to create content in advance that could be automatically spread over a period of time. It was the number one thing that I missed, and I said at the time that it was something I hoped to return to.
In this post I’m going to cover the solution I’m using to schedule posts.
I have to begin with a big thank you to Alex Johnson at alxmjo.com whose post How to Schedule Jekyll Posts on Github Pages enabled me in my approach. I would encourage you to check out his original post.
The Basic Approach
Now this isn’t exactly a replacement for the fine level of granularity that SquareSpace provided in it’s publishing engine, but as someone who isn’t even publishing on a daily basis, the following approach is entirely adequate for my needs.
The approach utilises three key things:
- The facility for Jekyll to be configured not to publish future dated posts.
- The Github Pages API to trigger a page build.
- A scheduled trigger mechanism.
This means that we can preload posts into GitHub Pages for publishing in the future, and then trigger publishing on a schedule via a call to the API.
Configuring the Jekyll System
The first step I took was a small amendment to my configuration file for Jekyll, the _config.yml file found in the root directory for my web site. This amendment was the addition of two configuration items that I didn’t currently have.
I have a small section of my file that I call publishing defaults. I already had a show_drafts entry which I use to hide new draft posts when publishing; just in case I accidentally upload anything to live, I wanted to be sure I don’t get any accidental inclusion.
To this section I added the two new entries.
#Publishing defaults
show_drafts: false
future: false
timezone: Europe/London
futurespecifies if future dated posts should be published. I want this set asfalseso that a round of publishing only makes those posts visible when that time has come.timezonespecifies the default time zone for which dates in posts should refer. Given that I live in the UK and we have to deal with daylight saving switches, this was definitely one I wanted to set just in case it messed up any timings in the future.
It is also worth noting that when I publish locally for testing my site and posts, I publish with an additional configuration file (_config_dev.yml) that is set with future: true so that I can see all of my future posts.
cd "/Users/stephen/github/thoughtasylum"
bundle exec jekyll serve --config _config.yml,_config_dev.yml --incremental
Configuring a Jekyll Post
On each post that I want to publish on a future date (rather than immediately), I set the date entry in the post’s front matter. For this post for example I have it set as this.
date: 2020-05-27 06:00:00
This tells Jekyll that this post is to be available from 6 AM on 27 May 2020.
Now the format of the date variable value should be of the form YYYY-MM-DD HH:MM:SS +/-TTTT, but only the date part is mandatory. By setting my default time zone in the Jekyll configuration (above), I can get the full accuracy of the format without having to put +0000 or +0100 in each time. The default time zone specification takes care of that for me.
At this point, with the Jekyll configuration set, and the publishing embargo in place on a particular post, if I push the content up to Github, the site will rebuild automatically, but the future content will not display.
Getting a Github API Token
This next step involves logging into Github to generate a special access token that will allow you to trigger a site rebuild.
First, navigate to https://github.com/settings/tokens in your web browser. It is also accessible via logging into Github, selecting Settings from your top right profile menu, then selecting Developer Settings, and finally Personal Access Tokens. This is where we are going to generate the API token that we need.
To generate a new token (a 40 character long hexadecimal string) for use in triggering Github pages rebuilds, follow these steps.
- Select Generate new token.
- Enter a simple name for your token (e.g. I named mine
Rebuild). - Check the box next to repo, this will automatically include the sub-settings.
- Check the box next to user, this will automatically include the sub-settings.
- Select Generate token.
- Copy the token into a permanent, secure location, e.g. a password manager, so that you can reference it later.
Please note that personal access tokens are for your own personal use, and they are in effect a user ID and password rolled into one, so do ensure that you look after them. If you do lose sole control of one, you can return to this token page and delete it.
Accessing the GitHub API
Now we have a token, we can use that along with a couple of other pieces of information to interact with Github, retrieve information and initiate a site rebuild. To build out an API call, we’ll need three pieces of information.
{TOKEN}the personal access token generated in the previous section.- I’ll use a fictitious token of
01234567890012345678900123456789001234567890in my examples.
- I’ll use a fictitious token of
{USERID}your Github user ID.- My Github user ID is
sylumer.
- My Github user ID is
{REPO}your repository name.- The repo name for this site is
thoughtasylum, so I’ll use that in my examples.
- The repo name for this site is
Validation of Last Build
Let’s start with a call that retrieves a set of JSON containing information about the last site rebuild. The call for this is of the following form.
| URL | https://api.github.com/repos/{USERID}/{REPO}/pages/builds/latest | |
|---|---|---|
| METHOD | GET | |
| HEADERS | Authorization | token {TOKEN} |
| Accept | application/vnd.github.mister-fantastic-preview | |
On my Mac, I can then trigger a query against my ThoughtAsylum repo using a curl command.
#!/bin/zsh

curl "https://api.github.com/repos/sylumer/thoughtasylum/pages/builds/latest" -X GET \
-H 'Authorization: token 01234567890012345678900123456789001234567890' \
-H "Accept: application/vnd.github.mister-fantastic-preview"
Which returns some JSON like this.
{
  "url": "https://api.github.com/repos/sylumer/thoughtasylum/pages/builds/182023467",
  "status": "building",
  "error": {
    "message": null
  },
  "pusher": {
    "login": "sylumer",
    "id": 3868841,
    "node_id": "MDQ8VXNlcjE4Ngg4NNE=",
    "avatar_url": "https://avatars0.githubusercontent.com/u/3868841?v=4",
    "gravatar_id": "",
    "url": "https://api.github.com/users/sylumer",
    "html_url": "https://github.com/sylumer",
    "followers_url": "https://api.github.com/users/sylumer/followers",
    "following_url": "https://api.github.com/users/sylumer/following{/other_user}",
    "gists_url": "https://api.github.com/users/sylumer/gists{/gist_id}",
    "starred_url": "https://api.github.com/users/sylumer/starred{/owner}{/repo}",
    "subscriptions_url": "https://api.github.com/users/sylumer/subscriptions",
    "organizations_url": "https://api.github.com/users/sylumer/orgs",
    "repos_url": "https://api.github.com/users/sylumer/repos",
    "events_url": "https://api.github.com/users/sylumer/events{/privacy}",
    "received_events_url": "https://api.github.com/users/sylumer/received_events",
    "type": "User",
    "site_admin": false
  },
  "commit": null,
  "duration": 0,
  "created_at": "2020-05-24T11:38:01Z",
  "updated_at": "2020-05-24T11:38:01Z"
}
Notably, the final two entries provide an indication of when the site was last rebuilt. This means that you can use this query to quickly check when a site was last rebuilt, which is useful for checking if any rebuild request sent triggered correctly, and when that was.
Pages Build
The next call to look at is one that triggers the rebuild. The structure and information for this are very similar to the previous one.
| URL | https://api.github.com/repos/{USERID}/{REPO}/pages/builds | |
|---|---|---|
| METHOD | POST | |
| HEADERS | Authorization | token {TOKEN} |
| Accept | application/vnd.github.mister-fantastic-preview | |
Again, on my Mac, I can trigger a request against my ThoughtAsylum repo to rebuild it using a curl command.
#!/bin/zsh

curl "https://api.github.com/repos/sylumer/thoughtasylum/pages/builds" -X POST \
-H 'Authorization: token 01234567890012345678900123456789001234567890' \
-H "Accept: application/vnd.github.mister-fantastic-preview"
Which returns some JSON like this.
{
  "status": "queued",
  "url": "https://api.github.com/repositories/204789655/pages/builds/latest"
}
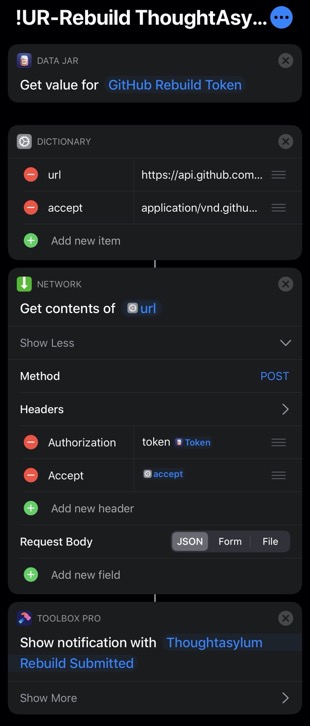
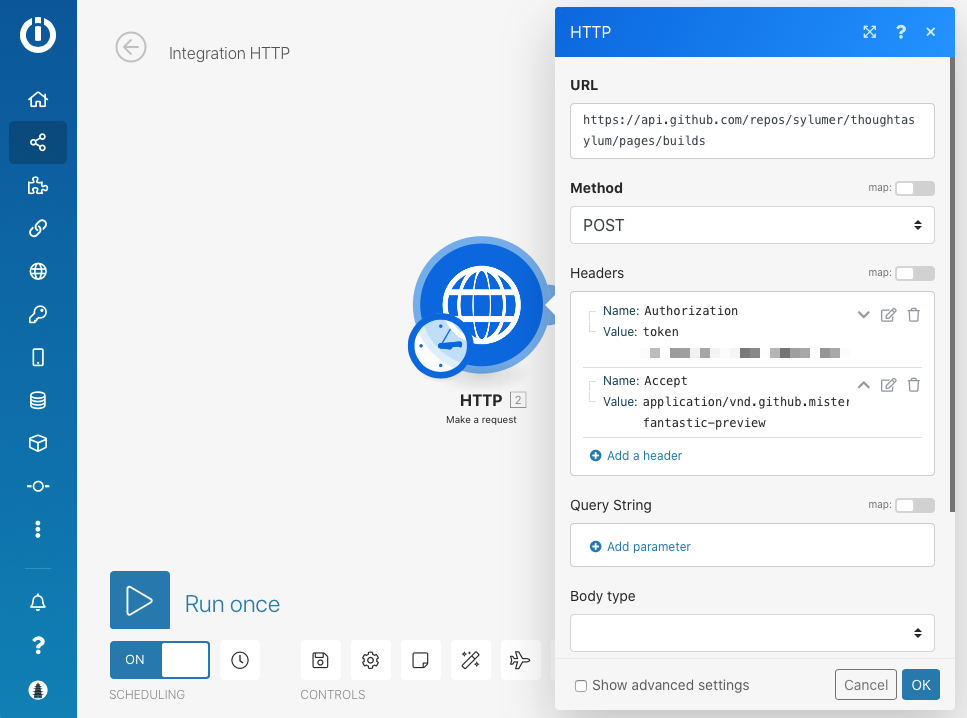
I can of course also do the same with Shortcuts. Here’s a shortcut I created that picks up my personal token from Data Jar (so that I can re-use it across different shortcuts), the URL and Accept header from a dictionary, and then posts it and pops up a notification (this one happens to be a Toolbox Pro notification as it gives me additional options) to indicate it is complete.
Since I basically have my phone with me all the time, this means that I can always easily trigger a site rebuild.
Scheduling
While I may be able to rebuild the site whenever I like, it’s even better if I don’t have to, and the site in effect rebuilds itself periodically, on some sort of schedule. There are many ways to accomplish this, and I could easily have set up a scheduled job on my Mac mini or a Raspberry Pi to run the curl command above, and rebuild the site. However, there are plenty of other great options out there for web automation that can do this simple task on my behalf, and so I created a simple Integromat scenario to do it for me.
The scenario is scheduled to run once a day at 7 AM UK (just via the scheduling options available at the bottom of the scenario), and will post the rebuild request to the site.
There are a couple of reasons why I’ve elected to just rebuild once per day.
- I simply don’t post frequently enough to require a greater frequency of rebuilds. Usually when I post, it’ll be be posting for now, and a rebuild will take place as part of that posting process. Only if I’m preparing ahead of time will it do otherwise, and it is easy enough for me to just put 6 AM as the time part of the
datevariable in the post front matter. Then at 7 AM, the rebuild will run, and any post for that day will go live. - I purposefully get notifications on each site rebuild as I wrote about in February. I don’t want lots of notifications telling me every hour that my site has been rebuilt, but I do want to keep my notifications. They are useful when posting immediately, and are actionable too.
If I needed to schedule something to be rebuilt at an earlier or later time on a specific day, I’d look at scheduling the run of a curl request from one of my personal computers at that time. This would be purely on an ad hoc basis as it would be such a rare occurrence for me to need to do this.
I would warn against rebuilding too often. While the GitHub API has healthy request limits for registered users, if you are trying to post to Github, while your site is already in the midst of a rebuild process, it just has a potential to get messy. Particularly if you have a large site that takes time to rebuild - this site takes several minutes as it currently builds out at almost 3.5K files.
Summary
And that’s it. My scheduling challenge has been resolved thanks to the insights from Alex Johnson at alxmjo.com. If you host on Github using Jekyll, and were looking to schedule posts, I hope that you have found this walk through of how I tackled it helpful.