Automating Time Travelling Blog Posts
23 Jul 2023Writing blog posts is something that I generally struggle to make time to do. I have always got several parallel activities on the go and writing everything down takes time and slow down progress. Things also come up and disrupt the flow, providing further challenges. I feel writing blog posts is useful as it allows me to share thoughts and solutions that others can then build on and utilise for their own needs, but I don’t have a way to set a structured regular time to do this, so it is an ad hoc activity. This frequently results in me starting writing up a post to be published on one day, but it getting delayed. Because my blog posts and assets utilise the publish date, this can lead to a bit of remedial work to line things up again prior to publishing.
After doing this manually a few times, I created an automation to allow me to quickly shift posts and assets to a new publish date. In this post I am going to outline how I do this to give you some ideas of how you might accomplish something similar with your own similar scenarios.
Tooling
While I have the option to publish a blog post from any web browser, my de facto set up is to produce my final blog posts from my Mac. I have several tools and automations I use for helping me prepare the posts that are tied to Mac-only tools, and so the Mac is where I created my solution for shifting the dates around on my blog posts.
Fundamentally, the automation that is doing the heavy lifting is a shell script. This means that whether you are on a Mac, Linux, or Windows (with the subsystem for Linux enabled - WSL). Alongside this I have three other tools that I am using that are worth mentioning, but are not exactly essential, or could be substituted for other tools.
Keyboard Maestro
The ubiquitous Keyboard Maestro is where a lot of my core automations reside as it gives me a flexible base for triggering the automations. In this case Keyboard Maestro is also used to capture the new blog post publishing data that is then used in the shell script.

Sublime Text
Sublime Text is the cross-platform editor I have been using for many years for writing blog posts - basically ever since SquareSpace dropped XML-RPC support and I was forced to switch to an alternate publishing platform and had to abandon my use of MarsEdit. The relevance to this particular automation is that Sublime Text allows you to copy the file path of the currently edited file to the clipboard.
I wanted to automate this and so I ended up adding a configuration entry to the settings file for Sublime Text to allow me to associate a keystroke combination with the feature since it was not easily automatable by default.
To do this, I edited the key binding settings (Sublime Text > Settings… > Key Bindings) to add a new entry to the JSON array that will trigger the file path copy when the CMD and F20 keys are pressed.
{
	"keys": ["super+f20"],
	"command": "copy_path"
}
While my old full size wired Apple keyboard had an F20 key, my current Keychron keyboard does not. So how do I use an F20 key? Well, it is just triggered by a step in the Keyboard Maestro macro.
If you want to adopt the approach used in this post, then you will need some way of getting the file path of the file you want to move. I wanted to do it from the editor, but selecting the blog post file in the Finder would be another approach you could take if your preferred editor does not allow you to easily retrieve the path of the currently edited file.
Better Touch Tool
While I can use Keyboard Maestro directly and this is made even easier by my Conductor workflow and the excellent launcher utility Alfred, the way I normally trigger the Keyboard Maestro macro is via my Elgato Stream Deck. Rather than using the default Elgato Stream Deck software, I am currently using Better Touch Tool’s Stream Deck support to manage and control my deck.
The button is just set to trigger the macro via an ID-based (rather than name-based, just in case I rename the macro) URL.
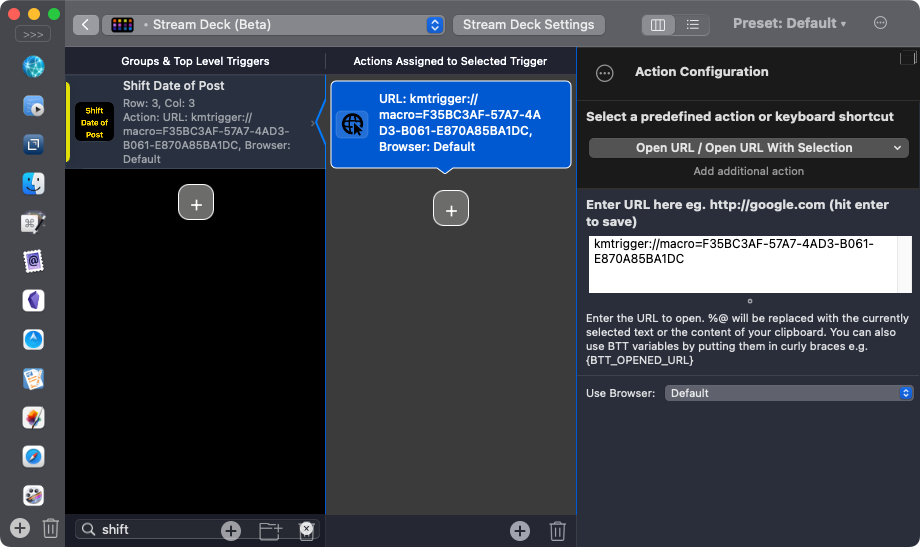
This part of the set up is of course totally optional, and just part of my personal preferences.
The High-Level Algorithm
Next I am going to walk through a step-by-step on what the automation does.
- The automation is triggered via my Stream Deck when I am editing a blog post in Sublime Text.
- A Keyboard Maestro macro is triggered via URL.
- The
⌘F20keystroke combination is sent to Sublime Text and the full path to the current file (a Markdown file) is copied to the clipboard. - Keyboard Maestro prompts for a new publish date in yyyy-MM-dd format, defaulting to today’s date.
- This is stored in a variable for later use in the shell script (
instanceDate).
- This is stored in a variable for later use in the shell script (
- Keyboard Maestro triggers the menus in Sublime Text to close the currently edited file.
- Keyboard Maestro runs a shell script to carry out a set of file modifications.
- Keyboard Maestro plays a couple of audible beeps to indicate that the changes have been made.
Obviously step #5 is the one where the majority of the work is done, so we’ll take a look at that in detail next.
The Shell Script
The shell script is written in Z-shell (zsh), which has been the default shell for several macOS releases now. There is a good chance it will work in other shells, and if there are any problems, it will most likely just be a few small syntax tweaks.
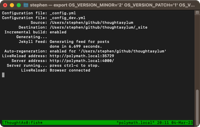
The first action that the script takes is to grab the content of the clipboard, the file path Sublime Text copied, and place it in a variable called FILEPATH.
# Get the file path from the clipboard
FILEPATH="$(pbpaste)"
echo FILEPATH=$FILEPATH
The file paths are usual
/Users/stephen/github/thoughtasylum/_posts/2023/2023-03-31-ste-mux-for-swiftbar.md
You may notice an additional echo command in the script. This was something I used for debugging when putting the script together outside of Keyboard Maestro, and I left them in, in case I need to do further debugging in the future.
The next step is to get the current publish date for the post. Now, this is in the file path, but technically it is possible I could include it more than once. While I think that is incredibly unlikely, there was somewhere more definitive I could retrieve this from. Each of my posts begins with a set of YAML that defines attributes for the post that my chosen static site generator (Jekyll) process as part of the site generation process.
---
layout: post
title: "ste-mux for SwiftBar"
category: [technology]
tags: [swiftbar,scripting,shell]
author: stephen_millard
thumbnail: /assets/thumbnails/2023/2023-03-31-tmux.png
image: /assets/thumbnails/2023/2023-03-31-tmux.png
date: 2023-03-31
---
The date attribute is used by Jekyll to specify the publish date and because we know the file path, we can parse the file for that attribute’s value.
# Get the current date stamp from the date YAML attribute in the current file
FILEDATE=$(egrep '^date: (....)-(..)-(..)$' "$FILEPATH" | xargs | awk '{ print $NF }')
echo FILEDATE=$FILEDATE
At first glance that setting of the FILEDATE variable might look a little complicated, but I’ll break it down a little.
First of all, we use egrep to carry out a regular expression-based search of the content of the file specified by the path held in FILEPATH. The search is for a line starting with “date: “, followed by some characters in the ISO date format, and then the end of the line.
From the above, the egrep would return date: 2023-03-31.
This is passed to xargs, which splits the line (on the space) into two arguments, date: and 2023-03-31.
Finally this is passed into awk which is set to return only the last column, which would be the second parameter. This means the output that is then stored in FILEDATE would be 2023-03-31.
The next section of the script reads through the file content looking for image files (PNG, JPG and GIF file extensions - I never use the JPEG extension). Again egrep is the tool used to do this search, but this time we pipe it to sort and unique to deduplicate any reused images and process each image based on the identified path.
# Rename all the image files used in the current file
egrep -o "/assets/(.*)/$FILEDATE(.*).(png|jpg|gif)" "$FILEPATH" | sort | uniq | while read IMAGEPATH
do
	# Generate the new image path
	NEWIMAGEPATH=/Users/stephen/github/thoughtasylum$(echo $IMAGEPATH | sed "s/$FILEDATE/$KMVAR_instanceDate/g")

	# Generate old image path
	OLDIMAGEPATH=/Users/stephen/github/thoughtasylum$IMAGEPATH

	# Move the file
	mv "$OLDIMAGEPATH" "$NEWIMAGEPATH"
	echo mv \"$OLDIMAGEPATH\" \"$NEWIMAGEPATH\"
done
Because the file paths in the blog post file are relative paths, the absolute file paths have to be built. For me this is just a case of prefixing with /Users/stephen/github/thoughtasylum.
The original file path (OLDIMAGEPATH) is a simple prefixing. The new image path (NEWIMAGEPATH) requires a bit more effort as we have to replace the old publish date with the new publish date. This is achieved using the stream editor sed and a substitution of the old date to the new date.
Notice here that a KMVAR_instanceDate variable is introduced. This is how the instanceDate variable containing the new publish date captured earlier (by Keyboard Maestro) can be accessed directly in the script. If you were using a different tool, you may need to pass this as a parameter in the script or by some other reference.
With both paths specified, the files are moved from one file path (name), to the other.
The same substitution is then carried out on the content of the blog post file so the entries all point to the new file paths.
# Update the image paths in the original file
sed -i "" "s/$FILEDATE/$KMVAR_instanceDate/g" "$FILEPATH"
echo sed -i \"\" "s/$FILEDATE/$KMVAR_instanceDate/g" \"$FILEPATH\"
Using the same sed substitution technique, the blog post file is then moved/renamed.
# Rename the file
NEWFILEPATH=$(echo $FILEPATH | sed "s/$FILEDATE/$KMVAR_instanceDate/g")
mv "$FILEPATH" "$NEWFILEPATH"
At this point I will note that there is something this script was not set up to deal with. That is the case where the year changes. In the file path above, you may have noticed that the file path includes the publish date in the file name and it includes the publish year as a folder in the file path. Now I could absolutely have scripted in something to modify this too, but given how often this is likely to happen, I purposefully chose not to include it. The effort of building and testing vs. the time I had available and the time it would save, simply didn’t justify it.
I did consider updating it for this blog post, but I figured it would be a good exercise for those who might need it. If you do wish to, incorporate this additional rigour, you will need to extract the years from the new publish date and the old publish date, update the file paths (post content and image files), and create any new folders that may be required if they do not already exist.
In addition, because this is something I do with new posts prior to publishing, I don’t do any work to check for cross-links as until it is published I would not amend any existing posts to link to it - as I might do if it was a series of connected posts.
The final thing the script does is mark the home page of my site as edited. I do this because when I run Jekyll locally for testing then it will only rebuild the home page, which includes summary excerpts from my most recent posts, when it identifies that page as modified. It takes a minute or two to build the whole site, so I always have it set to incrementally publish, but if I change the publish date, then I will inevitably want the home page of my development site to be updated.
# Update the home page
touch /Users/stephen/github/thoughtasylum/index.html
That covers everything the script does, and for convenience here’s the entire thing.
#!/bin/zsh

# Get the file path from the clipboard
FILEPATH="$(pbpaste)"
echo FILEPATH=$FILEPATH

# Get the current date stamp from the date YAML attribute in the current file
FILEDATE=$(egrep '^date: (....)-(..)-(..)$' "$FILEPATH" | xargs | awk '{ print $NF }')
echo FILEDATE=$FILEDATE

# Rename all the image files used in the current file
egrep -o "/assets/(.*)/$FILEDATE(.*).(png|jpg|gif)" "$FILEPATH" | sort | uniq | while read IMAGEPATH
do
	# Generate the new image path
	NEWIMAGEPATH=/Users/stephen/github/thoughtasylum$(echo $IMAGEPATH | sed "s/$FILEDATE/$KMVAR_instanceDate/g")

	# Generate old image path
	OLDIMAGEPATH=/Users/stephen/github/thoughtasylum$IMAGEPATH

	# Move the file
	mv "$OLDIMAGEPATH" "$NEWIMAGEPATH"
	echo mv \"$OLDIMAGEPATH\" \"$NEWIMAGEPATH\"
done

# Update the image paths in the original file
sed -i "" "s/$FILEDATE/$KMVAR_instanceDate/g" "$FILEPATH"
echo sed -i \"\" "s/$FILEDATE/$KMVAR_instanceDate/g" \"$FILEPATH\"

# Rename the file
NEWFILEPATH=$(echo $FILEPATH | sed "s/$FILEDATE/$KMVAR_instanceDate/g")
mv "$FILEPATH" "$NEWFILEPATH"

# Update the home page
touch /Users/stephen/github/thoughtasylum/index.html
Conclusion
The set up of this automation is obviously tailored to my own particular needs, so this is never going to be a lift and shift solution for anyone. However, what I hope it does is provide some useful ideas on how you could approach similar problems and how you might build it using some of the automation tools you have access to.
If you do want to review the full Keyboard Maestro macro, I’ve included a link below so you can download it and view it in Keyboard Maestro.
I also wanted to show that tailored solutions that don’t necessarily do everything they could do can still be valuable. A lot of the stuff I post is full-featured, customisable, and designed to be used by anyone. But not everything is like that and typically the most useful automations are the ones that fit your own very specific needs. As such, I wanted to share something I find incredibly useful, is specific to my set up, and does not take everything to the N-th degree, which is where a lot of my public facing solutions tend to.